Gengar Mask Merchant - Wall Art


Print Profile(1)

Description
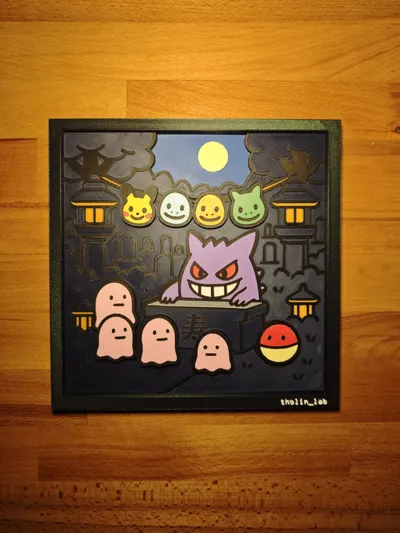
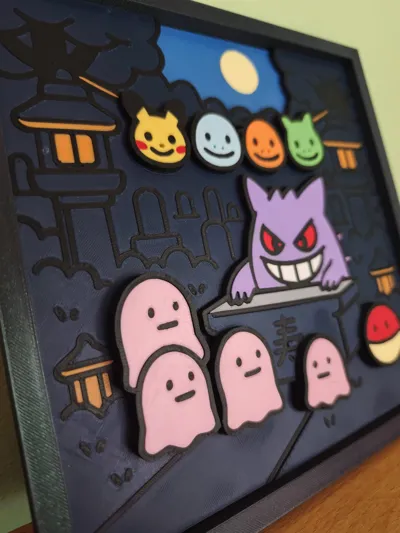
Gengar’s Midnight Mask Shop — Layered 3D Wall Art (No AMS)
I brought Gengar to life in a moonlit graveyard scene: a tiny mask stall, flickering vibes, and curious Ditto lining up for a new face.
Unlike a flat 2D print, this piece is built from four distinct 3D layers, all modeled by me.
Each color sits on its own plate. Internal spacers let every layer support the next, creating real depth without multi-material hardware.
Every piece has 3mm height so that each layer is 3mm and total frame is 12mm considering are 4 total layers total.
What you get
- A Bambu 3MF with plates clearly labeled by layer and color.
- Tight, intuitive fit. Parts snap together with very small tolerances. Some pieces are tiny: you may need firm, even pressure to click them in. A small drop of CA glue is best for a permanent bond.
Suggested print setup
- Material: Matte PLA
- Nozzle: 0.4 mm · Layer height: 0.20 mm
- Infill: 12–15% (consider higher for structural spacers)
- Supports: Not needed
- Bed adhesion: Brim recommended for the smallest parts
- For very small parts I sometimes used print per object instead of by layer and added a brim — your printer/PLA may vary.
Assembly tips
- Dry-fit all layers first.
- Assemble largest to smallest parts to avoid stressing thin details.
- If gluing, apply sparingly to hidden contact points only.
- Align the spacers so each layer sits flush before closing the frame.
Layer-by-Layer photo guide (captions)
Use these as the text on each image or as slide captions.
Layer 1 — Base & ground
Base plate with sky and moon. Check flatness; add brims if needed.

Layer 2 — Headstones & stall frame
Add tombstones and the stall frame. Dry-fit posts; ensure spacers seat fully
I used AMS here cause the details are too small, but you can try to divide by colour.

Layer 3 — Gengar & Ditto silhouettes
Place Gengar behind the counter with his masks; and the complementary base for the ghost for the next layer

Layer 4 — Ditto Ghosts
Final layer, the ghost waiting for their mask and one ghost already masked.

(Optionally add a final photo/caption:)
Final — Frame & close
Close the frame, press corners, then spot-glue from the back if you want it permanent.

If you want to follow me or support me you can do it here:
- Instagram: https://www.instagram.com/tholin_lab/
License
You shall not share, sub-license, sell, rent, host, transfer, or distribute in any way the digital or 3D printed versions of this object, nor any other derivative work of this object in its digital or physical format (including - but not limited to - remixes of this object, and hosting on other digital platforms). The objects may not be used without permission in any way whatsoever in which you charge money, or collect fees.
Comment & Rating (2)