Ghost Spider - NO AMS


Print Profile(1)

Description
A user asked me to create a no-ams version of my original Ghost Spider halloween bucket from 2024
I re-engineered the design to be more modular, trying to avoid any large failure points. It's also much stronger than the previous version =)
You will need to glue some pieces together.
Assembly Instructions
| Start by assembling the spider base plate. Apply some adhesive to the lip of the purple base and insert the spider into it. You should feel it click in place. Make sure it is glued in, you don't want this piece falling out later. |  
|  |
| Glue the blue webbing to the top ring. The side of the web with a slight chamfer should be on the inside and the textured surface of the web should be facing out. |
 | 
|
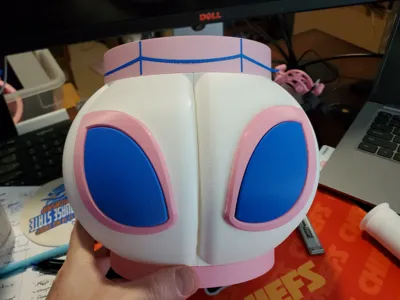
Each pumpkin segment is numbered. Find the segment with 6 on the outer edge. Now get the LEFT pink eye ring. The eye rings are NOT interchangeable so the left ring is the only one that will fit in the holes on the front of the pumpkin segment.
The curved segments are difficult to glue with thin CA gle so I like to use a hot glue gun for this part. I do apply CA glue to the small posts before I place them in the holes. It's easier if you put the bottom post in first (the small one) and then follow it with the top post. |
 |   |
| Now find the left pupil and glue it in place. Again, hot glue is your friend here. |
 |
 |
| Now get the other pumpkin section with holes in the face (it should have a 1 on the edge). Assemble the right eye the same way as the left. |
 |
 |
Now assemble the pumpkin segments. They must be connected in the correct order. Each segment has a number on the outside of the edge with the posts. They also have a number on the inside of the edge with the holes. The two numbers should be the same (ie connect the #5 holes with the #5 posts, etc).
You can glue these segments together if you want but it's not necessary. If you do glue them, verify you have them in the right order by trying to screw the top and bottom pieces on first. |
  |
 |
| Now place the purple base plate in the pink base and screw the base to the bottom of the pumpkin. You DON'T need adhesive for this. |
  |
 |
Screw the top ring on the pumpkin. Make sure the holes on the top are aligned and then press the handle posts into the holes.
These will be difficult to pull out (it should be so your child doesn't lose the handle) so make sure yo uhave the handle in the proper orientation BEFORE you push it all the way in.
If the posts are too difficult you can file them down around the edges a little. |
 |
 |
License
You shall not share, sub-license, sell, rent, host, transfer, or distribute in any way the digital or 3D printed versions of this object, nor any other derivative work of this object in its digital or physical format (including - but not limited to - remixes of this object, and hosting on other digital platforms). The objects may not be used without permission in any way whatsoever in which you charge money, or collect fees.
Comment & Rating (2)