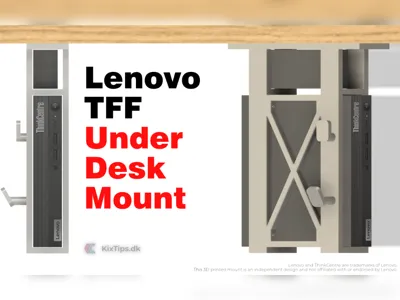
Lenovo ThinkCentre TFF PC Under Desk Mount


Print Profile(0)
Bill of Materials

- M2x.3.5x3.5 Inserts x 16: The listed Maker's Suply 2x3.5x4 should be OK
Description
Build the Lenovo TFF Under Desk Mount — Step-by-Step
Why build this under-desk mount?
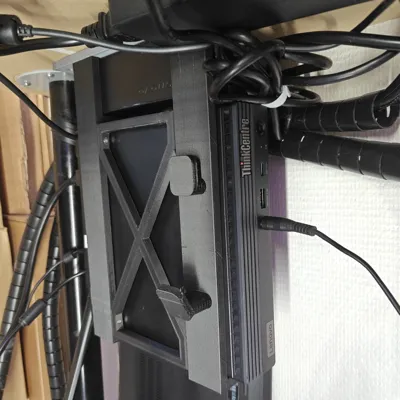
Do you want to unclutter your setup from cables, chargers, and compact PCs that take up valuable desk space? An under-desk mount is a clean, minimalist solution. The Lenovo TFF Under Desk Mount keeps your ThinkCentre Tiny Form Factor (TFF) PC securely tucked beneath your desk, next to its original 65 W power adapter, for a tidy and efficient workspace.
This build focuses on:
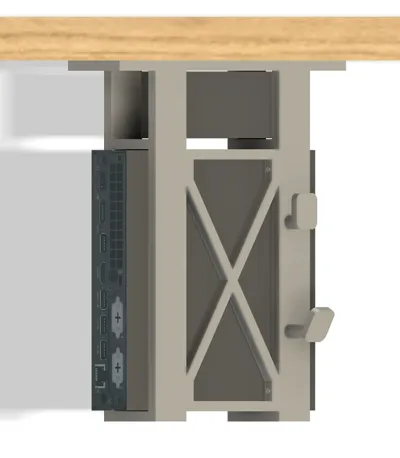
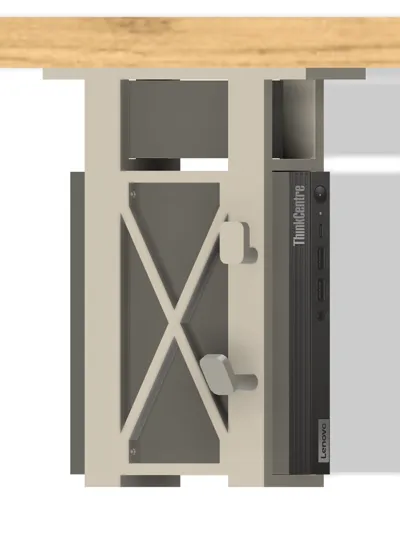
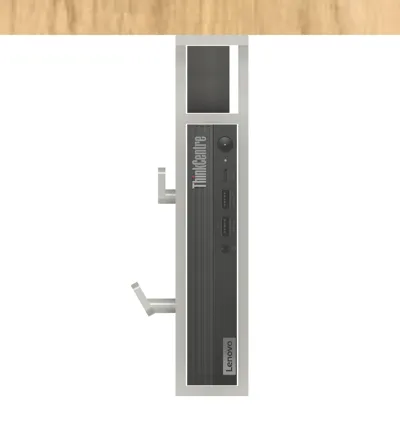
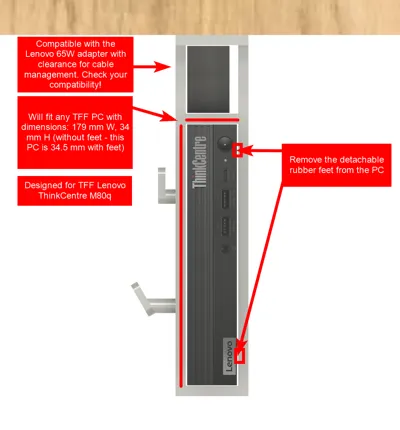
- A compact, airflow-friendly 3D-printed design that fits standard Lenovo TFF PCs (179 mm × 34 mm without feet)
- Integrated power adapter chamber with cable routing
- Hook section for cable management and accessories (e.g., headphones)
- Durable and rigid structure assembled with M2 brass inserts and countersunk screws
- Open front and rear for full access to all ports
Design overview (features)
- Fits all Lenovo TFF PCs (179 mm wide, 34 mm high without rubber feet)
- Internal chamber fits Lenovo 65 W power adapter
- Cable routing behind and between the power adapter and PC
- Integrated hooks for cable and accessories
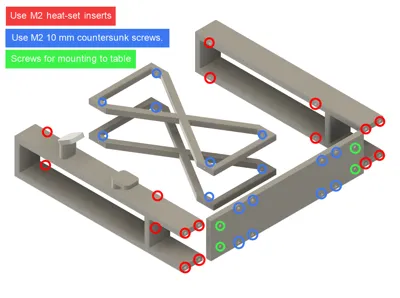
- Printed in multiple parts, assembled with M2 screws and brass heat-set inserts
- Solid, non-flexing structure when plugging/unplugging cables
- Open front and rear for ventilation and accessibility
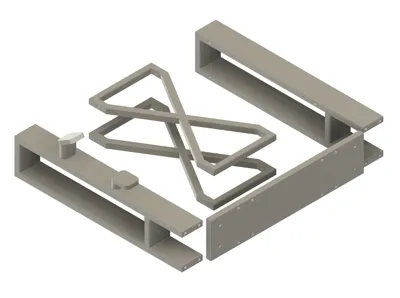
3D Print Files
- Frame_right.3mf — right frame with cable management hooks
- Frame_left.3mf — left frame
- Support_2x.3mf — two crossbeam supports connecting the frames
- Mount_plate.3mf — base plate that attaches to the desk underside
Suggested print settings:
- Material: PETG recommended for heat resistance (PLA also works for moderate temps)
- Layer height: 0.20 mm
- Walls: 3–4 perimeters
- Infill: 20–30 %
- Supports: Yes — required for screw holes, insert bosses, and hooks
- Orientation: As provided in .3mf files for best strength and minimal support
If this design helped you, consider supporting the work — Donate here.
Bill of Materials (affiliate links)
The products below are affiliate links.
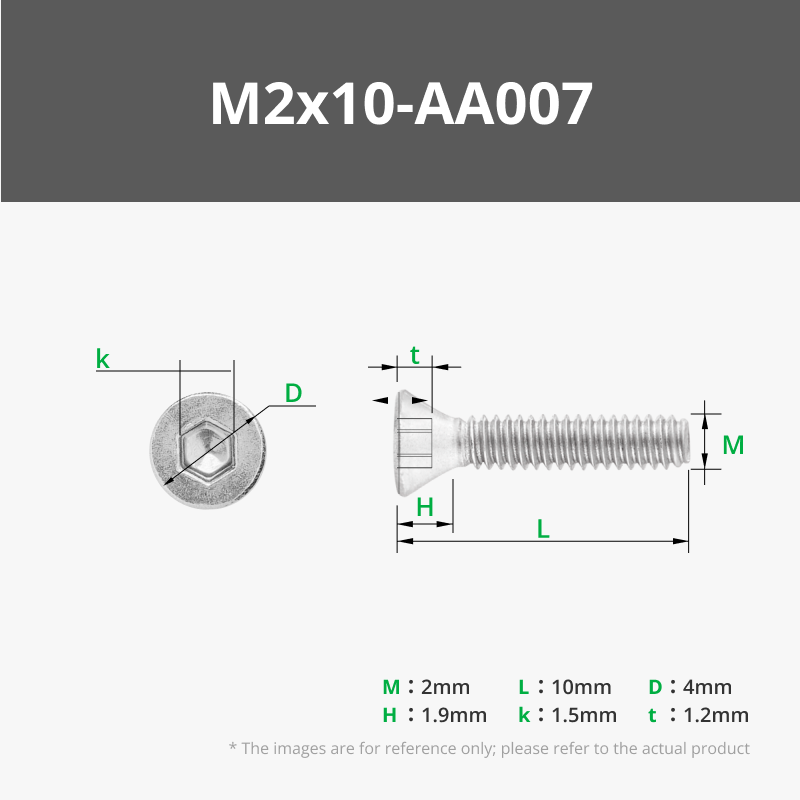
M2 flat head countersunk hex screw kit
https://s.click.aliexpress.com/e/_opjqzpT
or 10 mm length only: https://s.click.aliexpress.com/e/_c3wNDrqT
M2 Brass Heat‑Set Inserts (3 mm × 3.5 mm)
Tools (That I use)
- 3D Printer: Creality Ender‑3
- Filament: Geeetech PLA Matte Black (or PETG for higher temps): https://s.click.aliexpress.com/e/_c3vtatax
- Edge deburring tool: https://s.click.aliexpress.com/e/_oBWfO8l
- Soldering iron (for inserts), e.g., Miniware TS101: https://s.click.aliexpress.com/e/_okBt3BR
- Flush cutters, small pliers, hex drivers.
Step‑by‑Step Assembly
1) Print, clean, and dry‑fit
- Print all five parts from the provided .3mf files.
- Deburr edges and remove stringing.
- Remove rubber feet from your Lenovo TFF PC (they’re re‑attachable later if needed).
- Test‑fit the PC and power adapter into both side frames.
- Confirm alignment before final assembly.
2) Install heat‑set inserts
- Heat your iron to 220–260 °C.
- Press M2 inserts into the eight bosses on each frame (16 in total). Ensure they’re square and flush.
3) Attach the crossbeam supports
- Connect the left and right frames using 8 × M2 × 10 mm screws.
4) Mount the assembled frame to the plate
- Secure the frame assembly to the mount plate using another 8 × M2 × 10 mm screws.
5) Install under the desk
- Use screws appropriate for your desk’s material.
- Fasten the mount using four screws — tight enough for stability but without over‑torquing.
6) Install the TFF PC & power adapter
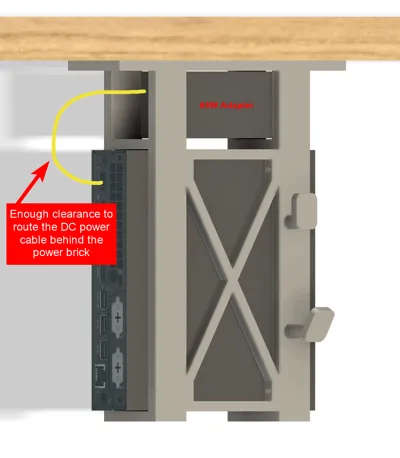
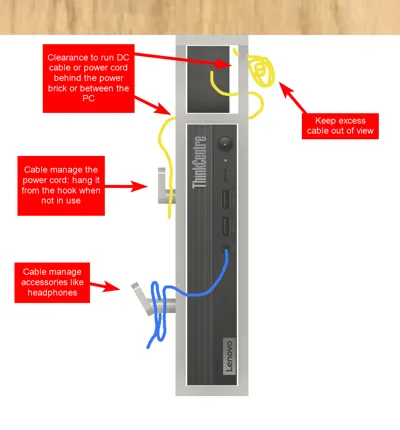
- Insert the power adapter in the compartment. Feed the power adapter from the front with the DC plug first. Bring the DC plug to the back and hold it up against the inner wall of the frame. Slide in the Power adapter in from the front so that DC cable runs between the inner wall of the frame and the power brick itself. You can use zip ties to manage the excess cables. The cable from the power cord shuld slide perfectly underneeth the power adapter ontop of the TFF PC for you to hide any excess cable.
- Slide in the TFF PC and connect the DC plug.
- You can use the hooks to mange the power cord (usefull for when the PC is not plugged in) and hang any accessories like headphones from the larger hook
- Plug in any other needed cables.
6) Install the TFF PC & power adapter
- Feed the power adapter from the front, DC plug first.
- Route the cable between the inner wall and adapter body.
- Slide the power brick into place and tidy up excess cable with zip ties.
- The AC cable routes under the power brick and over the TFF PC for a seamless look.
- Insert the PC and connect the DC plug.
- Use the side hooks to store cables or hang accessories like headphones.
Performance & thermal notes
- Ensure no ventilation holes are blocked — some TFF models vent through the sides.
- Modify the model as needed or perform stress/thermal tests.
- PLA can become brittle over time if exposed to heat — PETG or ABS recommended for longevity.
Troubleshooting
- Loose fit: Adjust model dimensions or add thin shims (e.g., tape) for tighter fit.
- Doesn’t fit: Remove rubber feet or re‑measure — Lenovo TFF PCs are ~34 mm without feet.
- Edge clearance: Lightly sand or trim edges post‑print.
Wrap‑up
This project turns your Lenovo Tiny PC into a clean, wall‑mounted workstation. It’s simple, printable, and upgradeable — with cable management, modularity, and minimalist appeal. Whether for a home office or lab setup, it keeps your hardware secure, accessible, and out of sight.
Disclaimer
Lenovo and ThinkCentre are trademarks of Lenovo. This 3D printed mount is an independent design and not affiliated with or endorsed by Lenovo.
Support the project & share feedback
If this design helped you, consider supporting the work — Donate here.
Questions, ideas, or improvements? Drop a comment below — I read everything and update the model/guide based on community feedback.
License
You shall not share, sub-license, sell, rent, host, transfer, or distribute in any way the digital or 3D printed versions of this object, nor any other derivative work of this object in its digital or physical format (including - but not limited to - remixes of this object, and hosting on other digital platforms). The objects may not be used without permission in any way whatsoever in which you charge money, or collect fees.
Comment & Rating (3)