Multi-Purpose Stand/Tray/Table Generator


Print Profile(2)


Description
Customizable Multi-Purpose Stand Generator
This is a generator for a multi-purpose stand that can be freely customized in size and shape using OpenSCAD. Since the top plate can be hollowed out, it is also perfect for creating stands for equipment where heat dissipation is important, such as USB hubs and Mac Minis.
It's possible to create a recess in the top plate, allowing for a secure fit. By utilizing this recess, you can also use the stand upside down to create an additional shelf on top of existing furniture or gadgets like PCs, USB hubs, Mac Minis, or shelves.
By simply adjusting the parameters at the top of the script, you can create a unique stand tailored to your needs. Let's build the perfect stand for whatever you want to place on it, such as keyboards, tablets, smartphones, tools, or small items.
By combining it with the separately released S-Hook and C-Hook generator, you can create more complex and flexible structures, such as a suspended ceiling-type table.
 |  |
Boost Me (for free)
If you love the these designs please consider a BOOST 🚀 It helps me keep creating more designs 🙏
Main Features
| Feature | Description |
|---|---|
| Top Plate Cutout | Allows for hollowing out the top plate for heat dissipation, drainage, or access to the underside. |
| Top Plate Recess | Create a single or double-level recess. Gadgets and small items will fit perfectly. |
| Recess Wall Removal | The "walls" created by the recess can be removed individually. This is useful for creating openings in a specific direction to pass cables through or for connecting multiple printed objects to create one larger object. |
| Leg Height and Placement | Freely set the overall height of the stand and offset the legs to the inside of the top plate. |
| Robust Structure | Add reinforcement parts that connect the legs to improve stability. Furthermore, they can be connected into a single solid plate, allowing it to be used as a middle shelf or as a top plate when installed upside down. |
| Easy-to-Assemble Joints | Adopts a structure that connects the legs and top plate with "dowels". Assembly after printing is easy, ensuring solid strength. Clearance is also adjustable. |
| Beautiful Finish | The overall corners of the stand can be rounded (fillet) or chamfered to give it a smooth finish. |
Printing Tips
- The top plate and legs are separate parts, so they can be easily printed without supports.
- Adjust the dowel_tolerance value according to the precision of your 3D printer. A good starting point is around 0.1 to 0.3. Increase the value if the fit is too tight, and decrease it if it's too loose.
Printing Example: Tray for a hot USB hub
- Create a recess and adjust it so the USB hub fits perfectly.
- Make the legs not too high, but high enough to allow for good airflow.
- By specifying a large cutout in the top plate, you can promote heat dissipation from the bottom of the hub.
 |  |
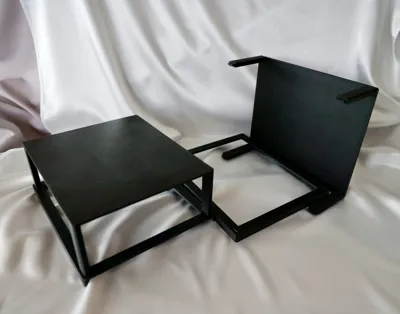
Printing Example: Dust cover and small item tray for a PC
- Create a recess so it can be placed upside down on top of a PC.
- Remove one of the side walls to design it as one unit from two trays.
- Make the legs slightly higher to prevent dust from entering, but not so high as to block ventilation ports or interfere with cables plugged into the top USB ports.
- Specify that the legs are connected on all four sides at the bottom and also filled in as a plate. When placed upside down, this surface will function as a lid or a tray for small items.
1  | 2  |
3  | 4  |
5  | 6  |
Key Parameters
1. Basic Size Settings
These are the most fundamental parameters that determine the "width," "depth," and "height" of the stand.
| Parameter Name | Description |
|---|---|
| hollow_width | Width of the recess. Set this to match the width of the object you want to place on the stand. |
| hollow_depth_param | Depth of the recess. Set this to match the depth of the object you want to place on the stand. |
| stand_height | Overall height of the stand. Specifies the height from the floor to the top surface of the top plate. |
| hollow_margin | Width of the top plate's border. This is the width of the border outside the recess. A larger value makes the entire top plate bigger. |
2. Strength and Stability Settings
Adjust the sturdiness of the stand and the appearance of the legs.
| Parameter Name | Description |
|---|---|
| stand_thickness | Thickness of the top plate. Making it thicker increases the strength of the top plate. |
| leg_width / leg_depth | Thickness of the legs. Making the legs thicker increases stability. |
| connect_legs_y_axis | Leg reinforcement (front-to-back). Setting to true connects the front and back legs, significantly improving stability. |
3. Finish and Assembly Settings
Adjust the visual finish and the ease of assembly after 3D printing.
| Parameter Name | Description |
|---|---|
| edge_style | Corner treatment. Choosing "chamfer" or "fillet" (round) will result in a smoother appearance. |
| edge_radius | Size of the corner treatment. Specifies the size of the chamfer or fillet selected above. |
| dowel_tolerance | Fit adjustment (clearance). Adjust this value if the dowels are too tight/loose (e.g., 0.1 to 0.3). |
All Parameters
1. Top Plate Settings
Settings related to the size, shape, and recess (tray part) of the top plate.
| Parameter Name | Description | |||
|---|---|---|---|---|
| hollow_width | Width of the top plate recess (1st level) (X-axis) Set according to the width of the object you want to place on the stand (e.g., keyboard, laptop). This will be the basic inner dimension of the recess. | |||
| hollow_depth_param | Depth of the top plate recess (1st level) (Y-axis) Similar to hollow_width, set this according to the depth of the object to be placed on top. | |||
| stand_thickness | Thickness of the top plate itself Specifies the basic thickness of the top plate. Making it thicker increases strength but also increases material usage and print time. | |||
| hollow_margin | Margin from the edge of the top plate to the recess This value determines the overall size of the top plate. For example, the width of the top plate will be hollow_width + (hollow_margin * 2). A larger margin makes the top plate wider. | |||
| hollow_depth | Depth of the 1st level recess Specifies the depth from the top surface of the plate to the bottom of the 1st level recess. If this value is greater than or equal to stand_thickness, the recess will penetrate through. | |||
| inner_hollow_margin | Margin of the 2nd level recess The distance from the wall of the 1st level recess to the 2nd level recess further inside. This value has no effect if a 2nd level recess is not used. | |||
| inner_hollow_depth | Depth of the 2nd level recess The additional depth from the bottom of the 1st level recess to the bottom of the 2nd level recess. The total depth from the top surface is hollow_depth + inner_hollow_depth. | |||
| remove_hollow_wall_front remove_hollow_wall_back remove_hollow_wall_left remove_hollow_wall_right |
| |||
| pierce_inner_hollow |
|


2. Legs & Structure Settings
Settings related to the stand's height, leg shape, and reinforcement structure.
| Parameter Name | Description | |||
|---|---|---|---|---|
| stand_height | Overall height of the stand Specifies the height from the floor to the top surface of the top plate. Adjust according to your needs, such as aligning a monitor to eye level. | |||
| leg_width | Leg width (X-axis) Specifies the thickness of the legs in the width direction. | |||
| leg_depth | Leg depth (Y-axis) Specifies the thickness of the legs in the depth direction. | |||
| leg_inset | Leg placement (inward offset) Specifies how far inward to place the legs from the edge of the top plate. If 0, the side of the leg will be flush with the edge of the top plate. A larger value moves the legs further inward. | |||
| connect_legs_x_axis | Reinforcement connecting left and right legs (X-axis) If true, a reinforcement plate is generated to connect the left and right legs (both front and back pairs), improving the stand's lateral rigidity. | |||
| connect_legs_y_axis | Reinforcement connecting front and back legs (Y-axis) If true, a reinforcement plate is generated to connect the front and back legs (both left and right pairs), improving the stand's front-to-back rigidity. | |||
| fill_leg_area |
| |||
| connector_thickness | Thickness of connecting parts Specifies the thickness of the reinforcement plates generated by connect_legs_... or fill_leg_area. | |||
| connector_height | Height of connecting parts from the floor Specifies how high to place the reinforcement plate from the floor. If 0, it will be flush with the floor. |


3. Joint & Finish Settings
Settings related to how the top plate and legs are joined, and the corner finishing of the entire model.
| Parameter Name | Description |
|---|---|
| dowel_enabled | Enable dowels (protrusions/holes for joining) If true, dowels (protrusions on legs, holes in top plate) are generated for positioning and securing the top plate and legs. This also serves as a guide for gluing and improves ease of assembly. |
| dowel_height | Dowel height Specifies the height of the dowel protruding from the leg. The height is automatically adjusted to prevent it from piercing through the top plate, considering the plate's thickness and structure (like recess depth). |
| dowel_tolerance | Dowel hole clearance Makes the dowel hole in the top plate larger than the dowel itself by this value. Adjusting this according to your 3D printer's accuracy can achieve a proper fit that is neither too tight nor too loose. A value of 0.1-0.3mm is common. |
| dowel_margin | Dowel margin Specifies the distance from the side of the leg to the dowel. A larger value makes the dowel thinner, and a smaller value makes it thicker. A setting of 2mm or more is recommended to maintain leg strength. |
| dowel_chamfer | Dowel corner chamfer size Chamfers the tip of the dowel at a 45° angle. This makes it easier to insert the dowel into the hole in the top plate. A small value, around 0.3-0.8mm, is effective. |
| pierce_dowel_hole | Pierce dowel hole If true, the dowel hole in the top plate will completely penetrate to the top surface. false is usually fine, but set to true for design reasons or if you want to confirm it's fully inserted. |
| edge_style | Overall corner treatment Selects the finish for the outer corners of the entire stand. ・"none": Does nothing, corners remain at 90 degrees. ・"fillet": Rounds the corners. ・"chamfer": Chamfers the corners at 45°. |
| edge_radius | Corner treatment size If fillet is chosen for edge_style, this specifies the rounding radius. If chamfer is chosen, it specifies the chamfer size. Be aware that specifying a value larger than the leg thickness may distort the shape. |
4. Display Settings
Settings to hide parts of the model to speed up previews and rendering.
| Parameter Name | Description |
|---|---|
| show_top | Show top plate If true, displays the top plate; if false, hides it. Useful for checking only the legs. |
| show_legs | Show legs If true, displays all four legs and connecting parts; if false, hides them. Useful for checking only the shape of the top plate. |
License
You shall not share, sub-license, sell, rent, host, transfer, or distribute in any way the digital or 3D printed versions of this object, nor any other derivative work of this object in its digital or physical format (including - but not limited to - remixes of this object, and hosting on other digital platforms). The objects may not be used without permission in any way whatsoever in which you charge money, or collect fees.
Comment & Rating (0)