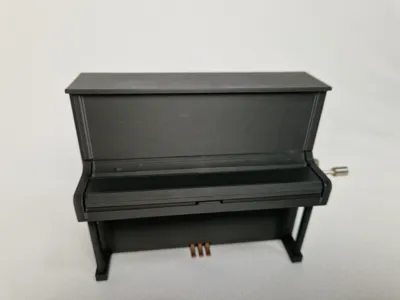
Miniature Piano Kit K015


Print Profile(1)

Bill of Materials


Description
This model is a detailed miniature piano, inspired by the Yamaha U3, designed as a decorative element with a functional hand-crank music box. It is precisely matched to the **Bambu Lab Piano Music Box Hand Winding Kit K015**
**Dimensions**
– Height: approx 10 cm
– Width: approx 5.5 cm
– Length: approx 12 cm (15 cm with music box inserted)
The model consists of several individual parts that are assembled and glued after printing. It is designed so that as many areas as possible can be printed continuously to avoid unnecessarily small components
**Printing Instructions**
For the housing, **support structures are recommended** – even if there are no classic overhangs, they are necessary for clean print quality. Without supports, the thin webs tend to vibrate due to the print head movements, leading to untidy layers.
In the **keyboard housing**, there are two open slots at the back. Support material is automatically generated in these areas during printing. This must be **thoroughly removed** so that the keyboard lid can later be cleanly inserted from the back.
The lid is mounted on two small, printed pins on the right and left, which rotate freely in the plastic. A separate back part later prevents the lid from sliding out backwards.
All surfaces should be neatly post-processed after removing the support structures
**Assembly Instructions**

Preparation
Carefully remove all **support structures from the main part**, especially from the **thin struts**
Then, also remove the **support structures at the designated points** in the **keyboard housing** (see **Figure 1**)
The surfaces must be **clean and smooth** so that everything fits correctly later
Insert Keyboard

Interlock the **keyboard** (white and black keys). Then insert it correctly into the key housing as shown in the image
Pay attention to the installation direction – if inserted incorrectly, it cannot be **fully pressed down** (see **Figure 2**)
Keyboard Lid
Slide the keyboard lid from the back into the long slots of the keyboard housing
This step must be done before inserting the assembly, as the lid cannot be installed afterwards
Mount Key Housing

Carefully apply superglue to the red marked areas. Then place the complete unit onto the piano housing. As shown in **Figure 4**: Ensure that the assembly is clean and flush at the sides
Key Housing Back Part


Again, sparingly apply superglue to the red marked adhesive points at the back (see **Figure 5**). Then insert the back part of the keyboard housing (see **Figure 6**). The part is slightly beveled at the front – this is intentional so that the keyboard lid can be opened correctly later. If the back part is seated as shown in Figure 6, it is correctly installed
Foot Pedals
Insert or glue the three foot pedals at the bottom. Ensure they are aligned straight and arranged symmetrically
Insert Kit 015
Insert the hand organ (music box) into the piano housing from above
Guide the crank out through the right side hole
Then screw the music box from the back. Ensure that the crank can turn freely and the housing sits flush
Place Lid
Finally, place the top lid on, but **do not glue it**. This maintains access to the interior to change or maintain the hand organ if necessary
**Note on Adhesive Points**
- Always apply glue **sparingly and precisely**
- It is best to orient yourself **by the red markings in the images**
- Apply glue **to the housing surfaces**, **not to the parts to be inserted**
- For tight spots, **dosing with a toothpick** is recommended to avoid smudges
**Usage**
The finished model serves as a decorative miniature piano with a rotatable music box – ideal as a stylish decoration, gift, or collector's item.
It can be printed in any desired color and looks particularly elegant in wood, black, or metallic tones
If you have any questions, something isn't working, or you have change requests, **just send me a message!**
Please **do not immediately leave a 1-star rating without first giving me the chance to solve the problem together with you.** I strive to help quickly and in a solution-oriented manner
Boost Me (for free)
If you like the model, I would appreciate a boost or a review.
This helps make more high-quality designs possible. Thank you
License
You shall not share, sub-license, sell, rent, host, transfer, or distribute in any way the digital or 3D printed versions of this object, nor any other derivative work of this object in its digital or physical format (including - but not limited to - remixes of this object, and hosting on other digital platforms). The objects may not be used without permission in any way whatsoever in which you charge money, or collect fees.
Comment & Rating (7)