Search models, users, collections, and posts

25 CoreBench - Bench Dog Lockable

IP Report

Print Profile(1)

All
P1S
H2S
X1
H2D
X1E
A1
H2D Pro
A1 mini
X1 Carbon
P1P
P2S
H2C
X2D
A2L

Benchdogs lockable
Benchdogs lockable
Designer
2.4 h
3 plates
4.9(13)

Open in Bambu Studio
Boost
368
1140
38
45
499
150
Released 

Bill of Materials

Bambu Filaments
Select all
Black (14100) / Filament with spool / 1 kg
ABS Black (40101) / Refill / 1kg
ABS
x1
Black (10101) / Refill / 1kg

Description

Content has been automatically translated.
Show original


25 Core Bench is a modular 25mm bench dog hole system, designed to be compatible with 20mm accessories, while also protecting our benches and offering greater versatility.
An economical, customizable alternative and part of a continuously evolving ecosystem, with interchangeable adapters and dedicated accessories.

Boost Me (for free)

Make me happy and give me a BOOST!
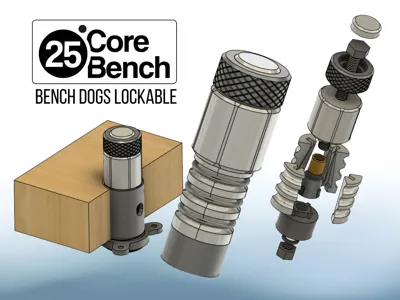
Bench Dog Lockable

An accessory fixed to the bench using a press and release system.
It can serve as a reference or a simple stop for jigs and workpieces.

1.Cover4.Bench Dog7.Tapered Slider10.O-ring
2.M6 Screw5.Threaded Insert8.Bottom11.Standard Block
3.Knob6.Side Plates9.Self-locking Nut12.Workbench

Operation
The bench dog inserts directly into a 20mm hole or into the Standard Block , turn the knob and you're done!
The system uses an M6 screw with a hex head closed at one end by a knob with a cover and at the other by a self-locking nut
The screw passes through the threaded insert hot-pressed into the tapered slider, which moves up and down, causing the side plates to expand.
The side plates, held by 3 O-rings of 18x2.4mm, lock the bench dog, centering it in the hole. 

Bench Dog HeightM6 Screw Length
20mm60mm
30mm70mm
40mm80mm

Assembly
HERE you can watch the video

Insert the screw into the knob and secure it with the cover (it's a snap-fit, but you can also use cyanoacrylate glue)

  1. Pass the screw through the bench dog
  2. Insert the tapered slider
  3. Insert the side plates, holding them momentarily with your hand
  4. Insert the bottom
  5. Lock with washer and self-tapping nut
  6. Insert the O-rings

The best results were obtained with PA6-CF or ABS, but for light-duty work, even PLA was acceptable.


Comment & Rating (38)

(0/1000)

Print Profile
Benchdogs lockable
Great, it works well
Show original
profile
1
Reply
Boosted
Print Profile
Benchdogs lockable
Great accessory Thank you
Show original
profile
1
Reply
Great work as usual, I printed some for my little workbench, but I ran into a insurmountable problem: what do I do with the dogs and accessories when my bench is full of caps????? So I started thinking about containers to support them next to the bench, now I ask you, can I post them on MakerWorld??? without you getting offended to death :) :)
The designer has replied
Show original
designer
2
Reply
ah ah you can do it, just link my project in the description, which I think you would have done anyway since yours will be supports for my system ;)
Show original
1
Reply
Replying to @whiteghostshop :
I am ready to post the system, but I wanted to share the text with you, you know I don't want to run into any legal problems........ AHAHAHAHAH how can I contact you
(Edited)
Show original
0
Reply
I now always forward every boost I receive to one of your models
The designer has replied
Show original
designer
1
Reply
ahahaha
0
Reply
Boosted
top product
The designer has replied
Show original
designer
1
Reply
grazie mille
0
Reply
Boosted
Great Andrea!!!!
The designer has replied
Show original
designer
1
Reply
Thank you very much ;)
Show original
0
Reply
Boosted
Thanks Andrea, after the threaded insert suggestion everything is perfect, great work
The designer has replied
Show original
designer
1
Reply
Excellent ;)
Show original
0
Reply
Well done, a colossal undertaking. The original link leads to countersunk screws
The designer has replied
Show original
designer
1
Reply
Hi, thank you, you're right, now it's correct ;)
Show original
0
Reply
Thank you. However, I don't understand the point of why I would need to lock a bank hook? Stick it in and it's set - so why the locking mechanism? I would be really grateful for a brief explanation on this....then I'll print it too ;-)
The designer has replied
Show original
0
Reply
hello, have you seen the youtube video? That already explains a lot, but basically you need it so you don't risk taking it off when you remove an accessory
Show original
0
Reply
Fantastic design, unfortunately, making it out of FDM print is not functional. Something like this needs to be milled from aluminum at the least. All the skinny bits snap off in assembly. Attempted in ABS, and it just breaks apart. Something ABS doesn't do.
The designer has replied
0
Reply
I have everything printed in abs or pla and I don't notice any particular problems, but in the youtube video I suggest a link for those who want to print them in metal. Not very cheap but feasible
Show original
0
Reply

License

This user content is licensed under a Standard Digital File License.

You shall not share, sub-license, sell, rent, host, transfer, or distribute in any way the digital or 3D printed versions of this object, nor any other derivative work of this object in its digital or physical format (including - but not limited to - remixes of this object, and hosting on other digital platforms). The objects may not be used without permission in any way whatsoever in which you charge money, or collect fees.