Ezystorage Drybox System - With Auto-Rewind


Print Profile(2)

Description
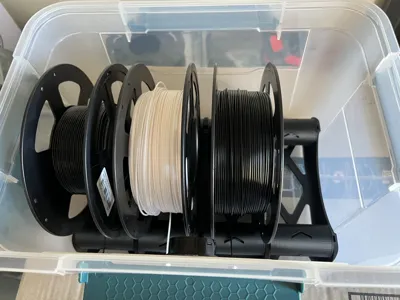
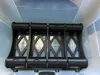
Ezystorage 18L Drybox System with Auto-Rewind:
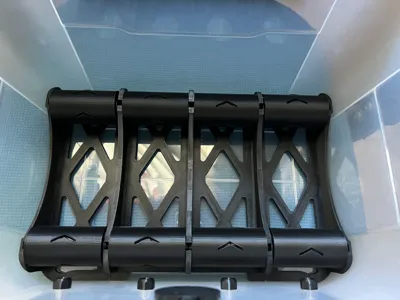
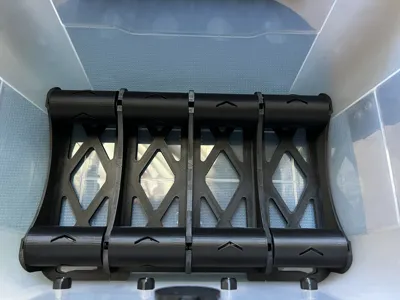
This is a remix of Jerrari's “Auto-Rewinder for Reprack” with a completely redesigned base to snugly fit the Ezystorage 18L container. The rollers with the coil and clutch system remain the same however I've reduced the number of coils and shortened the rollers to fit the base setup - this doesn't affect the functionality at all. Thanks to Jerrari for their clever design!
Why?
The drybox design space is definitely oversaturated but they're all for cereal boxes and for some reason Australia seems to have absolutely no cheap and easily accessible cereal boxes that are sized appropriately for filament drybox systems. There's the BigW 3.8L Essentials container, but the handle grip at the back makes it so that wide-ish spools don't fit. The other ones off amazon or aliexpress are like 10-20 bucks per container which is honestly ridiculous.
Now if you go the other way on the size spectrum, there's the IKEA Samla boxes but those are bigger than they need to be and also aren't completely airtight/watertight and HENCE I decided on the Ezystorage 18L container which has just the right dimensions to fit 4 spools and is also IP67 rated!!! It maintains ~10% humidity according to the cheap hygrometers (I know this isn't correct - might be cool to see actual measurements done on it) for 2+weeks. I am using activated alumina and have not had to change/recharge my dessicant since it went in a month ago even with a few open and closes (ideally you dont' open and close it too much though)
As for the auto-rewind system, occasionally when the AMS Lite feeds filament back after a print or changes filaments, it bulges out or flips off to the side and gets tangled and this just keeps it nice and neat. (I will say though, I am thinking and working on ways to change/improve the clutch/rewind system - but this'll probably take a while to figure out. Quite new to 3D modelling after all.)
Assembly:
Non-printed parts:
- Ezystorage 18L IP67 Rated Storage Container ($15 AUD at Bunnings - not sure if this is available in other countries)
- PC4 M10 Pneumatic connectors x4
- 608 Bearings x16
The printed parts:
(Disclaimer: I printed using JAYO PLA+ but you should be able to use any other material and be fine. The only potential thing is to avoid PETG for the rollers as PETG is more slippery and may make it so the spools just slip and don't rewind it enough for the auto-rewind system to work - I haven't tested this but it seems to be an issue that people had when printing Jerrari's original model)
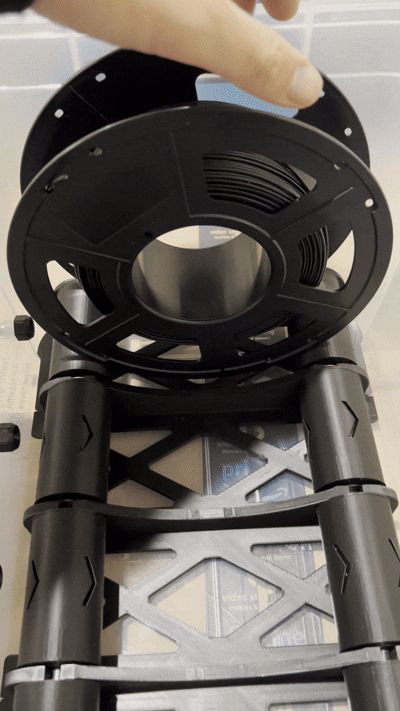
The base, rods and rollers should be relatively self explanatory - the auto-rewind system with the coils is completely optional btw.
The coils: (you can find detailed instructions with pictures at https://www.printables.com/model/292276-auto-rewind-spool-holder-for-reprack)
It's relatively self explanatory though - the clutch system has two parts: the clutch itself and the coil
You need to push on the inner clutch arms until you hear a snap so they bend a bit - the coil then goes straight in the middle. The other coil pieces you put together like puzzle pieces - the important thing is you have the semi-circle holed coil at the end.
Desiccant Box: (Updated: 18/5/26)
Newly released dessicant box design for this Ezystorage drybox which you can find here: https://makerworld.com/en/models/2817013-ezystorage-drybox-dessicant-box#profileId-3136391
The non-printed parts:
As for getting the pneumatic connectors in: Using a soldering iron is best. Mark the holes evenly, push the soldering iron right through and wallah! (might need a little bit of extra sanding depending on your soldering iron size as the PC4 M10 screws are on the bigger end)
I used the “Nut + Filament Funnel” by IDV (https://makerworld.com/en/models/1329390-pc4-m10-nut-filament-funnel-for-diy-dry-box?from=search#profileId-1367350) to secure the connectors from the other side.
Disclaimer: The setup with the pneumatic connectors at the bottom I have in the image are not ideal as it results in the filament sliding/rubbing on the rollers (in the grand scheme of things it's not like it damages the filament in that couple of seconds it brushes past but anyways). The only reason I have it like this is because I had another setup going with the box upside-down and decided to switch it over but of course didn't want to make more holes in my container just for that. You'll notice that wall has a bump towards the corners and so the amoutn of space as you go higher reduced - which is why I initially installed them that way.
TLDR: Don't install the pneumatic connectors at the bottom like I have - do them towards the top.
I'm very new to the community and this is my first proper design. Would love any feedback or suggestions if y'all have any!
Would also appreciate likes, comments or boosts if you like this design!

Comment & Rating (25)