Steel String Travel Guitar


Print Profile(5)


Description
This travel sized guitar features a full-length scale (24.5"), good volume, a balanced tone and good harmonics and sustain. It can also be built without any special lutherie skills. Outside of tapping a few holes, you can put together a playable version that just bolts together. Or to really improve the tone, you can do a bit of gluing as well. Oh, and it also weighs less than 3 lbs., making it great for travel and comfortable to play.
I've posted a number of earlier stringed instruments, but they all required some special lutherie skills (like setting and leveling frets), fabricated aluminum stiffening ribs, and relied heavily on gluing (a messy and highly stressful activity). This version is playable after just bolting it together. However the tone can be improved greatly by adding glue to the back and fretboard assembly.
Caveats: To get the stiffness, creep and temperature resistance required for a nice sounding, playable instrument, this is largely printed from PET-CF ($$) filament, or even better, printing the body with PPA-CF ($$$$). And it requires a large printer. The 3MF files are for my H2D, but you'll need a printer at least that large and also with a heated chamber. Attempting to print with cheaper filaments, even PLA-CF, will likely not work out very well.
You can skip the design notes down to the assembly section if you aren't interested in the rational for the various design elements.
Design Notes:
Body shape
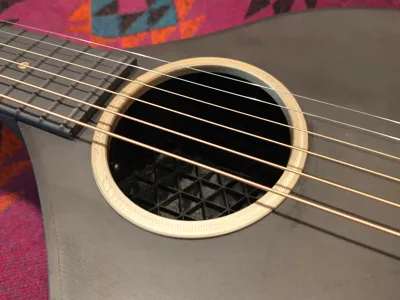
Why the teardrop shaped body? The soundboard (the top surface of the guitar) is the most important element in creating the guitar's tone. And it is also under about 160 lb. of string tension. Glue joints, fastening features, etc. will both disrupt the structural integrity of the soundboard as well mucking up the tone of the guitar. It is important to print the soundboard as a single piece. So the teardrop shape maximizes the area of the soundboard which in turn maximizes the volume and bass response.
Fretboard
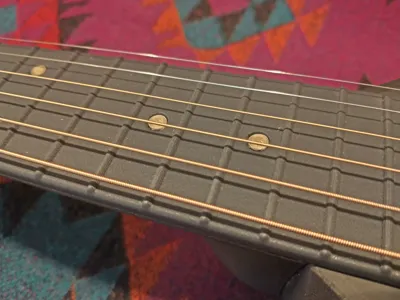
This was the trickiest decision of the design. Metal frets are really the best option for playability and durability, but learning to fret a guitar (install, dress, level, etc.) is a huge undertaking. So instead I decided to 3D print the fretboard with integral frets. The main issue is that the frets will wear out over time. Therefore I decided to make the entire fretboard easily replaceable. If you are a real shredder and do a lot of string bending, this may not be tenable, but for most people looking for a comfortable lap-sized guitar for picking on the sofa, the frets should last a good long while.
Note that the fretboard is printed vertically in two pieces. Because the fretboard is radiused, this orientation is necessary to get smooth frets without layer line stepping. Each section has a breakaway support structure that stabilizes the fretboard while prinitng.
Head Stock / Neck / Truss Rod
The headstock and neck bolt through to the body using a ¼-20 threaded rod that is anchored in the headstock, passes through the length of the neck, and then bolts into the body. There is also a second threaded stud anchored in the heel that also bolts into the body. Because the fretboard merely screws on, it doesn't add much stiffness to the neck and hence, the neck profile is a little on the chunkier side.
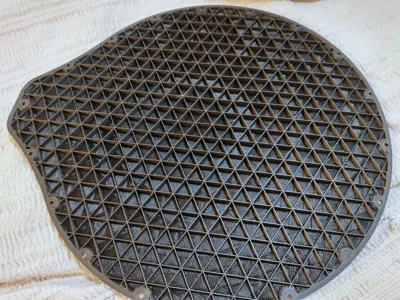
Soundboard
As mentioned above, the soundboard is the most critical element to the overall tone. Ideally, you want a soundboard that is very stiff but also very light to maximize the volume and the harmonic content. The bulk of the area of the soundboard is a sandwich structure consisting of just two bottom layers, a grid infill, and topped by two high density infill layers. I did many many tests of different parameters (layer number, thickness, infill densities, infill angles, etc., etc.) to find a combination that maximizes the stiffness for a given area density (g/cm^2). As a result, the 3MF file settings for the body are quite complex. Take a lot of time to understand exactly what is going on before you attempt to modify these settings.
I've actually included 2 separate 3MF files for the body: one using PET-CF (note: not PETG-CF), and one using PPA-CF. Because PPA-CF is much stiffer, the dimensions of some bracing ribs are a little different. The PPA-CF sounds better, but it is much more expensive and much trickier to print with.
Bridge
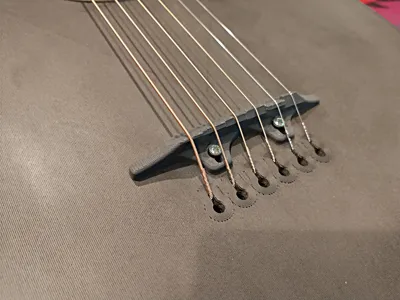
Many stringed instruments have floating bridges that can be adjusted to get perfect intonation. Most standard guitars, however, have fixed pin bridges that excite the soundboard in a twisting fashion, yielding that unique guitar tone. But a fixed bridge allows for little adjustment for intonation. I opted for a semi-floating bridge to get the best of both worlds. The ball end of the strings go through fixed holes in the soundboard (no bridge pins are necessary) but they then go up and over the movable bridge/saddle piece. But because of the sharp break angle, the strings want to push the bridge forward as they are tensioned. Therefore, I added slotted holes in the bridge so that it can be secured to the soundboard after being positioned correctly.
Printing
There are 5 separate 3MF files for this project:
1. main 3MF that contains the neck, headstock and back (all in PET-CF), the fretboard, the bridge and 2 fretboard filler dots (all in PLA-CF).
2. contains the version of the body printed in PET-CF.
3. an alternate body designed for PPA-CF
4. contains the rosette, fretboard dots, and strap pins printed in PLA
5. the nameplate also printed in PLA.
Print out one body (either the PET-CF or the PPA-CF version) and all of the rest of the boards.
Assembly
Supplies and materials:
1 set guitar tuners (compatible with the Gotoh SG-328-01)
1 set light guitar strings (I like d'Addario EJ-16's)
1 ¼-20 threaded rod x 18" long
1 ¼-20 threaded rod x 2" long
2 ¼-20 nuts
2 ¼-20 washers
18 6-32 x ½" socket cap screws
10 4-40 x 3/8" flathead screws
2 4-40 x 3/8" pan head screws
2 4-40 washers
You will also need:
4-40 tap, 6-32 tap, 8-32 tap, ¼-20 tap
1/16" drill bit
400 grit sandpaper
gel-type superglue
5 min. epoxy
masking tape
1. Tap Holes
Use the 6-32 tap to tap the 18 holes around the perimeter of the body.
Use the 8-32 tap to tap the strap pin holes in the end of the body and on the neck heel.
Use the ¼-20 tap to tap the truss rod hole in the end of the headstock and the lower hole in the neck heel. These are blind taps.
Use the 4-40 tap to tap the holes in the neck for the fretboard and also the two holes in the soundboard near the string holes.
2. Secure the nameplate piece in the headstock with a couple dots of gel superglue. Use only a tiny amount and not near the edges to avoid squeeze-out.
3. Screw the back onto the body with the 18 6-32 screws.
4. Use the 4-40 flathead screw to secure the two fretboard sections to the neck. Lightly sand the tops of the frets with the 400 grit sand paper so that the surface that contacts the strings is smooth. Do not over sand.
5. Thread the 2" ¼-20 threaded stud into the lower hole in the neck heel. Thread the 18" truss rod into the end of the headstock. Slide the neck onto the headstock. You should now have the 2 threaded rods sticking out of the heel as shown:

6. Insert the neck studs into the body. You can access the ends of the studs through the sound hole. Secure the neck with the two ¼-20 nuts and washers. Only finger tighten the upper nut for the truss rod and then use a socket wrench to tighten another ¼ turn. (This will get fully tightened later as you are stringing the guitar to adjust the neck relief.) Make sure the end of the fretboard is pressed tightly against the top of the body as you tighten the nuts.
7. Secure rosette in the sound hole with a tiny amount of gel superglue. Avoid any squeeze-out as it will stain the finish.
8. Assemble the tuners to the headstock. Gotoh compatible tuners will have the same 10mm post sleeve sticking up, but the location of the 2nd small hole that prevents tuner rotation varies all over the place. First use the 10mm nuts to secure the tuners and get them all oriented nicely with the 10mm nuts snugged down. Then use the small holes as a guide to drill pilot holes for the additional small screws. Tighten them in gently.
9. Screw the bridge to the soundboard with the two 4-40 pan head screws and washers. Position the bridge so that the screws are about in the middle of the slots.
10. Initial string installation. Insert the ball end of the string into the keyhole in the soundboard. It can then help to insert a screwdriver shaft or hex wrench into the hole to keep the string from flopping out while you tension it. Bring the string up to tension. Note that the string will probably buzz until you get most of the strings installed. Install the rest of the strings one-by-one. Do a final tuning of the guitar.
11. Adjust the intonation by moving the bridge. On both the 1st and 6th strings, play the 12th harmonic followed by playing the 12th fret. If the fretted note is sharp relative to the harmonic, you'll need to move the bridge back further from the headstock. If the fretted note is flat relative to the harmonic, move the bridge towards the headstock. Make sure to loosen the strings before loosening the bridge screws and moving the bridge. This is an iterative process that can require many loosening and retuning of the strings.
12. Adjust the neck relief by adjusting the truss rod. Hold the 1st string fretted at the 12th fret. Tap the string just above the 6th fret and note the amount of clearance between the string and fret. There should be about the thickness of a piece of paper between the string and the fret. If the gap is too large, loosen all the strings and loosen the 3rd and 4th strings enough to fit your socket wrench between the strings. Tighten by no more than ¼ turn. Re-tune the guitar and re-check the relief.
13. Check the string action at the 12th fret. The recommended height of the 1st string (high e) above the 12th fret is about 0.085" and the recommended height for the 6th string (low E) is about 0.105". If you are off by only about 0.015" or less, you can adjust this to your liking using the truss rod. If you are off by more than that, you will need to re-print the bridge with more or less material on bottom side. I've included a tall bridge STL file and you can use the slicer to move it relative to the build plate (move it down into the build plate and also change the angle) to get the exact bridge height and angle. At this point, you should have a playable guitar.
14. If you are happy with the sound, go ahead and use some thin double sided tape (not foam tape) to stick the fretboard dots to the tops of the 4-40 screw heads. If you want to improve the tone, read further.
15. Optional gluing. Gluing the back onto the body (in addition to the screw) can dramatically improve the tone of the guitar. Likewise, gluing the fretboard onto the neck will further improve the tone. The down-side is that this makes the guitar more difficult to disassemble. Before gluing, completely disassemble the neck and body.
For the gluing on the back, I recommending using 5-minute epoxy as the inevitable squeeze-out cleaned up with isopropyl alcohol while not fully set. I recommend, with the back still screwed on, taping the seam as shown. Then loosen the screws slightly and slit the tape along the seam. Then you can remove the back, glue it on, and clamp in place with the 18 screws. Make sure you've wiped off all the squeeze-out glue with alcohol before it sets.
For gluing on the fretboard, I recommend using gel-type superglue as superglue softens at a fairly low temperature. You don't want to coat the entire surface because you'll never be able to get it off to replace it. I used small dots of glue on about a 1" grid spacing, staging away from the edge of the fretboard to avoid squeeze-out. With the dots of glue applied, secure the fretboard sections back in place with the 10 screws. Finally re-affix your fretboard dots.
If you ever need to remove the fretboard, disassemble the neck and place it in an oven at about 200 deg. F / 100 deg. C. This will soften both the adhesive and the PLA-CF fretboard, allowing you to peel it off. The PET-CF neck itself won't begin to soften itself until about 400 deg. F / 200 deg. C so it should be fine in the oven.
16. Optional strap buttons. Strap buttons are a mixed bag. They can create a real vulnerable spot at the tail end of the guitar if they get bumped. And this guitar is more of a lap guitar so a strap is not so necessary. But if you need them: thread short lengths of 8-32 threaded rod into the buttons and then screw them into hole at the end of the guitar and into the hole in the heel.
Comment & Rating (12)