


Print Profile(1)

Bill of Materials


Description
The graveyard was silent, the air heavy with mist. A crooked gravestone stood alone, forgotten by time. Then, as the moon broke through the clouds, the earth stirred. From behind the stone, a pale ghost rose, drifting weightlessly into the night. It circled in silence, bound to the place it once called home, forever guarding the secrets beneath the soil.
No soldering / programming required
This diorama with a flying ghost can be motorised with a TT motor, or operated using the included hand crank! No AMS is required to print all the individual pieces!
To assemble the diorama, start with the mechanism. Choose if you like the motorised or the hand crank option.
Step 1 (motorised)
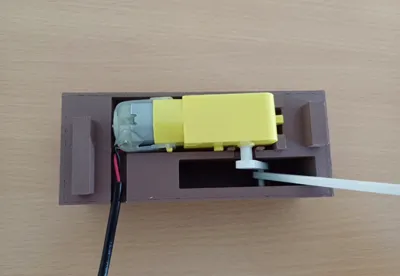
Connect the small white rod to the TT motor. It should be flush with the end of the motor shaft. Ensure that the pin on the first rod is pointing away from the motor. Then slide the long rod (with the hole in it) over the pin. Then place the motor in the bottom section of the box as seen below. Make sure the wires of the motor are in the wire slot!


Step 1 (Hand Crank)
Take the hand crank and now slide the long rod (with the hole) over one of the pins of the hand crank. Then, place the middle axle of the handcrank in the foreseen cutout in the base.


Step 2 (motorised / hand crank both follow all the following steps)
Put the lid on the box, make sure that the large slit is aligned with the rods. Put the gravestone in the fitting hole, again make sure the long rod passes through the ring on the back of the gravestone!


Step 3
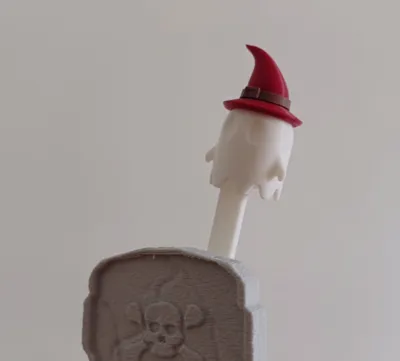
Place the Ghost on top of the rod. Keep in mind the ghost has a slot on the inside! Slide the rod in this slot. After this, put the hat on top of the ghost and slide the belt over the hat


Step 4
Add the final decorations. Put the fence in front of the gravestone, and the skeleton hand next to it. Enjoy the diorama!

Boost Me (for free)
The best way to share models you like is by boosting them. So, If you recommend this model to other people, please consider supporting with a boost :)) A very big thank you for every boost :))
License
You shall not share, sub-license, sell, rent, host, transfer, or distribute in any way the digital or 3D printed versions of this object, nor any other derivative work of this object in its digital or physical format (including - but not limited to - remixes of this object, and hosting on other digital platforms). The objects may not be used without permission in any way whatsoever in which you charge money, or collect fees.
Comment & Rating (0)