Search models, users, collections, and posts

Low profile AMS riser with LED and glass lid riser

Print Profile(2)

All
P1S
P1P
X1
X1 Carbon
X1E
A1
H2D
H2D Pro
H2S
P2S
H2C
X2D
A2L

0.6mm nozzle, 0.3mm layer, 2 walls, 15% infill
Designer
13.8 h
4 plates
4.8(55)

0.4nozzle PLA, SINGLE PLATE 0.2mm layer, 2 walls, 15% infill
13.8 h
1 plate
4.9(46)

Open in Bambu Studio
Boost
287
751
182
115
1.2 k
672
Released 

Description

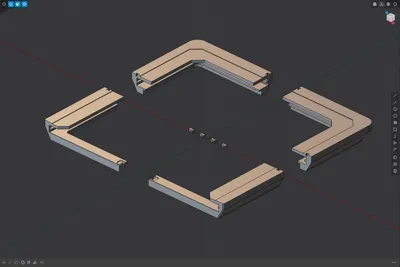
I've wanted a new riser for a bit, especially since I moved from my A1 units and one P1S to multiple P1S units. There are definitely some good ones here on MakerWorld, and I've printed a couple of them! But none of them quite did it for me. A lot of them are reeeeeaaally tall, and I didn't want that. Or they're unnecessarily decorative for my tastes. Or they have storage built in that I don't plan to use. Or they use the underpowered side panel light connector that isn't specced for adequate amperage. Or they didn't have a slot to lift away the glass for PLA ventilation. So I set out to make my own! This one is easy to print in PETG (I printed a PLA-CF test for a part of this model and OMG IT LOOKS SO GOOD but it's just not the right material given the heat rising off the print chamber, so I printed this one in the matte PETG from Jarees). Would recommend using PETG or better. Low profile (total height to the AMS is just under 40mm) and there is a slot to elevate the glass lid for printing PLA. Non-angled curved face along the bottom edge of the riser allows for LED strip lighting, easily routes to the front panel USB-A connector behind the screen (using this is better than the connector the built-in LED uses, as that connector is specced for 0.5A and the front panel USB-A is specced for 1.5A so you won't kill your printer over time). Thanks for checking out my riser, hope you'll give it a shot and I hope you all have a great day!

Comment & Rating (182)

(0/1000)

“In the beginning God created the heavens and the earth. The earth was without form, and void; and darkness was on the face of the deep. And the Spirit of God was hovering over the face of the waters. Then God said, “Let there be light”; and there was light. And God saw the light, that it was good; and God divided the light from the darkness.” ‭‭Genesis‬ ‭1‬:‭1‬-‭4‬ ‭NKJV‬‬ Fantastic minimalistic design. I used ws2811 programmable & diffused LEDs (EDIT: they’re called neon rope LEDs on Amazon) for this build and they fit perfectly. I have an ESP32 running WLED controlling them, and will use the printers state within Home Assistant to control the color of the LEDs at any given time. For instance, white while printing for better camera visibility, green when print is complete, etc. It will all be automated. Thanks for sharing this thoughtful design! YOU have a great day, and may the Lord bless you and keep you 🙏🏼✝️
(Edited)
The designer has replied
designer
7
Reply
Your print looks great, friend! I appreciate the kind words and your support!
2
Reply
Replying to @darren.meier :
Thanks again 😊! Isaiah 55:6-11 ✝️
0
Reply
Where did you get the led diffuser?
0
Reply
Print Profile
0.6mm nozzle, 0.3mm layer, 2 walls, 15% infill
Worked out great.
The profile uploader has replied
profile
2
Reply
That looks great, friend! Thanks for sharing your make, I was getting anxious to see someone else's build!
0
Reply
Boosted
Curious did you go with a battery powered LED strip for your X1C?
0
Reply
Replying to @montazuma :
I used a wall powered led strip. The benefit of that is I get lighting while the printer is powered off for maintenance.
(Edited)
2
Reply
Boosted
lose love love this riser! much shorter than others and I combined it with a vented riser and it’s still shorter than the other users out there. I printed on one plate with PLA and supports, took about 13 or so hours overnight. thanks to the creator! I sent you a boost
designer
4
Reply
The vented riser you made for it was needed. Did you upload it to your profile?
0
Reply
I want to complement you on the deign of your LED Riser. I have printed many other designs out there, and of the 8 that I have pry ted I like yours best because you keep it small, compact, multi functional, and expandable. However, there are a few things that I know will improve your design for joining pieces together, speed and print quality and extra functions while still keeping the riser the size it is. I would like to ask if I can have a copy of your risers CAD files or the STEP files so that I can make these improvements. However, before I would publish a remix, I will first get your approval of the improvements and a yes or no approving and to allow me to publish the remix. and I will make sure you are given complete credit for your deaign and I will give you and only you a complete copy of my CAD files for your riser with my improvements so that you can do with it as you want. I look forward to hearing from you and working with you to implement these improvements and in any other designs. FYI… as you can see by pictures, I printed your riser and I like it, but I want to point out some potential problems fir you but you might have already found these issues and you’re working on the corrections. First, the width and depth of the riser channel for the glass is to small. you have to push pretty hard to get the glass to go into the riser channel and even harder to get the glass all the way in andm then you have to push down on the corners and front to get the glass seated flat against the riser. And you also have to pull rather forcefully to pull the glass back out from the channel in the riser. second, every joint need either another bowtie on the bottom for stregth to keep the joints from twisting and to keep it from breaking. also, I guggest that you switch to Gyroid infill because your chosen infield pattern runs parallel with the longest runs of filament thats laid down on the rear section of the riser when printing the rise, which makes the riser weak across the back and susceptible to cracking. other than these few issues, I still like your riser and will continue to use it. I also hope you decide to allow me to have a step file for your rise so that I can try some of the improvements that I believe will help your design. also, the channel for the LEDs was the perfect width to allow me to run two sets if COB LED light all the way around the riser. The COB LEDs that I used are 5mm wide and have 480 LEDS per Meter and operate at 6500k and on 5v. I was able to plug the new LEDs into the location that the LED of the X1C which allows me to operate the LEDs with the on and off light switch from the panel or app. I have plenty of light now regarads, CC Regards, CC
(Edited)
designer
4
Reply
Print Profile
0.6mm nozzle, 0.3mm layer, 2 walls, 15% infill
IT'S SO BRIGHT!
The profile uploader has replied
profile
1
Reply
Looks wonderful, friend! The difference in light in the chamber is shocking. Cheers!
(Edited)
1
Reply
Replying to @darren.meier :
It really is, I absolutely love this mod
0
Reply
Boosted
Thank you so much it came out fantastic. And the glass top slides in like butter. Perfect size for my small shop closet. lol. I’m making a donation for the print.
The designer has replied
designer
2
Reply
Thank you so much for the support, friend! Your print looks fantastic, that's a sharp little shop you've got set up there!
0
Reply
I like the low profile design, but I had issues removing supports from the areas that the connector fits into so I had to use glue instead. The front of the AMS has insufficient contact with this design (back fits fine) so I’m a bit hesitant as the printer shakes around. I’d love to see a V2 that has better contact area for the front feet and a better connection between the 4 pieces that slide into each other to lock in place. Thank you!
The designer has replied
designer
2
Reply
Thanks for your comment! I didn't actually print it with supports in the bowtie connector areas, the only support I used was on the overhangs sections on the rear pieces only (I marked the print orientation with a circular indent on the back of those pieces). As for contact, I will take that under advisement! It doesn't have full contact by design, but I've run mine a couple hundred print hours so far with the anti-vibration feet installed so my P1S is pretty bouncy and I haven't had any issues.
0
Reply
Print Profile
0.6mm nozzle, 0.3mm layer, 2 walls, 15% infill
Thanks for sharing your design! it’s exactly what I was looking for - not too much, not too little, just perfect for the job. One of my first “big” prints in this new hobby and it came out great! Resliced to print PETG with .4mm nozzle, took a while and had a few stringers on the back corners but a heat gun cleaned that up. Used the led strip you suggested and works perfectly! PS - make sure you print a PTFE tube removal tool if your AMS is already installed, it makes life a lot easier!
(Edited)
The profile uploader has replied
profile
1
Reply
Wanted to add how much of an improvement the led lighting makes - you can see everything inside the printer so much better and even the camera view is significantly improved! I may put a small strip of thin felt tape on the front edge to improve the glass seal. It doesn’t really need it (there is a tiny gap under the handle that is probably insignificant) but might as well dress it up even more. I do really like the ability to raise the glass top for cooling. Thanks again!
(Edited)
profile
1
Reply
Thanks so much for the kind words, friend! Your build looks awesome. I considered adding a tiny bit of felt to the glass-riser interface as well, but honestly I only ever see it if I'm looking down at the riser from above so I just chose to leave it be. I'm so glad it works out for you!
0
Reply
First, thank you for this. I just printed this yesterday. I probably should have asked this beforehand but, is there any concern with the lights peeling off due to the print temperatures? I'm still waiting on my lights to arrive. Edit: Added photos. Looks great!
(Edited)
The designer has replied
0
Reply
Hi, thanks for asking! I didn't have any issues with things peeling from the print temperature, but one of the three strips I'd ordered did seem to have less adhesion than the other two right after initial install (I have three P1S units I keep risers on currently). For that strip I did opt to put a few little dots of CA glue in the problem spots, but the other two strips have held up without issue for... a year now? Year and a half? Something like that. Hope that helps, cheers!
0
Reply
Replying to @darren.meier :
Thanks for the info! That really does help... It is an excellent design.
0
Reply
Print Profile
0.6mm nozzle, 0.3mm layer, 2 walls, 15% infill
Great print! using CF-PETG, the supports came off relatively easily and mostly in one piece- thank goodness! I used with a low profile riser I had already installed LEDs to and it fit perfectly. eventually I’ll get around to taking them out and just using this riser- which is so much nicer with the top glass storage for open or closed- just what I was looking for!
The profile uploader has replied
profile
1
Reply
Thank you for the kind words! I appreciate it!
0
Reply