Buffer Relocation for AMS (Reduce time by 35% +)


Print Profile(1)

Bill of Materials


Description
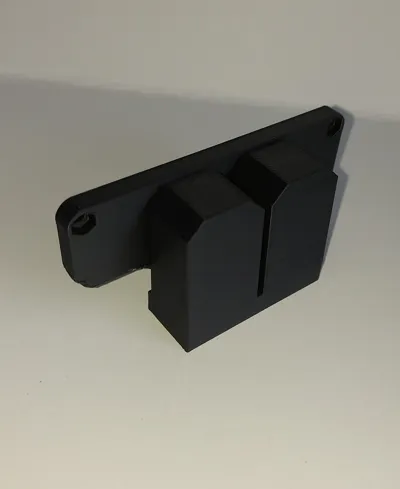
Buffer Relocation Holder for AMS (It Can Reduce multi-color print time by 35% +)
This clip-on buffer holder is designed to work with AMS, offering an easy way to optimize your 3D printing setup. By shortening the Bowden tube, this design significantly reduces the filament's travel distance. This helps to dramatically cut down on filament loading and unloading times during Especially multicolor prints, leading to substantial savings in overall print time and power consumption.
Easy Photographic Assembly file attached here in pdf format.
Required Materials:
- Screws: 2 x M3x25 mm socket head screws (replace your original screws)
- Nuts: 2 x M3 hex nuts
- PTFE Tubing: (This is Most optimized length)
- 140 mm length (4 mm OD x 2 mm ID) for the AMS-to-buffer connection
180 mm length (4 mm OD x 2 mm ID) for the buffer-to-extruder connection
- Compatibility Note: This holder is not compatible with setups using a flipper-type riser. This design avoids the repeated bending of wires that can lead to failure over time.
Boost Me (for free)
Dear Community,
I dedicate significant time and effort to designing and printing models, refining them until they achieve success. If you appreciate my work, I kindly ask you to value my time by boosting my models, providing feedback, and liking my designs. Your support can help me earn credits for Bambu Lab gift cards, which I will use for further development.
Thank you for your motivation and kind support!
Best regards
FortuneAU
Assembly Instructions for the Buffer Holder
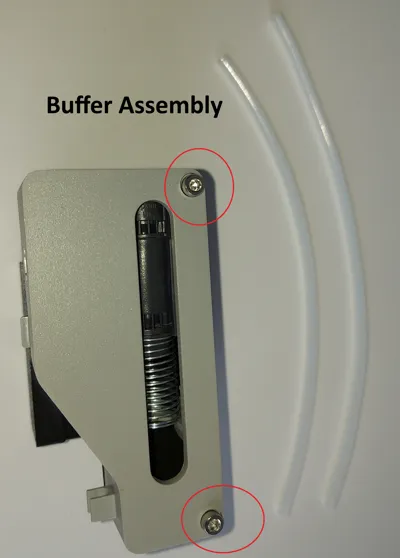
- Install the Hex Nuts: Press the two M3 hex nuts into the hexagonal cavities on the 3D-printed part.
- Attach the Buffer Unit: Place the white buffer unit against the printed holder. Use the two M3x25 mm screws to secure it by driving the screws through the holder and into the hex nuts.
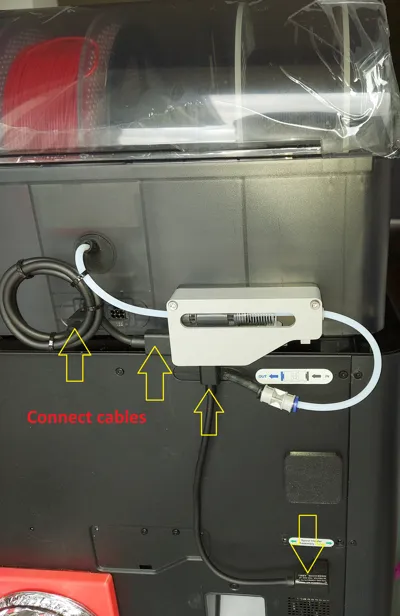
- Mount the Assembly to the AMS: On the bottom of the AMS unit, locate the mounting cavity on the left rear side. Align the slit on your assembled part with the support fin on the AMS and push the holder all the way up until it is securely in place.
- Connect the PTFE Tubing:
- AMS to Buffer: Use the 140 mm length of PTFE tubing (4 mm OD x 2 mm ID) to connect the AMS unit to the buffer.
- Buffer to Extruder: Use the 180 mm length of PTFE tubing (4 mm OD x 2 mm ID) to connect the buffer to the extruder.
Cheers!
Documentation (2)

License
You shall not share, sub-license, sell, rent, host, transfer, or distribute in any way the digital or 3D printed versions of this object, nor any other derivative work of this object in its digital or physical format (including - but not limited to - remixes of this object, and hosting on other digital platforms). The objects may not be used without permission in any way whatsoever in which you charge money, or collect fees.
Comment & Rating (9)