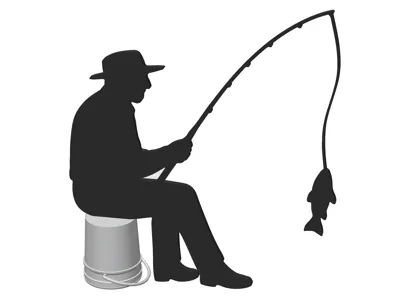
Fisherman Silhouette


Print Profile(1)

Description
A tribute to our family's fisherman patriarch ("Papa").
The model comes in 3 pieces: a flat silhouette, round bucket, and bucket handle.
Sizes
Small: 126mm (~5") wide x 140mm (~5.5") tall
Large: 180mm (~7") wide x 200mm (~7.9") tall
A1 Mini note: the large model is too big for the A1 Mini, but the small model works. All other Bambu printers work, and so should any other brand with a 200mm or larger build plate.
I don't recommend scaling the models much, as the tab and slot may not stay in proportion.
Print Settings
The Bambu .3mf profile is ready to print as-is, but here are some recommended settings for printing the STL files.
This was tested with a 0.4mm nozzle. I assume 0.2mm will also work, but 0.6 or 0.8 would probably lose details or create rounding errors on the thin areas.
- Silhouette
- Layer height: 0.20mm
- Infill: 15% rectilinear
- Top & Bottom Shells: 5
- Ironing (optional)
- Top surfaces
- Rectilinear
- 65mm/s speed
- 22% ironing flow
- Bucket and Handle
- Layer height: 0.20mm
- Infill: 100% rectilinear
- Top & Bottom Shells: 5
- Seam position: Back (with the handle holes facing left & right)
- Ironing (optional, same as Silhouette above)
Notes:
100% infill on the bucket is to add weight to the model so it doesn't tip over as easily.
Ironing the top is optional. The model can face either direction after printing, so if your build plate adds a texture/pattern that you like to the “bottom,” that can become the visible side when finished.
In the included profile, there's an extra modifier that makes the “tab” on the bottom of the silhouette have solid infill, but this is not necessary.
Assembly
- The handle is flexible and will clip into the holes on the side of the bucket.
- The silhouette has a tab that inserts into the bucket's top.
- All parts fit loosely, so a dab of super glue or hot glue should keep it all together.
- Recommendation: you can partially hide the seam in the bucket by turning the bucket so the seam faces the legs, not the back.

Comment & Rating (1)