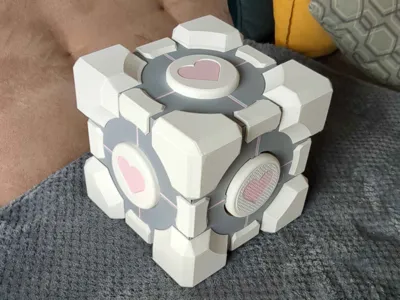
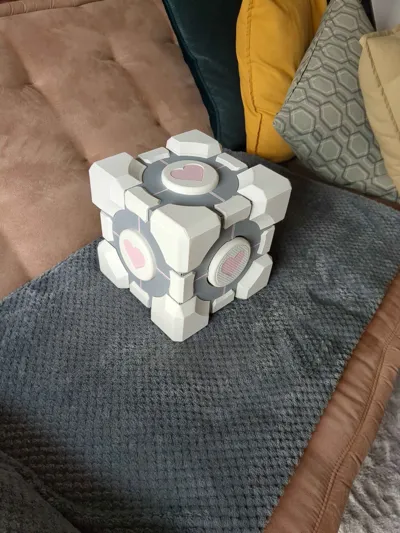
Companion Cube NAS


Print Profile(1)

Bill of Materials


Description

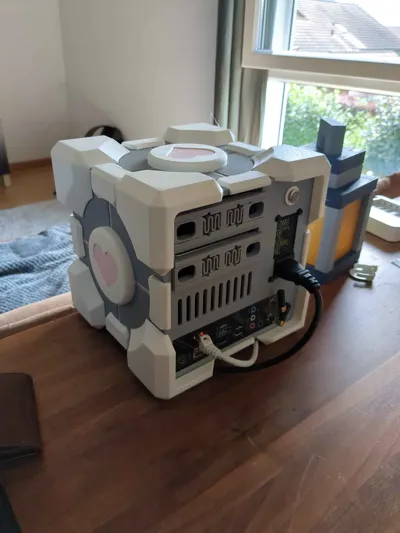
The Portal NAS Case is a PC Case blending the iconic design of the Portal Companion Cube with the functionality of a Network Attached Storage (NAS) case. Fully 3D printed, this enclosure offers a distinctive aesthetic while being practical and modular. Its approximate dimensions are 220mm x 220mm x 220mm.
The case has been printed with a 0.6mm nozzle.
Features
- Support-Free Printing: Designed to be printed without the need for external support structures, simplifying the printing process and reducing post-processing.
- 2x HDD Hotswap Bays: Easily access and swap your hard drives without having to power down your system.
- "Transparent" Design Aesthetic: The interlocking design of the pieces effectively hides many assembly seams.
- Modular Interior Compartment: A flexible interior space allows you to adapt the case for your specific needs, whether for cable management, additional SSDs, or other accessories.
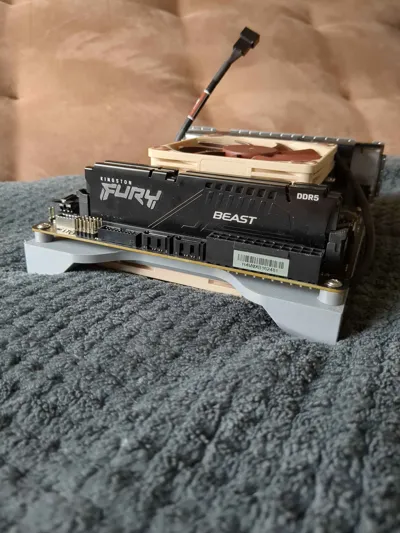
- Independent Motherboard Tray: A dedicated tray for your Mini-ITX motherboard with support for a 120mm fan. This tray is detachable, enabling the creation of alternative versions for different component sizes or configurations.
- Easy Front Fan Access: The front panel features a magnetic mounting system for the fan, allowing for quick, tool-free removal and cleaning.
What You'll Print
You will need to print all the .stl files provided in this download to assemble the complete case. The filament used is your choice, but Rose PLA, White PLA, and Grey PETG are recommended for the suggested aesthetic.
There is also a .3mf file avaliable
Required Hardware
Tools Needed
- 3D printer capable of printing a minimum volume of 208mm x 208mm x 208mm.
- Soldering iron (for installing M3 heat-set inserts).
- Screwdriver appropriate for the screw sizes used (M3, PC fan screws, HDD screws).
Materials for Assembly
Some have been added in the Bambu materials, so its this list + the one from bambu's supplies below
| Type | Components | Additional Information | Quantity (Recommended) |
|---|---|---|---|
| Screws | PC Fan Screws | For attaching fans to their mounts | 18x |
| Screws | 3.5" HDD Screws | For mounting hard drives (ensure you have the correct length) | 8x (4 per HDD) or 12x (6 per HDD), depending on your drives |
| Fan | 92mm x 14mm Fan | For the main case cooling (check compatibility) | 1x |
| Fan | 120mm x 15mm Fan | For the motherboard tray cooling | 1x |
| Adapter | SATA Angled adapter | For the hotswappable brackets | 2x |
| Cables | SATA Cable | For connecting the drives to Motherboard, get ones with a small head so it doesnt touch the printed brackets | |
| Motherboard | Mini-ITX Motherboard | Standard form factor for the case | 1x |
| CPU Cooler | Max Height 40mm | To ensure clearance within the case with the tray and top panel | 1x |
| Power Supply | Flex-ATX Power Supply | Compact form factor suitable for NAS builds | 1x |
| Storage | 3.5" Hard Drives | For data storage | 2x |
| Button | External Power Button (12mm) | For system activation (12 | 1x |
| Adhesive | Glue | Glue that glues well plastic together | 1x |
Assembly
After printing everything and having everything mentionned above we can start the build
Chassis
We're going to start with the biggest printable piece of the project Wich is the chassis.
Task 1 - HDD Hotswap function
- Mount the HDD angled brackets (2 brackets with each 2 fan screws) (it clips in) into the adapter and screw it to the chassis.

Task 2 - TPU Feet + Magnet insertion
- Mount the TPU feet to the bottom of the case and insert the magnets to the chassis, you can push the magnets in, the magnet clips in the piece after pushing it inside.

Task 3 - Power Button
- Mount the button adapter in the back of the case
The button can be modified to be adapted to the needed size of course - 🔵🔵The button is force pushed into the chassis, it holds there by itself, if not, use glue
- 🔵🔵 If you buy the same button as me, it self-tapes itself into the button adapter print.

- 🔵🔵 It is recommended that cable of the button gets routed through the wall hole to go down to the motherboard

Task 4 - PSU
- Add the PSU to the case
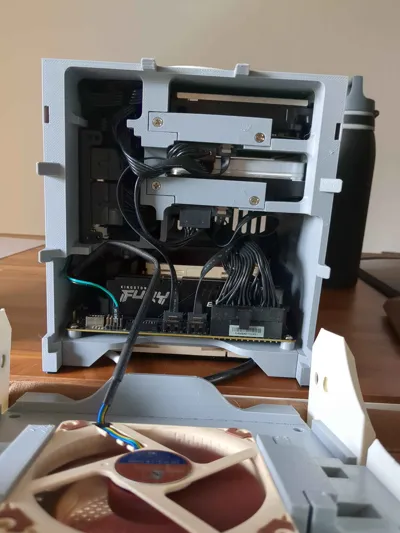
- 🔵🔵 The slot on the side of the PSU is made to hide the cables, a hole at the back of the interior is there to route the CPU + Motherboard cables. The SATA cables shouldnt pass there, you can look at the interior picture from the photos on the top of this page.

Task 5 - Pink stripes
- Glue the pink stripes to the case (Normal & angled stripes)
- 🔴🔴 Look closely into the image to see wich ones go where (or logic also).

Task 6 - Middle edge pieces
- Glue and clip the pieces onto the chassis

Task 7 - Corner pieces
- Glue and clip the pieces onto the chassis.
- 🔵🔵 The top heart face has a different orientation compared to the side faces, check before gluing.

Task 8 - Pink hearts
- Glue the hearts onto the chassis and the heart faces.

HDD Cages
Next we have the HDD Cages, per cage there are 6 TPU Screw washers, for a total of 12.
Task 1 - TPU Washers
- Add the washers to the cage.
- 🔵🔵 to know wich side to slide it in, Check the profile of the TPU washer and compare it to the hole of the HDD Cage, they should match.

Task 2 - Screwing the HDD
- Slide in the disk first and screw it through the washers
- ‼If you only have 4 screws DO NOT skip the ones on the left of the image! the cage will slide with the disk!

Motherboard Tray
The Tray assembly is the only piece where a soldering iron is needed
Task 1 - Assembly
- Add the M3 Inserts the motherboard tray.
- (Optional) Screw the 120mm fan between the motherboard tray and washers.
- 🔵🔵 A closed motherboard tray is also avaliable to print.

Task 2 - Motherboard screw-in (Illustration WIP)
- Mount the motherboard with the M3 screws on top the completed piece
- ❔Sorry, i didn't find a good motherboard to show, it will be updated in the future, sorry in advance

Front panel
Now, we have to do the front panel to do, the front panel has most of the pieces glued to it, the fonctionnal ones have a fan screw involved (The white corner pieces + the fan clamp).
Task 1 - Pink stripes
- Glue the pink stripes (the rectangular thinner ones)

Task 2 - Middle white pieces
- Glue the white pieces on the middle of the 4 sides, there are 3 pieces that have a totaly flat side without nothing except the one on the lower edge that clips in (must also be glued).

Task 3 - Magnet insertion
- Add the magnets to the corner pieces, you can push the magnets in, the magnet clips in the piece after pushing it inside.
- 🔵🔵 This is the lower front corner piece, the top one has the same magnet insertion mecanism, this task also applies for the top front corner.
- 🔴🔴 Make sure the magnet is in the right orientation for it to be attracted by the other one!

Task 4 - Corner pieces
- Screw (with 4x fan screws) and glue the corner pieces

Task 5 - Front fan filter
- Glue and connect the following pieces together

- Glue the pink heart to the pieces.
- 🔵🔵Put the glue on the borders of the heart and push it in.

Task 6 - Front filter heart
- Glue the heart to the front.

Task 7 - Front fan setup
- Add the fan clamp first and the fan after.

Task 8 - Front fan locking
- Add the screws to clamp the fan, the screws will push the fan clamp against the fan.

Final assembly
The final assembly consist of mounting the pieces you've put together from this little manual.
Task 1 - Motherboard tray to Interior chassis.
- Connect the PSU Cables to the motherboard and slide the motherboard tray into the chassis.

- Screw the 2 fan screws on the sides to the motherboard tray to hold it in place.

Task 2 - Front panel to chassis
- Connect the front fan to the motherboard and simply put it in place, the magnets will hold the face together.

Task 3 - HDD Drives to chassis (seems obvious at this point)
- Slide the HDD cages into the chassis

The end
I hope you enjoyed building this case, if you have feedback about the building process or some pieces, ill be checking the comments for a moment!
PS: This has been written at 2AM and probably posted on reddit at 3AM, i might have to do some corrections on the texts etc…
Credits
I used some 3D models for the illustrations here are the sources for them
- Valve for making Portal ❤
- Martin Csanaki - Noctua NF-A12-15
- Martin Csanaki - Noctua NF-A9-14
- Western Digital HDD - To be found, forgot to keep the source, if someone knows who made it, i would appreciate adding him here!
Comment & Rating (26)