Universal Phone Holder with Ball Joint


Print Profile(1)
Description
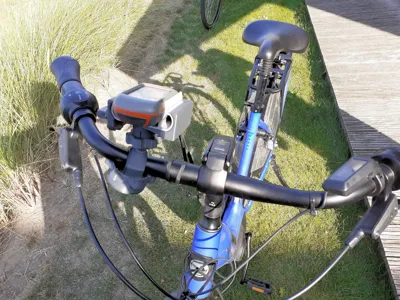
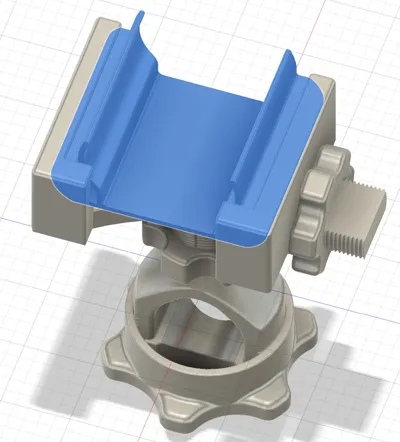
Universal Bike Phone Mount
I designed this bicycle phone holder to mount my phone on any rental bike while on vacation. No tools required and no scratches left behind.
Jaw width: 73 – 92 mm, height: 23 mm.
Handlebar diameter: 23—32 mm
The ball joint is just tight enough to hold the weight of a regular phone while still allowing the nut to be turned by hand.
As material, I used ASA. Other materials should also work, except for the clamping screw. The clamping screw should be printed with ABS or ASA, since it needs to be glued and must remain both elastic and strong.
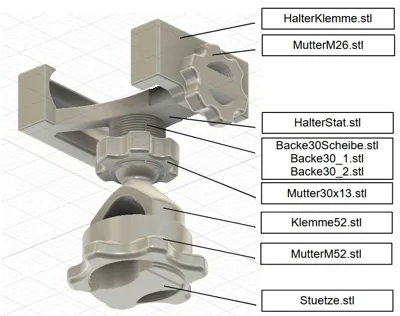
Parts

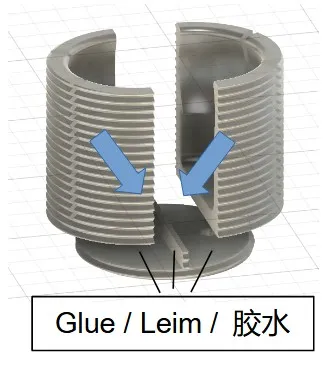
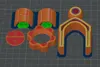
Clamping Screw of ball joint
Files: Backe30Scheibe.stl, Backe30_1.stl, Backe30_2.stl
The clamping screw of the ball joint requires manual work and glue, as it must be printed axially; otherwise, the thread will break along the layers. To ensure the thread prints with the best possible resolution, I split the model into three parts that need to be glued together.
Printing:
Print with 0.12 mm layer height, support, and at least 5 wall loops to ensure 100% concentric infill.
Assembly of the Clamping Screw
When assembling, make sure the two halves are aligned correctly with the washer, otherwise the thread will not work. In addition, no glue should get onto the thread.
To facilitate tightening of the M30 nut, a small amount of silicone oil may be applied to the thread. However, it must be applied strictly to the thread only – and absolutely not to the ball head socket!
Print Settings
- nozzle diameter: 0,4 mm
- files: Backe30_1.stl, Backe30_2.stl, Backe30Scheibe.stl
see print chapter of clamping screw - files: HalterKlemme.stl, HalterStat.stl, Mutter30x13.stl, MutterM26.stl
0.12 mm layer height, 4 wall loops, 15 % infill - files: Klemme52.stl, MutterM52.stl
0.12 mm layer height, 6 wall loops, 25 % infill, 5 mm brim - files: Stuetze.stl, Dakota20Adapter.stl
0,2 mm layer height, 3 wall loops, 15 % infill
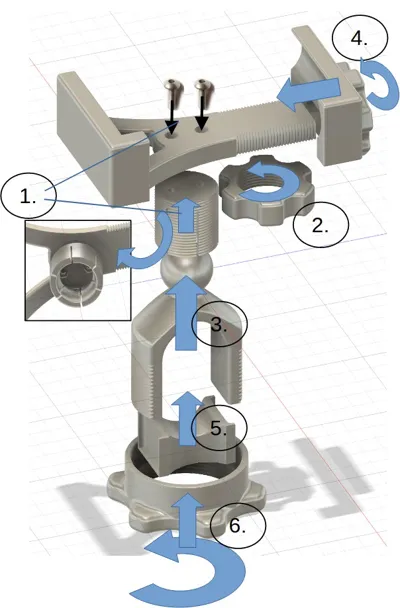
Assembly of Phone Holder

- Fasten the assembled clamping screw (Backe30*.stl) to the holder (HalterStat.stl) using 2 M3x10 pan head screws and 2 M3 nuts.
- Screw the M30x13 nut (Mutter30x13.stl) onto the clamping screw until it reaches the holder. If necessary, apply a small amount of silicone oil to the thread to improve smoothness.
- Insert the ball head (Klemme52.stl) into the clamping screw (Backe30*.stl).
- Slide the clamp jaw (HalterKlemme.stl) onto the holder (HalterStat.stl) and secure it with the M26 nut (MutterM26.stl).
Mounting on Handlebar
5. Position the ball head (Klemme52.stl) of the smartphone holder over the handlebar and fit the support (Stuetze.stl) onto it.
6. Place the M52 nut vertically and tighten. Ensure proper right-angle alignment. For handlebars with a 23 mm diameter, the thread of the M52 nut should face downward; for larger diameters, it should face upward.

Garmin Dakota20 Adapter
File: Dakota20Adapter.stl
Adapter for mounting Garmin Dakota20 into this holder.

License
You shall not share, sub-license, sell, rent, host, transfer, or distribute in any way the digital or 3D printed versions of this object, nor any other derivative work of this object in its digital or physical format (including - but not limited to - remixes of this object, and hosting on other digital platforms). The objects may not be used without permission in any way whatsoever in which you charge money, or collect fees.
Comment & Rating (7)