Search models, users, collections, and posts

Microlab 2 - Mini Modular Home Server Rack

Print Profile(1)

All
P1S
X1
H2D
A1
P1P
H2D Pro
X1E
H2S
X1 Carbon
P2S
H2C
X2D
A2L

0.2mm layer, 2 walls, 15% infill
Designer
65.5 h
36 plates
5.0(24)

Open in Bambu Studio
Boost
523
1465
127
60
802
220
Released 

Bill of Materials

Maker's Supply Kits and Parts
Select all
M3 Carbon Steel Hex Nut (20PCS) - AB005
D8x3 mm Round Magnet (20PCS) - CA008

Description

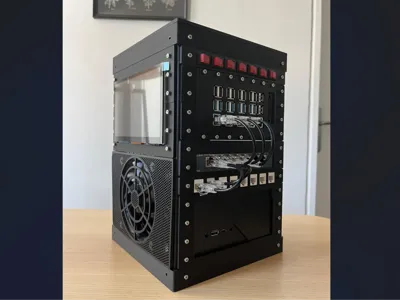
Microlab 2 — Modular 3D-Printable Mini Homelab

Microlab 2 is a fully modular, open-source mini-rack system designed for makers, homelab enthusiasts, and anyone who wants a compact, customizable workspace for electronics or servers.
Unlike common 10″ racks, Microlab 2 is:

  • Compact & Square – Small footprint, flexible orientation.
  • Fully Modular – Columns, caps, trays, and panels snap together with M3 screws or magnets.
  • 100% 3D-Printable – Print the entire project with just a couple of PLA rolls.
  • Open & Hackable – Build trays and panels for Raspberry Pi, SATA drives, fans, screens, buttons, switches, and more.

Key Features

  • Scalable frame: Start with 6U and extend vertically as needed.
  • Universal panel standard: Any panel or tray can be mounted on any side.
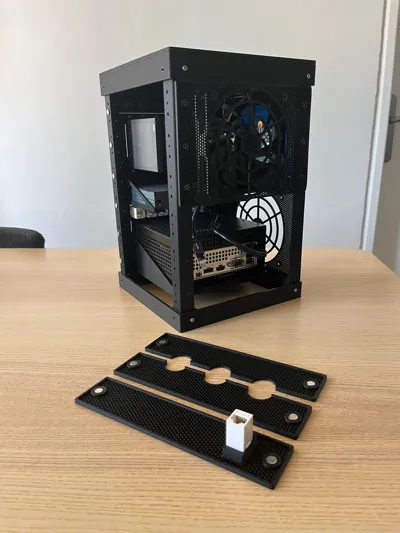
  • Cooling options: Perforated panels, magnetic fan mounts, and vertical airflow support.
  • Accessory ecosystem: Mini-trays for SBCs and 2.5″ drives, panels for keystones, switches, rotary encoders, and displays up to 7″.
  • Magnetic or screw-mounted side panels for quick swaps.

Printing & Assembly

  • Print the columns, caps, and trays in PLA or PETG.
  • Use standard M3 screws and nuts (optional 8×3 mm magnets for tool-less panels).
  • All files are modular — you only print what you need.

Materials

  • M3x10 or M3x12 screws & nuts
    • Minimum: ~32 pairs (all magnetic panels)
    • Full 6U build: ~112 pairs
    • Large setups (e.g., 6U+4U extension): ~160–180 pairs
  • Optional: 8×3 mm magnets (4 per 1U panel) for magnetic mounting

Tip: Glue the magnets and let the adhesive dry before attaching panels. Make sure all magnets share the same polarity for maximum flexibility.
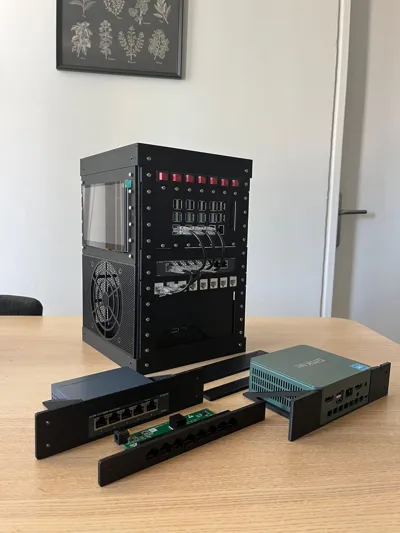
Example Use Cases

  • Raspberry Pi clusters or NAS builds
  • Compact home servers and firewalls
  • Network switch + mini PC combos
  • Sensor dashboards, HMI, or DIY control panels

More info: https://github.com/canberkdurmus/microlab-2


Boost Me (for free)

This project is fully open-source. You can support my work by boosting this model. Thanks!


Comment & Rating (127)

(0/1000)

Print Profile
0.2mm layer, 2 walls, 15% infill
It worked! The Japanese TL-SG105 seems to be a slightly different size. I fixed it myself.
The profile uploader has replied
profile
1
Reply
Wow looks great in white! Also I love the idea of having patches next to the switch. Thanks for sharing!
(Edited)
1
Reply
Replying to @CB4D :
It fits perfectly under the printer. My next task is to organize the cables.
0
Reply
would you be willing to share the file to that? its really cool and i would benefit greatly from it
0
Reply
Print Profile
0.2mm layer, 2 walls, 15% infill
Nice project. And thanks to stp file I was able to adapt to my needs. Great Job. 👍
The profile uploader has replied
profile
2
Reply
It’s nice to see such great builds! Thanks
(Edited)
1
Reply
Is that the filament for the yellow/green slot? ( sry red green colorblind not sure which) or did you like spray paint it to get the "splatter"
0
Reply
Replying to @strongerthanall :
No, it was fault of my plate (not original bambu), it leaves part of its black coating. It was a test but at the end it came out with a nice effect
0
Reply
Really nice project. Designed a lot of my own parts and I was really happy with the results. My switch was unfortunately too wide but I printed too much to change lol. It's not fully complete yet but this was very fun to make. 10/10
The designer has replied
designer
2
Reply
Thank you! It looks cool!
0
Reply
It may be a known issue, but it interferes with the power connector on the pi4. (I'll fix it myself.)
The designer has replied
designer
1
Reply
Hi, it’s a headphone jack.
1
Reply
Replying to @CB4D :
Thank you! It was my mistake. I will modify it so that it can be inserted. I have finished printing the frames and am now printing each tray.
designer
1
Reply
Boosted
Print Profile
0.2mm layer, 2 walls, 15% infill
I recently got myself a bigger printer so i thought i would upgrade my homelab from the smaller Microlab to Microlab 2. And it made all the difference. i got a couple pf SBCs running OMV, Home Assistant, PieHole and such. Also made a HDD-tray based on a couple of Phanteks HDD-slider trays i had laying around. (Not done with it yet, the one in the pics is just a test print.) And two gigabit switches, one with PoE so run the SBCs and one regular. Planning on expanding it to add a Ubiquiti Cloud Gateway Ultra to replace my current router. Thanks for sharing your models and i guess this is gonna be a work in progress permanently, because one cannot simply be satisfied you know haha.
The profile uploader has replied
profile
2
Reply
This looks amazing! Thanks for sharing your build!
0
Reply
Great project, I am very happy to have made it. Thanks to the designer, it is truly excellent I greatly appreciated the colors of V1 with the space and flexibility of V2 so I made a small mix For the front panel, I modeled this small screen support for monitoring I will upload the part if needed Thanks again and long live open source and FDM
(Edited)
The designer has replied
Show original
2
Reply
Merci !
0
Reply
Print Profile
0.2mm layer, 2 walls, 15% infill
I love my Microlab 2 rack. It's a great conversation piece and has been a catalyst for my own personal technology projects. I opted to put fans at the "top" and "bottom", so it lays sideways. My rack essentially functions as a home web data center. I put NPM (Nginx) on a Raspberry Pi then proceeded to create an entire CICD system with Pis and an Intel NUC, using Docker, HashiCorp Vault, Cloudflare, Sql Server among other tools. Probably the biggest win is my RaspberryPi hosting a Pi-Hole server. I truly love the design and the compact size actually helps keep things cooler with the two fans. One little issue, I wish there were more designs for more devices. For example I just got a GFiber upgrade and want to upgrade my 8 port switch to a 2.5G switch but they're different sizes.
The profile uploader has replied
profile
1
Reply
It feels great to hear all these kind words, thanks you very much! I did my best to draw for everything I could find. The design is all open, you can find the STEP files in github and develop your own trays. Please don’t hesitate to share as remixes! Thanks again!
0
Reply
Boosted
Great print, easy to build and clearly passionate designer
The designer has replied
designer
1
Reply
Your build looks great, thank you!
0
Reply
I’ve gone through a couple of iterations and everything is starting to come together. I’ve made a couple of changes and updates. There’s a pull request with one of them. I can push more up if you’re interested.
The designer has replied
designer
1
Reply
Hi it looks great, all pull requests and remixes are welcome! Thanks for sharing
0
Reply
do you have a link to the display you’re using? my 7” touch screen doesn’t align with the anchor points of the brackets in a way that fits the 3U design its intended for.
The designer has replied
0
Reply
Hi, here it is: https://a.aliexpress.com/_c4WIXYTB I think it has the same dimensions as the Waveshare display which is a very common model I think.
(Edited)
2
Reply
Replying to @CB4D :
thank you!
0
Reply