Ikea Sink Strainer Gasket


Print Profile(0)
Description
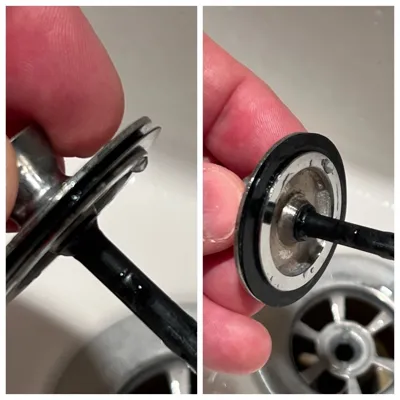
The IKEA Ensen faucet (and other models) comes with a sink drain plug or strainer. This is presumably because the faucet itself does not have a drain pull mechanism, so they give you a matching drain plug designed to be pushed in or pulled out directly.
While this solution is fine, it does require that the drain filter basket makes a good seal when pressed in. That seal relies upon a rubber ring that is attached to the plug. It sits into a thin recess.
The problem with this setup is that the rubber seal degrades over time. I don’t know if it is made of silicone or some other rubber formulation, but after a year or so of daily sink use, whether the stopper strainer is used or not, the little ring gasket starts to deform and falls apart. It may not be a problem until you decide to fill the sink and realize it does not keep water from draining.
Print Settings
Printer:
Prusa Mini+
Rafts:
No
Supports:
No
Resolution:
.15
Infill:
100
Filament: Overture TPU black
Notes:
Printed using a Prusa Mini+
Overture TPU black
Used Prusa Slicer, starting wth the Generic FLEX filament profile that I simply updated to use 225 nozzle temp. It also has a 50 degree print bed temp.
I used the smooth print plate, concentric top and bottom infill.
This was my first attempt at using TPU on the Mini+ and I’d say it worked better than expected! Stringing is a potential problem, but for this model it does not really affect the print.
I set the infill to concentric to give circular strength to the print. 100% infill prevents any voids, though this is rather small to begin with.
Post-Printing =============
After the print, I trimmed the string leading up to the object from the single layer skirt line, and the one leading away as the print finished. These are easily pulled off by hand or trimmed with a side cutter.
After printing several, some of them have a tiny nub left where the final extrusion ended. Others had a blob on the inside rim, probably from the first layer. These can be carefully sliced off using a very sharp razor blade.
To attach the new gasket ring to the strainer/plug, snap it over the lip from the bottom with the wider, flat side oriented down. You may need to run your fingernail around the inside of the lip to tuck the gasket in past the metal flange. It should sit neatly into the groove with the thin rim protruding straight out.
I tested this for a half hour while I worked on something else to see if a sink full of hot water could be contained with the plug pressed in and my new gasket making the seal. It worked perfectly. Who knows how long it will last, but since these are impossible to find (IKEA won’t sell spares or give them to you, those bastards), I can always print more.
How I Designed This
This was deigned in TinkerCAD in about 30 minutes, then refined slightly to get a good fit. The dimensions came directly from the parts manifest from IKEA customer service desk: 39.4mm OD, 4.5mm width. I measured 1.5mm height where it attaches to get a snug fit. The original has four bevels but this makes printing problematic, so I only have one bevel from the outside rim to the elevated section. This gives strength where it bends, and flexibility to the outside edge where it deforms to seal the drain.
Category: Bathroom
Comment & Rating (3)