Custom Water Slide Poop Chute - P1, P2, X1, X2, H2


Print Profile(6)


Description
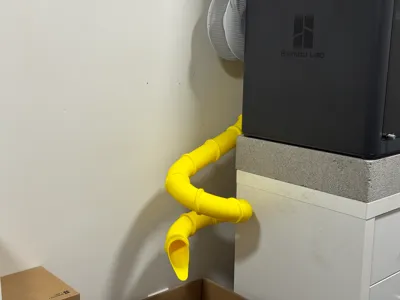
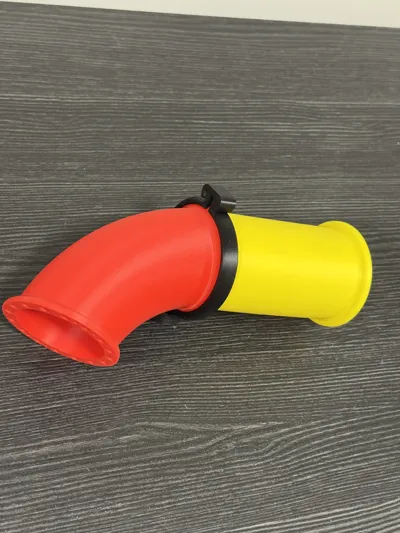
This is the ultimate poop chute. It's infinitely customizable, works perfectly, and most importantly FUN! I've always wanted a poop chute that would dump my printer poop directly into my garbage but I could never find one that dumped exactly where I needed. When I had the idea to make it like a waterslide with a handful of pieces that could be connected, I knew I had to create it!
The poop chute attaches using the two existing screws above and below the poop chute. It does not get in the way of any cables/tubing and still allows use of the external spool holder.
Compatible with:
- P1S, P2S, X1C - Uses the main attachment piece
- X2D - Uses the X2D specific attachment piece in the `All Pieces` profile on the X2D Attachment Pieces plate. Slightly modified to accommodate the filter and different screw spacing.
- H2S, H2D, H2C - Uses the H2 specific attachment pieces in the `All Pieces` profile on the H2 Attachment Pieces plate. Both pieces are enlarged to fit the larger opening.
A word about clogging
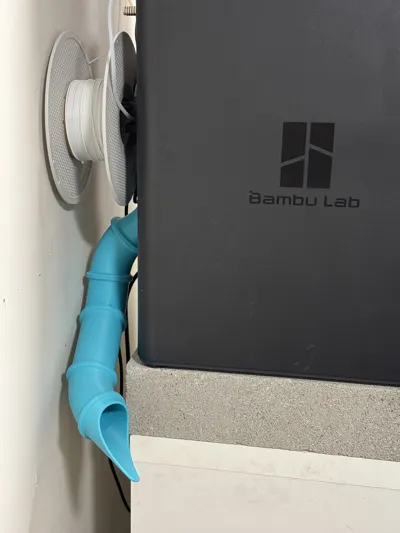
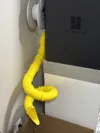
Edit: After realizing how much concern there was about clogging, I have added a full set of steeper non-planar pieces which are steep enough that filament cannot get stuck. The regular nonplanar pieces are not quite steep enough and on occasion poops will stop on the slide mid way. Using the steeper pieces will resolve this.
Steeper slides (blue one) should never clog, however, slides that aren't as steep (yellow one) can get backed up from a lot of filament swaps and cause issues if left unattended. If you print large prints with lots of filament swaps, make sure you either have a steep slide like the blue one or make sure to check that the slide is clear every few hours.
To test clogging, I ran a 30 hour print with 1,600 filament swaps using the yellow slide and it did clog after ~1,400 swaps and 28 hours, but this would have been easily avoided if I had simply cleared out the slide by giving it a slight wiggle. I intentionally avoided clearing out the slide to see if it would clog and eventually it did eventuall back up all the way and my print paused because the toolhead cover popped off. I quickly cleared the slide and resumed the print and everything worked out fine.
Connecting pieces
When building slides, there are multiple ways of connecting pieces. There is a clamp and lock piece that you can print for connecting any pieces. These work great especially because they are easily removable. There are multiple sizes of lock pieces if needed depending on printing tolerances. This makes prototyping slides super convenient as you can test different connections and slide shapes. This is also a great option if you want to be able to disassemble your slide for any reason.
If you want a more finished looking slide and prefer the look without clamps, super glue works great. Some people in the comments have also plastic welded them together using a soldering iron or 3D pen and had a lot of success.
All pieces have 16 different alignment points to help properly align them. This allows pieces to be connected at 16 different angles while still having positive stopping points for perfect alignment. There are also two small notches on the top and bottom to help align pieces and keep them straight if desired.
Suggested Poop Chutes
I have created two specific print profiles with exactly the pieces that I used for the two different poop chute slides in the pictures. There are detailed instructions for these in the print profile descriptions.
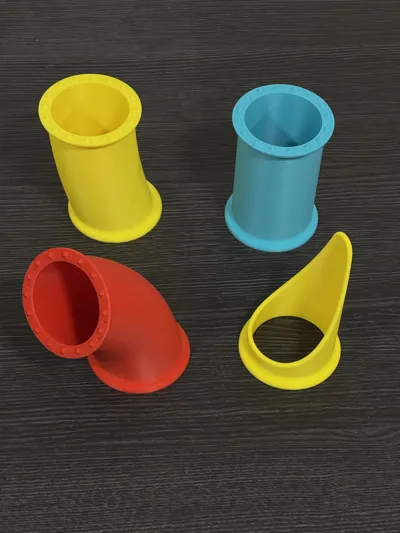
Pieces
There are quite a few different pieces, specifically some planar and some non-planar pieces. I have a detailed mathy explanation of the difference below for those interested but if you just want to make fun slides, I would highly recommend to stick with just the planar pieces, specifically the straight piece, the planar 30°, 45°, and 60° pieces, and a chute end piece. In fact, this is exactly how custom tubes are made in vehicles such as custom headers or custom exhausts. A bunch of short curved sections are connected, each one rated slightly to create a completely custom curve. While the majority of the pieces are non-planar, non-planar pieces are exclusively for creating a downward spiral helix like the yellow slide. For any custom slides that do not have a downward spiral use only the planar pieces.
Pieces
Planar Pieces:
- straight: A straight section (also available in ½, ⅓, and ¼ length for fine tuning)
- planar_30: A 30° planar curve
- planar_45: A 45° planar curve
- planar_60: A 60° planar curve
- planar_chute_end: A fun chute end piece.
- end_male: A smooth cap with male alignment pins.
- end_female: A smooth cap with female alignment cutouts.
Poop Chute Attachment Pieces:
- poop_chute_attachment: A specific attachment piece for attaching to the P1P, P1S, or X1C poop chute using the existing screws.
- planar_45_w_poop_chute_mounting_cutouts: A planar 45° piece with cutouts. The cutouts allow the lower mounting screw to be reached. Once a slide is glue together, the lower mounting screw cannot be accessed otherwise.
Nonplanar Pieces - Helix:
- helix_60_counterclockwise: A 60° section of a helix that spirals counterclockwise downwards.
- helix_45_counterclockwise: A 45° section of a helix that spirals counterclockwise downwards.
- helix_60_clockwise: A 60° section of a helix that spirals clockwise downwards.
- helix_45_clockwise: A 45° section of a helix that spirals clockwise downwards.
- sloped: A straight section with the same slope as the helix pieces.
- nonplanar_chute_end: A fun chute end piece with the same slope as the helix pieces.
Planar to Nonplanar Connecting Pieces:
- planar_female_to_nonplanar_male: Connecting piece for transitioning from planar to nonplanar pieces.
- nonplanar_female_to_planar_male: Connecting piece for transitioning from nonplanar to planar pieces.
- planar_45_to_nonplanar: Connecting piece for transitioning from planar 45 to nonplanar pieces. A more compact version of a planar 45° and a planar_female_to_nonplanar_male.
Couplers
- double_45_y: A Y shaped coupler joining two 45° sections.
There are also steep versions of all nonplanar and planar to nonplanar connecting pieces.
Use the regular non-planar pieces if you want to limit the vertical drop of your slide. Use the steeper pieces if clogging is a concern and you have space for the vertical drop.
Detailed Planar vs. Non-Planar Explanation
Each piece is effectively defined by a curve or line that goes through the center of each piece. For the planar pieces, their curves are planar, meaning the curves are 2-dimensional. The curve for the straight piece is simply a straight line. The curves for the 45° and 60° pieces are simply 1/8th and 1/6th of a circle. If you connected 8 of the 45° degree pieces or 6 of the 60° pieces without rotating them, you would get a perfect closed loop circle.
The curves for the non-planar helix pieces are 3-dimensional and cannot be drawn or represented in only 2-dimensions. This is what non-planar means. This means that there is a difference between a clockwise and couterclockwise curved piece.
One of the big differences between the planar and non-planar pieces is that the curves for the planar pieces are orthogonal/perpendicular to their ends. In more practical terms, imagine a planar piece had one end up against a wall. Imagine a person going down that slide or perhaps a small marble rolling down the slide. When they hit the wall, they would slide/roll directly into the wall. For any of the planar pieces, they would actually slide/roll into the wall at an angle, not straight into the wall. The result of this is that connecting a planar piece to a non-planar piece results in a slide that is not smooth. It will have a sharp angle. If you imagine an invisible curtain between the two pieces, exiting a planar piece, you would go straight through the curtain, but as you passed through the curtain into the non-planar piece, the slide would be at a weird angle causing you to either hit a bump, or possible catch a little air.
Another consideration is that planar pieces will create a smooth path no matter how they are oriented or rotated. The non-planar pieces on the other hand MUST be perfectly oriented, both in relationship to each other as well as to the world to create a smooth downward spiral and any deviation will throw everything else off. So you need to be very careful when using the non-planar pieces, but if you do it correctly, the results are AWESOME!
If you ever need to transition from planar to non-planar pieces, (the poop chute attachment its planar, you MUST use one of the planar to non-planar connecting pieces to get a smooth slide. The yellow poop chute with a loop uses the 45° planar to non-planar connector. This is effectively the same as using two planar 45° pieces and a straight to sloped (planar to non-planar) connecting piece, it is just a lot more compact and better for making sure filament keeps moving along and doesn't get stuck on any flat parts.
If you have any ideas or suggestions let me know. The connecting clamps were an idea from a comment that greatly improved this model!
Boost Me (for free)
Printing should be fun and floors should be clean!
License
You shall not share, sub-license, sell, rent, host, transfer, or distribute in any way the digital or 3D printed versions of this object, nor any other derivative work of this object in its digital or physical format (including - but not limited to - remixes of this object, and hosting on other digital platforms). The objects may not be used without permission in any way whatsoever in which you charge money, or collect fees.
Comment & Rating (684)