Search models, users, collections, and posts

Pyraminx/Pyramid Puzzle

GIF

Print Profile(2)

All
A1 mini
H2D
P2S
X1 Carbon
H2D Pro
X1E
P1S
X1
H2S
P1P
A1
H2C
X2D
A2L

Pyraminx Parts
Pyraminx Parts
Designer
5.7 h
5 plates
4.4(30)

0.24mm layer, 3 walls, 20% infill
3.5 h
2 plates
2.0(1)

Open in Bambu Studio
Boost
447
899
102
33
862
401
Released 

Bill of Materials

Bambu Filaments
Select all
Jade White (10100) / Refill / 1kg
Red (10200) / Refill / 1kg
Blue (10601) / Refill / 1kg
Bambu Green (10501) / Filament with spool / 1kg
Yellow (10400) / Refill / 1kg

Description

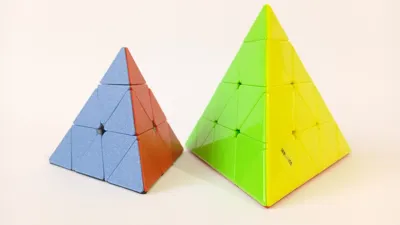
This is my 3D printed Pyraminx or Pyramid puzzle. It is slightly smaller than the regular size pyraminxes you can buy. Edge is ~80mm compared to the ~98mm edge for the regular size pyraminx. It is about the same size as the 3 layers on the QiYi Master Pyraminx.

Since this puzzle is 100% 3D printed and it doesn't use any springs it can lockup if you try to do corner cutting. Small corner cutting should work, but while you're turning the puzzle you should try to line up the edges to avoid lockups.


Boost Me (for free)

If you like the model.


Printing instructions:


All parts of the puzzle are 100% 3d printed without any supports. Glue is not required, all parts snap into place. Optionally you can use the glue for core of the puzzle and for the center and edge tiles.

First plate contains all puzzle parts, recommended color is white or black PLA. Next 4 plates contain colored tiles for the puzzle, recommended colors are red, blue, green and yellow PLA. However you can use any color combination you prefer.


Assembly instructions:


Assembly is fairly straightforward, especially if you ever disassembled Rubik's cube or any other similar puzzle.

  1. Start by assembling 2 axle pieces.

  2. Insert one half of the ball core onto the top axle and then slide it all the way down to the center until it snaps into place. Pay attention to the orientation of the part, it will correctly fit only one way. Optionally you can add some glue on the inside surfaces of the ball core where it contacts the axles.

  3. Repeat the last step for the other half of the ball core. Once again pay attention to the part orientation.

  4. Insert the center piece on the top axle.

  5. Insert the corner piece on top of the center piece.

  6. Insert the end cap on the axle and then push it all the way until it snaps into place. Pay attention to the orientation, make sure flat surfaces on the end cap match the flat surfaces on the axle.

  7. Repeat the last 3 steps for 2 other axles. Leave the last axle open for now.

  8. Place the edge piece on one of the center pieces, than rotate it down until it is held between two center pieces.

  9. Repeat the last step to place 2 other edge pieces.

  10. Place the last 3 edge pieces. If you want to apply lube to the puzzle now is a good time to do it. You can add it into the channels on the center pieces before placing the last 3 edges. Just don't overdo it.

  11. Place the last center piece on top.

  12. Place the last corner piece.

  13. Finally place the last end cap and push it down until it snaps into place.

  14. At this point your puzzle should look like this.

  15. Now it's time to start adding the colored tiles. Start by placing the tiles on the center pieces on one side of the puzzle. Place 2 hooks on the tile into the openings on the center piece. Then press down on the tile until the bottom hook snaps into place. Optionally you can glue the tile to the center piece to ensure it wont fall off if you drop the puzzle.

  16. Repeat the last step for the 2 other tiles on the same side of the puzzle.

  17. After this you can place the rest of the center tiles. If you're looking at the puzzle from the top, color order should be red, blue and green going clockwise with the yellow on the bottom of the puzzle. Puzzle should look like this after placing all of the center tiles, blue is in the back, yellow is on the bottom.

  18. Now you can start placing the edge tiles. They are attached almost the same way as the center tiles. Make sure the tile color matches 2 neighboring center pieces. Place 2 hooks on the tile into the openings on the edge piece. Then press down on the tile until the bottom hook snaps into place. Optionally you can glue the tile to the edge piece to ensure it wont fall off if you drop the puzzle.

  19. Repeat the last step to attach the tile on the other side of the edge piece.

  20. Repeat the last 2 steps to attach the tiles to the remaining 5 edges.

  21. Finally you can start attaching the corner tiles. Make sure tile color matches the center tile bellow it. Place 2 hooks on the tile into the openings on the corner piece.

  22. Insert the second corner tile the same way. Ribs on the corner pieces should interlock to keep them in place, kinda similar to interlocking your fingers.

  23. Finally insert the last corner piece the same way.

  24. Repeat the last 3 steps to attach tiles to the 3 remaining corner pieces. Completed puzzle should look like this.

Comment & Rating (102)

(0/1000)

Boosted
Print Profile
Pyraminx Parts
nice design
The profile uploader has replied
profile
2
Reply
Thank you for the boost and rating and for sharing the picture of your print.
0
Reply
Print Profile
Pyraminx Parts
My son and his friends are into Rubik’s cubes and now the new challenge is the pyraminx. The triangle pieces are slightly tricky to snap in. Some were simple and some made me crazy. Printed in PLA. My son loves it.
The profile uploader has replied
profile
1
Reply
It can be a little bit tricky to assemble the puzzle, especially you didn't take apart similar puzzles before. Thank you for the rating and for sharing the pictures of your print.
0
Reply
Print Profile
Pyraminx Parts
didn’t do it
The profile uploader has replied
0
Reply
Sorry to hear about that. Can you tell me what was the problem with puzzle?
0
Reply
there was no prob I just didn’t print it
0
Reply
Replying to @jiddybirrd.com :
Bro you don’t have to say that
0
Reply
Print Profile
Pyraminx Parts
Nice idea. It would be easier to model coloured surfaces instead of assembling faces. The pyramid is quite loose, but turning is hard and not very smooth.
The profile uploader has replied
profile
1
Reply
It would be fairly easy to model colored surfaces, but that would create several problems. First one it would require you to use the AMS and I don't have one. Second one it make it impossible to orient the parts so they don't require any supports, this is especially true for the edge and corner pieces. And the third one the tiles wouldn't look as good as they do right now. One of my main goals was to make all of the parts 3d printable. Because of that puzzle doesn't use any springs which would help with the alignment of the parts and the puzzle wouldn't feel so loose. I'm planing to make a version of the puzzle that will use springs, I just have to find the springs that are right size and are easy to acquire. Turning should improve with some use. Main issue is that puzzle doesn't use springs and edge pieces will catch on the center pieces if they are not aligned properly. I'll do some testing to see if increasing the radius on the edges will help with that. Thank you for the rating.
(Edited)
1
Reply
Replying to @radejov :
Any update on the model with springs?
0
Reply
Replying to @1qschool1 :
Not really, I've been busy with some other stuff. I do plan to return to this puzzle because I want to make corner turning octahedron. Which is very similar to pyraminx.
0
Reply
Boosted
Print Profile
Pyraminx Parts
Fantastic design and build! The only yellow I had was matte, and those pieces didn't end up fitting properly, so I reprinted in regular ol' white, which worked much better. Probably just as well, since matte PLA isn't as strong anyway. Follow the instructions and just use standard PLA. 🙂
The profile uploader has replied
profile
3
Reply
Thank you for the boost and rating.
0
Reply
Print Profile
Pyraminx Parts
Awesome design!! This was a lot of fun to put together!
The profile uploader has replied
profile
1
Reply
Thank you for the rating.
0
Reply
Replying to @radejov :
👍👍
0
Reply
I love this design and we were looking forward to use it. however when we put all the pieces together and followed all instructions, they fall off and are not clicking into place?can u help us ? where can we place glue? maybe that would help
The designer has replied
designer
1
Reply
You should apply some glue to the inner side of the tiles that will be in contact with center and edge pieces. Corner tiles shouldn't require any glue. Only a few drops should be enough, you don't want glue to leak and make a mess.
0
Reply
k I’ll try it . tx
designer
1
Reply
Print Profile
Pyraminx Parts
Nice model I had some problems with some of the colored tiles falling off and I also had to super glue it together so it wouldn't fall apart.
(Edited)
The profile uploader has replied
profile
1
Reply
Depending on the filament sometimes the tiles can shrink at a different rate. And that can cause them have tight or lose fit. That's why I suggested using some supper glue during some of the steps, to ensure the tiles will stay in place. Thank you for the rating.
0
Reply
Replying to @radejov :
Got it working I glued the tiles on with hot glue and sanded the corners a little bit and know it works beautifully.
(Edited)
profile
1
Reply
do we need screws
The designer has replied
designer
1
Reply
No screws required, all parts are 3D printed. You may need little bit of glue if you want to make sure the tiles don't fall off if you accidentally drop the puzzle.
0
Reply
Replying to @radejov :
thanks you
0
Reply
Thanks for the Model and instructions! It's a great design (especially if you don't have an AMS) - Advice to anyone printing - Ensure everything is very tight when assembling - you might want to consider glue in some places- I had about .6mm gap in my ball core for some reason - and it resulted in a loose tip. The tolerances for prints are very tight - Ex some of my colors snapped in well, but some did not and I figure that it might a result of a slightly high flowrate (.99) (I assume lowering even down .01 - .02 would probably would have helped me.
The designer has replied
designer
2
Reply
Thanks for the comment. The ball core was the part that caused me most problems when I designed the puzzle. I think I've printed 5 different iterations of ball core, before I've managed to get 2 halves to fit close enough to not cause any problems. On my puzzle gap between two halves is about 0.2-0.25mm. The tolerances for the tiles had to be tight to be able to snap them into place without using the glue. Only problem is the filaments can shrink at different rates and then cause the tiles to be tight or lose. That's why I suggested to use glue if necessary.
1
Reply

License

This user content is licensed under a Standard Digital File License.

You shall not share, sub-license, sell, rent, host, transfer, or distribute in any way the digital or 3D printed versions of this object, nor any other derivative work of this object in its digital or physical format (including - but not limited to - remixes of this object, and hosting on other digital platforms). The objects may not be used without permission in any way whatsoever in which you charge money, or collect fees.