Whack-a-tube: Zorr Powermatic 5+


Print Profile(1)

Description
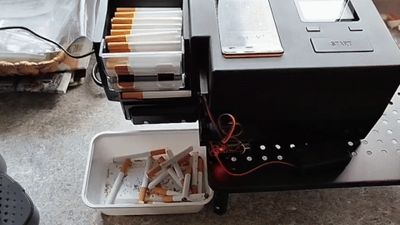
I recently purchased a Powermatic 5+ cigarette machine. This model should've been fully automatic, with the push of a button it should create cigarettes non-stop. Sadly for me it didn't work out that well, as the tubes kept hanging onto the feeder after being filled, causing the next cigarette to get crushed onto the stuck cigarette.
There was the option of disassembling the machine, and shipping the motherboard to someone and have it reprogrammed, but I didn't like that option for a brand new machine. Instead I started brainstorming a way to get the filled tubes off the machine, in a way that I didn't need to mess with the machine itself.
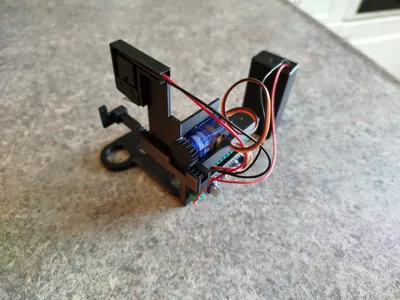
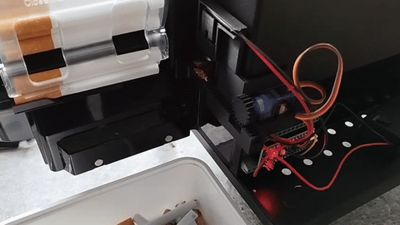
I ended up going with an Arduino Nano, with a servo motor and microswitch, that whacks the tube off after it's filled, hence the name Whack-a-tube. The microswitch gives a signal when the lever of the tube-holder of the machine moves up after filling the tube, and this signals the servo to move the servo rail back and forth, whacking the tube. The whack-a-tube doesn't do anything by itself, so this sadly will only work for the PM5+ that has a fully automatic mode.
I designed it in a way that you don't need to break open the machine, you can place the machine onto the bracket of the Whack-a-tube so it's aligned. Make sure the microswitch lever aligns with the lever of the tube holder. The Whack-a-tube has been designed with the use of a Nano Screw Terminal Adapter for the Arduino Nano. This way there's no need for soldering. It's an open-design model, so I haven't designed it in a way that all the components are enclosed. That way it's easier to replace parts, or see if something is not working. There are several holes in the model so you can pop the components out more easily.
There's 2 options for the Whack-a-tube, a parts-option, where the model is split into parts, or the combined-option, where there's 1 complete model. The parts-option is a good choice if you want to save on supports, and don't have a big printbed. If supports isn't a problem, and you've a big enough printbed, the combined-option is the better choice. I added all the .STEP files, so if a part doesn't fit properly, or you want to change something, you can try editing the model.
Components
The list of components that I used is as following, with the price I paid for at the end.
- Arduino Nano (Type-C USB Soldered) €2,89
- SG90 180 degrees Servo Motor €1,28
- KW11-3Z-2 Microswitch (Normally Closed) €0,20
- 9V Battery Holder (Optional) €1,54
- Nano Screw Terminal Adapter €1,71
- Jumper wires 20cm (Bundle) €2,79
Total costs: €10,41
Wiring Instructions
Servo Motor (SG90)
Connect the three wires of the servo motor to the Arduino Nano as follows:
| Servo Wire | Function | Arduino Nano Pin |
| Red | Power (+5V) | 5V |
| Yellow | Signal | D9 |
| Brown | Ground (GND) | GND |
Microswitch (KW11-3Z-2)
Use the Normally Closed (NC) and Common (COM) terminals:
| Microswitch Terminal | Function | Arduino Nano Pin |
| NC | Ground (GND) | GND |
| COM | Signal | D2 |
Power Supply Options
You can power the Arduino Nano in two ways:
- Via USB (Recommended for development and testing) Simply plug the Nano into your computer or USB power adapter.
- Via 9V Battery (Optional for portable use) Connect the battery leads to the Nano as follows:
Using the Nano Screw Terminal Adapter
To avoid soldering, you can use the Nano Screw Terminal Adapter:
- Strip the ends of each wire (servo, switch, battery) so that about 5–7 mm of bare copper is exposed.
- Insert each wire into the corresponding terminal on the adapter, matching the pin labels (e.g., D9, GND, 5V, etc.).
- Tighten the screws on each terminal to secure the wires firmly in place.
This adapter makes it easy to connect and disconnect components without permanent soldering.
For the Arduino Nano to work, you'll need to supply it with a code. I've added a .txt file with the code that I'm using for the Whack-a-tube. I used the program Arduino IDE to upload the code to the Nano. If you're not familiar with Arduino, I suggest searching for guides on how to use Arduino, and how to upload codes, such as this guide.
Comment & Rating (2)