Lightsaber Stand (w LED Lights) - Savi's Workshop


Print Profile(2)


Description
Boost Me (for free)
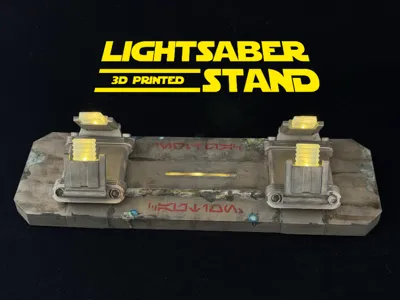
Light. Darkness. Balance.
I designed this stand to fix a few things I didn’t love about the original Disney/Galaxy’s Edge lightsaber stand. It runs on a tiny, budget-friendly ESP32 microcontroller that lights up the blade. The little program I’ve included keeps the LEDs glowing for six hours, then takes an 18-hour nap. Since it sips almost no power while sleeping, you can run it on the right USB battery pack for over three months before needing a recharge.

(lightsaber not included!!)
Unlike Disney’s stand, the ‘hilt holders’ on this one gently pulse and flicker for a more “alive” look. I also added three LEDs aimed up at the bottom of the hilt to give it a soft underglow. You can mix and match any color combination you like—bright white for the tips, red for the underglow, or whatever feels right for your saber’s vibe.
Things you'll need:
- Filament: PLA or Anything you want
- You will want either a Clear (preferred) or White color for the LED Covers/Tips.
- XIAO ESP32C3 - Tiny MCU Board
- I'm using this board for its low-power sleep modes. I've also included a holder for the cheaper RP2040 microcontroller, just know that the RP2040 will pull more power while it sleeps (not an issue if you don't use a battery)
- 7x Pre-Wired 3mm LED's (4 for the ‘hilt holders’, 3 for the under lighting)
- Save yourself the hassle and buy the 3mm LEDs with the pre-attached resistor
- You can pick any colors you want, White for the holders, and red/green/blue/purple for the underlighting. (i did warm-white on all 7 for mine)
- Some type of Glue (optional.. but recomended).
- I used CA glue, but anything you use on your 3D prints will work.
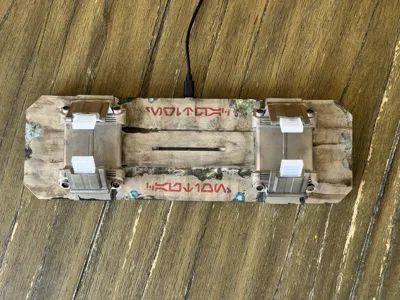
- Paint (optional - you can just go with your filament color)
- I've had a lot of questions on what i did to paint mine… so here you go:
- Krylon Matte Sand Dollar Spraypaint (just cover the entire thing with it)
- Ammo's U-RUST Rust Oxide Patina (creates REAL rust effects)
- AK Interactive Streaking Grime
- Then just go to town making the thing look like the scrap metal it is!
- I've had a lot of questions on what i did to paint mine… so here you go:
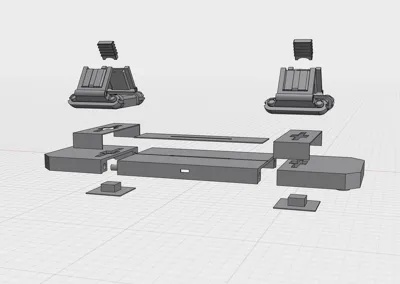
Assembly:
Everything goes together easy..
- Put the peg's into the middle section holes (← use a little glue)
- Slide on the Left & right sides (← use a little glue)
- push the square plugs up through the holes
- Slide down the seam covers over the square lugs. (← use a little glue)
- Glue to top plate middle LED cover in place (there are little groves that help possition it)
- Install the LED lights into the large hilt holders (see below!!).
INSTALL TIP!!! Wrap a small amount of tape around the tips of the wires, give it a small bend, and it will glide through the wire holes more easily. Otherwise, just give it a twist and a push, and they should go through (but really… use the tape trick)

- Push the wires from the hilt holders through the holes in the base
- Push the hilt holders onto the square plugs (I don't glue these.. that way i can switch things up easily)
- Put the 4 clear/white covers over the LED's.
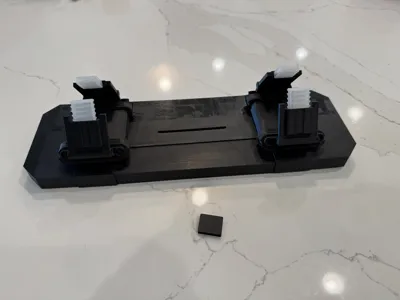
How to wire it up:
- flip it upside down…
- Install THREE 3mm LED's of your color choice into the 3 holes in the middle of the base (for that sweet undercarriage lighting).
- Put the microcontroller into the USB hole in the side.
- glue the controller stop behind the controller (small squares in the project.. one for the ESP32, and one for the RP3040)
- This is a tight fit.. but once it's glued into place, the microcontroller isn't going anywhere!!
The 4 Hilt LEDs RED wires….
- Bundle up all 4 of the RED wires, and connect them to PIN 10 on the ESP32. I used simple crimp connectors (no soldering).. however you can solder them directly to PIN 10 if you want.
The 3 Undercarriage RED wires..
- Bundle up all 3 of the RED wires, and connect them to PIN 8 on the ESP32. Again, crimp or solder.. your choice.
All 7 of the BLACK GROUND wires..
- Bundle all seven black wires up, and connect them to the GND pin on the ESP32 (crimp, solder.. its easy)

(Try to do a cleaner job than me :) )
Install the sketch onto the ESP32.. This isn't hard, but there isn't enough room for a how-to flash Arduino code onto a microcontroller. There are some great youtube videos showing how to do this. If you get stuck, post a comment and i'll try to help.
(The code is included in this project)

A Jedi’s lightsaber is an extension of themselves….
My sketch will keep the lights on for 6 hours, then sleep for 18.. but feel free to change the code to do whatever you want!! Change the flicker brightness, add NEO pixels to change colors .. Its an ESP32 with Wifi and Bluetooth: Make it flash when you get an email, make it blink when that Slack work notice comes in…. The options are endless.
A final note on USB Battery Packs:
Most USB Power Bricks will shut down if it doesn't detect a larger power draw. Meaning that you can't use a NORMAL Power brick for this project. I use a “Voltaic Systems V75” Always-On battery… and there are a few other “Always-ON” options to pick from. Using a normal USB battery pack will not work.
On the plus side.. I'm getting about 4 months of usage on my 19,200mAh Voltic V75 before i have to recharge (i don't have an outlet on the shelf my saber sits… another reason i designed this thing)
Documentation (1)
License
You shall not share, sub-license, sell, rent, host, transfer, or distribute in any way the digital or 3D printed versions of this object, nor any other derivative work of this object in its digital or physical format (including - but not limited to - remixes of this object, and hosting on other digital platforms). The objects may not be used without permission in any way whatsoever in which you charge money, or collect fees.
Comment & Rating (28)