


Print Profile(1)

Bill of Materials


.png)


- ESp32 or Esp8266 or other microcontroller x 1: or a pre-flashed WLED controller
- LED strip x 1:
- (INMP411 or other microphone) x 1:
- (button) x 1:
Description
Boost Me (for free)
You like this project? please consider boosting it!
This project is a custom Stray Kids lightbox I designed and built as a fan decoration and gift for a friend.
The logo is 3D printed and illuminated with addressable LEDs (WS2812B) controlled by an ESP8266 (d1 mini) running WLED (free and open-source), so you can enjoy beautiful rainbow effects, smooth transitions, and even sync the lights with music.
AND THE BEST THING - NO PROGRAMMING IS INVOLVED!
If you don't want to bother with soldering, you can also buy a pre-flashed WLED controller (then skip step 1) but maybe adjustments have to be made!
(for help you can watch a YouTube video or just ask me in the comments)
It’s a perfect project if you’re into K-Pop, DIY electronics, or 3D printing — and of course, if you’re a STAY!
You can use my files to recreate the same design, or customize the colors, size, and effects however you like.
You can also realise this project with parts from bambulab's maker supply, which may be more convenient if you don't know what to do with your gift cards!
Or you can just put a single color LED strip inside and don't even have to deal with controllers etc.
There are endless possibilities!
Just see the instructions as inspiration and reference and pick the parts you need.
How It Works
- The ESP8266 runs WLED, a FREE open-source LED controller firmware.
- You can connect via WiFi or app to change colors, patterns, brightness, and even sync with music.
- The logo design has a hollow backside where the LED strip is placed, creating the glowing edge effect.
Materials & Components
(this is only a suggestion, you don't need everything I included here, it depends on your needs)
- 3D printed parts (STL files included)
Microcontroller like the ESP8266 or ESP32 (SuperMini or similar)
or a pre-flashed WLED-Controller
- Addressable LED strip (WS2812B or SK6812 recommended)
- Power supply (USB-C or 5V adapter)
- (USB-C connector and drill or dremel etc)
- filament (silk titan grey + silk candy red + translucent/white for diffuser)
- Hot glue, superglue or epoxy for assembly (or magnets)
- (if you want to, you can also add a power button or switch)
- I also put recommendations from the bambulab store in the parts list below but you may have to make adjustments
(if you want to do it exclusively with bambu parts, you only need the LED strip kit from the parts list)
note: The listed maker's supply parts are only recommendations and could make building easier. They were not necessarily used for this model but are compatible. Alternative components can also be used, like I did.
INSTRUCTIONS / RECOMMENDATIONS
Flash WLED (https://install.wled.me/) on a compatible microcontroller (see here)
e.g. Esp32 or Esp8266 etc.
use the Chrome or Edge browser on your computer
click on install and select a port and a WLED version (normal or sound-reactive)
I recommend to skip the Wifi settings because it may be unreliable (depends on the microcontroller)

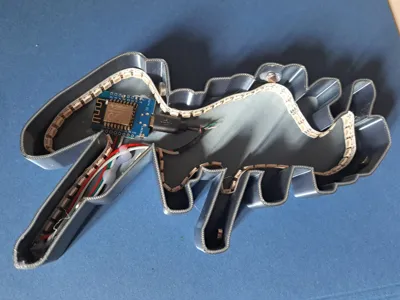
Solder the adressable LED strip to the microcontroller or connect it to the pre-flashed WLED controller
(if you want to, you can drill a hole into the main body to fit a usbc-connector and solder it to the microcontroller, i placed it at the bottom of the S-stroke)
(and if you want the sound-reactive version, also solder a microphone like the INMP441 to the microcontroller)
Glue the LED strip to the walls of the main body, cut it if needed and fit the microcontroller inside

Test the setup by connecting the microcontroller to power, connect to the WLED-AP in the wifi settings of your phone and configure it how you like (LED pin, effect, brightness etc)
I found the wifi connectivity and the app very unreliable, so recommend you go to the Wifi settings and turn the AP to always on and just don't connect WLED to your wifi
Either glue the front shut on or connect it with magnets like I did and use the stand if you want (you may need to glue it in place)

ENJOY, fellow STAY!

AGAIN if you have any questions or trouble, there are great YouTube tutorials out there or just ask me in the comments!
Or if you have feedback or recommendations for me or fellow builders, feel free to write a comment and leave a rating!
Boost Me (for free)
you love this as much as I do?
License
You shall not share, sub-license, sell, rent, host, transfer, or distribute in any way the digital or 3D printed versions of this object, nor any other derivative work of this object in its digital or physical format (including - but not limited to - remixes of this object, and hosting on other digital platforms). The objects may not be used without permission in any way whatsoever in which you charge money, or collect fees.
Comment & Rating (8)