ROJOCO - Chain-Link Hex Pixel Puzzle


Print Profile(6)


Description
ROJOCO — The Chain-Link Hex Pixel Puzzle
Greetings, fellow tinkerers!
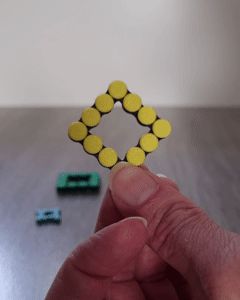
Meet the ROJOCO— a chain-link puzzle with a twist!
Built on a hexagonal pixel grid, it’s part fidget toy, part display art, and part brain teaser.
Unlike standard pixel puzzles, ROJOCO’s interlocking chain links stay together once built. That means you can solve it over and over again without scattering pieces everywhere. And thanks to its snap-and-rotate mechanism, each link holds its position, making even large builds easier to handle. No glue or AMS required.
ROJOCO is based on a hexagonal pixel grid, giving your builds a distinctive and refreshing look..
Whether you want:
- A relaxing fidget toy to play with,
- A distinctive piece of pixel art to gift,
- Or a satisfying, meditative project to lose yourself in with good tunes in the background…
…ROJOCO has you covered.
But fair warning: the larger designs can top 300 pieces, so bring your patience and enjoy the process.
TLDR:
Assembly required! The longer the chain, the more time it will take!
Recommend starting with the basic loop & then going on to larger builds.
For a fun fidget toy: print the basic loop with the large version (0,4 nozzle) or medium version (0,2 nozzle)
For a satisfying puzzle experience: pick a design below, go to documentation for the corresponding guide & print the required parts with the medium version with 0.2 mm nozzle.
For a display piece: pick a design below, go to documentation for the corresponding guide & print the required parts with the medium version with 0.2 mm /0.4 mm nozzle or small with a 0.2 mm nozzle + the matching display plate & frame (see the links below in “Optional Accessories”).
Warning: medium with 0.4 mm nozzle and small with 0.2 mm nozzle tend to break more often so print extras.
Available Designs:
For those who want something more than a simple fidget toy, designs are provided in the documentation below – each with:
- Assembly guides
- Piece counts
- Solving paths
Basic Loop

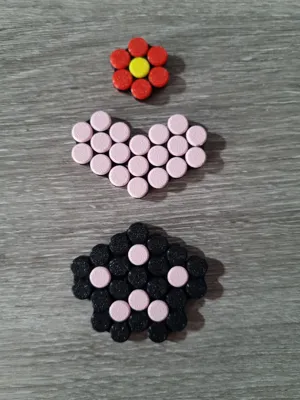
Set 1 (small):

01_B heart
01_C paw
Set 2 (large):

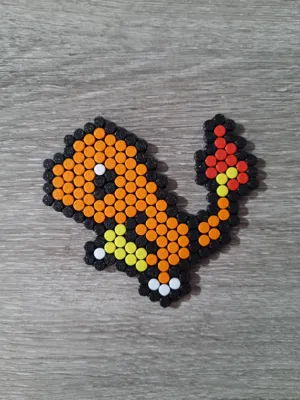
02_B charmander
02_C squirtle
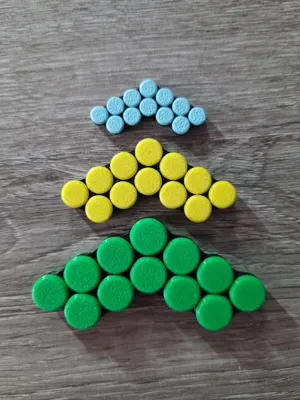
Available Sizes
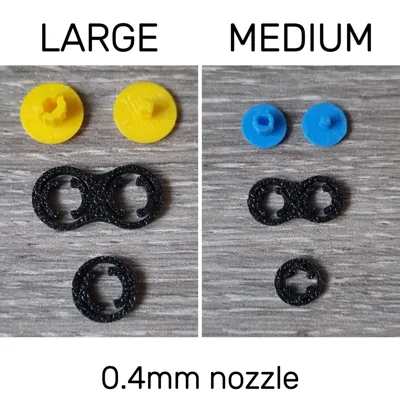
Large
- Pixel diameter: 10 mm
- Optimized for a 0.4 mm nozzle
- Best for small builds
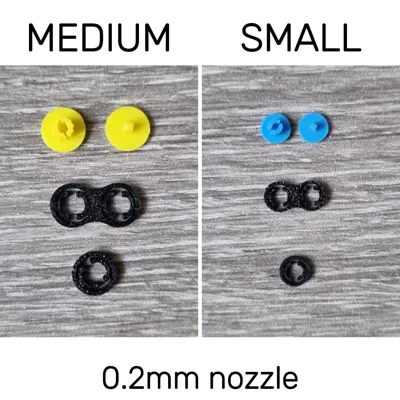
Medium
- Pixel diameter: 7.5 mm
- Works best with a 0.2 mm nozzle (0.4 mm possible, but snapping/rotation will be looser)
- Suitable for both small and large builds
- Build/display plate available (see “Optional Accessories” at end)
Small
- Pixel diameter: 5 mm
- Requires a 0.2 mm nozzle
- Suitable for both small and large builds
- Recommend using a tweezer for assembly
- Build/display plate available (see “Optional Accessories” at end)
Large with a 0.4 mm nozzle and medium with a 0.2 mm nozzle give the best results, with the medium at 0.2 mm even producing a satisfying click when rotated.
Medium with a 0.4 mm nozzle and small with a 0.2 mm nozzle are more prone to breakage during assembly because of the thinner parts. For these sizes, printing a few extras is highly recommended.
Assembly
The chain consists of four piece types:
- T & U pieces – top and bottom of each pixel
- 8 piece – connects the T & U pieces
O piece – starts/ends any open chain

Left to right: U-piece, T-piece, 8-piece & O-piece
Assembly methods:
Linear assembly — build one link after another, following the puzzle path.

open chain with even number of pixels 
open chain with odd number of pixels 
closed chain (only possible with even number of pixels) In-place assembly (best for large builds) — place all U-pieces on a plate, add the first layer of 8-pieces, then the second layer of 8-pieces and then the T-pieces.

Print profiles:
For the basic loop there are two profiles that contain all the required pieces:
ROJOCO 0.2 LOOP: print profile for the basic loop, medium or small, with 0.2 nozzle
ROJOCO 0.4 LOOP: print profile for the basic loop, large or medium, with 0.4 nozzle
For all other designs, you have to pick the profile corresponding to the desired size & nozzle.
These print files come with pre-arranged plates:

Total piece counts are shown in each plate’s label.
For example:
UT 200 has 200 U-pieces & 200 T-pieces
8&O EVEN 194 & 2 has 194 8-pieces & 2 O-pieces
Individual piece counts are listed at the end of each object’s name on the plate.
All pieces are grouped into objects with connecting tabs that help prevent print failures. (As an added extra this also makes storage easier if you succeed in detaching them in one piece.) When you can, go for bigger grouped sets (for example a 6-piece T&U instead of a 5-piece plus a single T&U).
This setup makes it simple to deselect extras in the Bambu Handy app — or deselect everything and add pieces as you go.
From experience, it’s wise to print at least two extra pieces of each type in every color. Mistakes happen, and printing spares alongside the rest saves both time and filament later.
Although not designed for it, it’s possible to take pieces apart, but forcing them can snap T or U parts.
For the small version, a pair of tweezers makes assembly much easier. They let you press directly on the center of the T-piece when snapping it into the U-piece, reducing the risk of the disk of the T-piece breaking off.
Materials:
- Designed with PLA
- Avoid older/brittle filament (test prints with older filament broke during assembly)
Printing & Technical Notes / Recommendations:
- Let your print cool completely before removing it and use a scraper. This way, the pieces and their tabs come off in one piece instead of snapping off.
- Once assembled, try to store your chain puzzle on a flat surface. Leaving it bent or hanging for long periods puts stress on the T and U pieces over time.
- After assembly, it’s a good idea to stretch out the chain and rotate the pieces a few times to check that everything moves smoothly and no parts have cracked. Especially if you’re planning to gift them.
Optional Accessories
For medium and small sizes, a hexagonal assembly/display plate with frame, stand and connectors is available.
Medium assembly/display plate:
https://makerworld.com/en/models/1783035-rojoco-assembly-display-plate-medium-d23#profileId-1899548
Small assembly/display plate:
https://makerworld.com/en/models/1783023-rojoco-assembly-display-plate-small-d23#profileId-1899531
Commercial License
Available through my Patreon:
patreon.com/3DTjoene
Future Updates
If ROJOCO gains traction, expect more designs sets to be released.
Documentation (6)
License
You shall not share, sub-license, sell, rent, host, transfer, or distribute in any way the digital or 3D printed versions of this object, nor any other derivative work of this object in its digital or physical format (including - but not limited to - remixes of this object, and hosting on other digital platforms). The objects may not be used without permission in any way whatsoever in which you charge money, or collect fees.
Comment & Rating (0)