P1S DIY Chamber Heater Bracket and Heat Shield

P1S DIY Chamber Heater Bracket and Heat Shield

Boost
53
126
22

Print Profile(2)

All
P1S
P1P
X1
X1 Carbon
X1E
A1

0.2mm layer, 3 walls, 25% infill
4.5 h
1 plate
5.0(3)

0.2mm layer, 4 walls, 25% infill
2.3 h
1 plate
5.0(1)

Boost
53
126
22
3
107
45
Released

Description

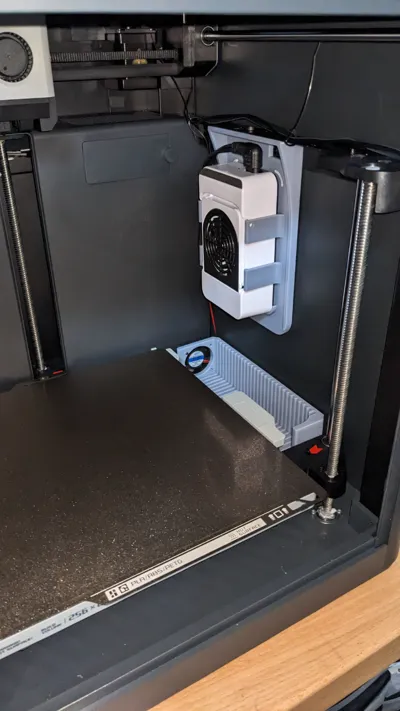
A couple of simple parts I designed to install a DIY Chamber heater on my P1S. I printed the parts in ABS. 

Works in conjunction with the bed to raise the chamber temperature and maintain it at 55 degrees Celsius when printing ABS even when its cold outside. 


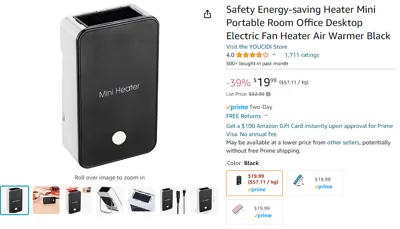
Pictures show the mini heater and additional power cord I used. You would have to figure out the controller side on your own for liability reasons. 


Heat shield prevents the heated air from hitting the printer's enclosure directly. It also has a spot for a 4010 fan to help with air circulation. 


IMPORTANT NOTE: While I cannot recommend doing this and, if you do, you do it at your own risk, you may need to remove the safety temperature switch inside the heater and replace it with a solid core wire instead. This will prevent the heater from shutting off at around 60C. 

Comment & Rating (22)

Please fill in your opinion
(0/5000)

Print Profile
0.2mm layer, 3 walls, 25% infill
I have remixed the heater holder to incorporate a Hepa filter but you still need to download this heat shield in order for it to work thanks https://makerworld.com/en/models/195594#profileId-216262
(Edited)
1
Reply
Looks awesome! Great work!
0
Reply
the model is perfect, very well designed. I would love to hear more about the lower piece/fan and how it works though.
The designer has replied
1
Reply
Lower piece is heat shield that prevents the heated air from hitting the printer's enclosure directly. It also has a spot for a 4010 fan to help with air circulation.
(Edited)
0
Reply
thanks a lot for the design! mind to tell us what switch that we should remove? I’m kinda lost on that part.
The designer has replied
0
Reply
You have to open the heater and find the thermal switch that looks like the picture attached on this comment. Its located by the heating element. Installed with two screws. I removed mine and put a solid piece of copper wire in place of it.
1
Reply
Replying to @gdramos :
oh got it! I saw a video in YouTube and thought it was exactly that. thanks a lot! by the way, does the heater turns off when it reaches 60° and turns on again to maintain that temperature or it will “permanently” turn off?
0
Reply
Replying to @VividLayer :
Those thermal switches rely on the thermal expansion properties of the materials they are made of. It's not meant to be an accurate way to control temperature. It's a like a fuse, but it goes back to normal once it cools down enough. they usually have to cool down much lower than their "trip" temperature, so in this case I would say it has to cool down past 50 degrees for it to reset.
1
Reply
What are those button's attached to the printers LCD?
The designer has replied
0
Reply
It's my temperature controller solution. Controls an SSR located inside the back compartment of the printer to switch the heater on and off based on temperature reading.
0
Reply
Replying to @gdramos :
Very nice, thank you
0
Reply
@gdramos do you have video showing that temp controller being installed and wired?
0
Reply
How do you route the power out of the back?
The designer has replied
0
Reply
I have custom wiring going on on mine. I tapped the existing power line in the back and use a solid state relay to switch the heater on or off with a temperature controller.
1
Reply
What hardware is needed to mount this? I'm guessing given internal temps, PLA+ would be sufficient (most filaments I print top out around 50c chamber temp), is that right? Thanks! Love the design!
The designer has replied
0
Reply
Just M3 screws. M3x12 and M3x20 I believe should work. I would recommend ABS or better.
0
Reply
Where can I exit the cable outside my P1S?
0
Reply
Print Profile
0.2mm layer, 3 walls, 25% infill
0
Reply
Print Profile
0.2mm layer, 3 walls, 25% infill
0
Reply
Print Profile
0.2mm layer, 4 walls, 25% infill
0
Reply