The Labyrinth – Daedalus’ Challenge


Print Profile(2)


Bill of Materials


Description
🏛️ The Labyrinth – Daedalus’ Challenge
Inspired by Daedalus himself comes a puzzle worthy of myth. The Labyrinth is no ordinary maze—it twists, deceives, and hides its secrets across multiple levels. Only those with patience may find their way to the heart, where the Minotaur awaits.
Boost Me (for free)
Thanks much for your boosts!
✨ Highlights
- A Labyrinth marble maze designed for 6mm balls
- Dual-Sided Mystery: A maze above, a maze below… only by discovering the connections can you continue your journey.
- Rotating Rings: Shifting pathways reveal new possibilities, but the solution is never given freely.
- Ancient Symbols: Markings along the ring's edge hint at the special alignments.
- Minotaur’s Domain: At the center lies a relief of the beast itself—the destination of every hero who dares enter.
- Crafted Form: Five interlocking pieces in bold metallic and translucent PLA combine into a relic that feels plucked from myth.
- Storage area for balls underneath the maze /w threaded plug
- Choose between the original large maze, or Labyrinth Mini
- Powered by Relief Sculpture Maker from MakerWorld
- Amazing Maze generation ;-)
⚔️ A Puzzle of Legend
With finger grips along its rim and a design inspired by the cunning of Daedalus, this labyrinth provides a bit of a challenge. Will you reach the Minotaur, or remain forever wandering the maze?
Start by placing your ball into the hold on the side of the top ring. Your goal is to exit the center hub and defeat the Minotaur! Good luck and have fun!
Revisions
1.1 9/12/2025 Addition of top retaining ring
Top ring updates
- Updated top ring to have a groove to accept the top retaining ring
Top cover updates
- Reduced diameter a bit to accommodate top retaining ring
- added groove to try to reduce some friction
New Top Retaining Ring
Added new retaining ring trim to give the top a more polished look and contain the top cover
1.0 9/7/2025 Initial release
Assembly Instructions
Warning: The Labyrinth requires 6mm or smaller marbles or ball bearings. ( Please keep them away from small children.)
Non-printed parts and materials
- 6mm Ball bearings or marbles. I have linked to maker supply with some nice bearings that I used
- Glue (I used cyanoacrylate )
Step 1
- Choose which version of The Labyrinth you wish to print. The original maze fits larger bed printers while the mini version fits all printers including A1-mini.
- Print all plates. (I turned off the prime tower due to my inability to consistently position and persist their location it within the profiles (maybe it's just me), if you print with a desktop slicer, you may want to turn it back on and place it in the center of the ring for a clean print)
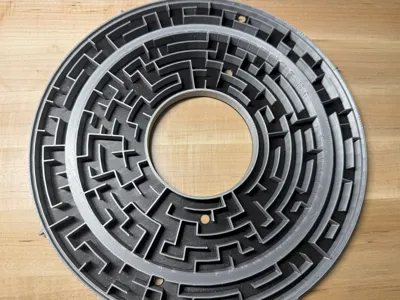
- I used black for the ring floors and Bambu Labs Gold and Silver for the top and bottom ring walls. I used Bambu Labs White Marble for the background of the Minotaur.
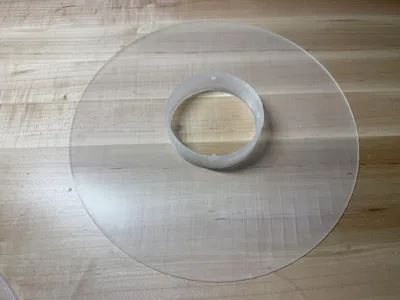
- The top and bottom cover plates are printed with translucent PLA. I have used both Bambu Labs Mellow Yellow as well as Sunlu translucent clear filament. Pictures show the larger maze in clear and the mini maze in yellow. Pictures also show the black in sparkle, but you cannot see the sparkle through the covers, so I would just use basic black.
Step 2
Test fit and make sure your transparent bottom cover and transparent top covers lock together. They may need a little pressure and torque to have them slide together and lock/snap (twist clockwise).

Once you are satisfied with the fit, then place the bottom cover onto the bottom ring as shown. Press around the edges of the bottom cover and it will press fit / snap into place and seat onto the bottom ring.


Step 2
Place the top ring back to back with the bottom ring as shown.

Step 3
Place the top cover over the top ring. Align the tabs with the bottom cover's collar slots. With some pressure on a flat hard surface, press down and twist and lock into place clockwise. It should be snug, but the top ring should rotate relatively freely with respect to the bottom ring(check your print's tabs and slots for imperfections if you have an issue. The top cover floats above the top ring)

Step 4
Place your Minotaur into the center top ring. Press it down until it sits on top of the bottom cover's collar. Make sure you have clearance between the Minotaur and the exit hole. (rotate it to a flat spot before you optionally glue anything down)


You can place additional balls in the bottom storage area and use the plug to keep them contained
Step 5
Press fit the top retaining ring onto the top ring around the perimeter of the ring.. It should press fit nicely but not restrict the movement of the top ring with respect to the top cover. At this point you should be able to rotate the top ring with respect to the bottom ring, but the top cover will not unlock and should stay in place.


Step 6
Once satisfied with your fit, you may glue down the Minotaur as it is the lid of the ball storage container.
Place your 6mm ball bearing or marble into the outer hole in the top ring and find your way to exit in the center hub at the Minotaur!
Have FUN!
P.S. If you want a hint of how to start, scroll down!
Start here:

License
You shall not share, sub-license, sell, rent, host, transfer, or distribute in any way the digital or 3D printed versions of this object, nor any other derivative work of this object in its digital or physical format (including - but not limited to - remixes of this object, and hosting on other digital platforms). The objects may not be used without permission in any way whatsoever in which you charge money, or collect fees.
Comment & Rating (10)