Light Duty, Parametric, Hinged Container


Print Profile(5)


Description
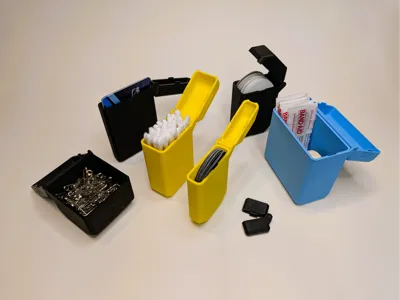
This model started because I wanted a lightweight, travel case for my mouth tape. It's got a lid that locks into place via the tabs on the side and it can be opened with one or two hands. The lid and case print separately but are super-easy to assemble. Just put one pin in the slot and the other pin should slide in the other side, from above, with just a little effort.
I quickly realized I could make it parametric and adjustable for all kinds of uses. This is my first attempt at uploading a dynamic model, so if you've got some helpful tips and tricks, I'm all ears. Apparently, because this was designed in Fusion as an assembly, you'll need to split it up in Bambu Studio before printing. Don't worry, I'll walk you through how to do it! It's really not too hard:


This is a light duty case so don't expect it to survive getting dropped off a building or run over by a car. But, it should hold up just fine for most household uses. Thanks for checking it out!
If you found this design interesting or useful, check out some of my other models.
Boost Me (for free)
I appreciate any and all constructive feedback to improve my designs. Thanks!
Membership
Click here if you're interested in a commercial license for my models. Thanks!
License
You shall not share, sub-license, sell, rent, host, transfer, or distribute in any way the digital or 3D printed versions of this object, nor any other derivative work of this object in its digital or physical format (including - but not limited to - remixes of this object, and hosting on other digital platforms). The objects may not be used without permission in any way whatsoever in which you charge money, or collect fees.
Comment & Rating (100)