


Print Profile(5)

Bill of Materials


Description
Boost Me (for free)
I really appreciate the boosts, so if you enjoy or find useful, Please consider boosting me! Thanks.
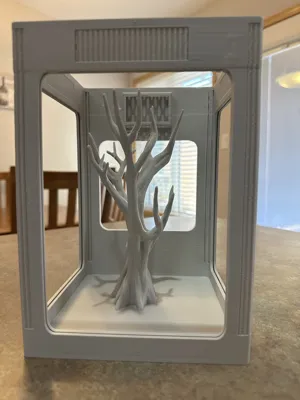
I have spent a good deal of time designing this enclosure / terrarium for use with jumping spiders. Can likely be used with other animals as well. After using for a few weeks and feedback from others I have made some nice additions & modifications. If you downloaded the original versions and are happy with it then keep the file and away you go!
Also now have newer Larger version of Terrarium
https://makerworld.com/en/models/2326780-xl-jumping-spider-tesrrarium#profileId-2541759
Or a smaller version here
https://makerworld.com/en/models/2383820-smaller-jumping-spider-terrarium#profileId-2610699
ALSO PLEASE NOTE - BECAUSE OF HOW MUCH IS IN THE FIRST PLATE IF YOU WANT TO PRINT THE LOADED ENCLOSURE PLEASE DO A PREVIEW AND MAKE SURE THE CHANNELS FOR THE ACYLIC REMAIN CLEAR ALL THE WAY… IF SOMETHING HAPPENS TO GET NUDGED OR MOVED ITS' A BIT OF A PAIN TO CUT THE CHANNEL OUT.. :)
New Cemetery themed enclosure here:
https://makerworld.com/en/models/1938088-cemetery-theme-jumping-spider-terrarium#profileId-2081201
What has changed:
Removed the tall side vents as they are really not needed now with the improved vetilation, and looks much nicer.
LID - Most changes
Thicker magnets in lid so holds better, but I also got rid of the need for elastics OR pins to hold the lid on. The new ball & socket feet hold rather well but can use magnets as well for additional security.
*Trick to make sure magnet polarity works is to install them in main body, then put one magnet on each of the ones installed , then take lid and press onto the main body. Once in the holes you can press them in further with pliers or something carefully. Shouldn't need glue.
Lid uses 5x3mm magnets
Main Body uses 5x3mm magnets
Redid the holes for the light cover as it always seemed that one was slightly out - all fit nice now
You still need 8 - 5mmx3mm magnets for feeding door (has 4 now).
Backdoor change to 6mm x 2mm magnets, but honestly don't need any there- gravity does it's thing.
Other thank that I tried to make sure everything is clearly labeled now and cleaned up placement of everything.
You can obviously still adjust as you see fit.
I tried to take into account everything needed/wanted.
You can print a basic terrarium in about 15 hours that you can add a hygrometer to if wanted or can print it with all the decorations I have added to it in about 22 hours depending on printer and then you can also pick and choose what you want or modify as you see fit :).
The Acrylic Panel I used were these https://www.amazon.ca/dp/B09XR74TY5?ref=ppx_yo2ov_dt_b_fed_asin_title
They fit really nicely, do not need glue and can removed if damage or need to be cleaned. they are 1mm x 5" x 7"
The hygrometer I used was here 5-Pack Mini Digital Thermometer Hygrometer Meters Gauge Indoor, Large Number Display Temperature Humidity for Home Office Humidors Jars Incubators Guitar Case : Amazon.ca: Patio, Lawn & Garden
Has option for the Bambu led light kit as well, but can also print without light (solid top). And there are several copies of that light available elsewhere as well that work.
Both tops have a feeding hole as well which requires (2) 5mm x3mm magnets and a 3mmx12mm screw and nut.
Top can use (6) 5mm x 3mm magnets, and (4) 5x2mm magnets and 4 x 2.6 x 8mm screws (only if using light), you can also ream the hole out slightly and use 3mm x 12mm tapping screws for a more secure hold for the light.
Has room in the bottom for substrate, certainly recommended if using light and with help keep humidity higher.
There is also a nameplate that you can glue on to add your spiders name :) but I recommend something removable so that you can change as needed. (two sided tape works well)
The supports all come off pretty cleanly, just take your time and remove carefully.
And if you want to set the terrariums up on a wall I have even done a nice custom wall shelf that is recessed so that the terrarium cannot slide off by accident.
For any additional Ventilation you can obviously use a drill bit and add holes where you want to or in the acrylic, but I don't think int's needed.
Feel free to modify as you see fit! I have also had a few people ask if they can print and sell, and honestly I have no problem with that so knock your boots off, just send me a few boosts!
*** Second profile I did for someone making these and wanted to try magnets only on the back door. He uses the empty enclosure so that is what I have done with this one. Hopefully once printed someone will send me a picture of how it worked - should be good as nothing else has changed.
Boost Me (for free)
I really like the way these turned out so consider boosting me if you like as well, it costs you nothing and helps me with the materials :)
As always if there is something of mine that you like and would like tweaked in someway or perhaps something new created, please send me a message!
License
You shall not share, sub-license, sell, rent, host, transfer, or distribute in any way the digital or 3D printed versions of this object, nor any other derivative work of this object in its digital or physical format (including - but not limited to - remixes of this object, and hosting on other digital platforms). The objects may not be used without permission in any way whatsoever in which you charge money, or collect fees.
Comment & Rating (21)