


Print Profile(2)

Description

Please consider leaving me a boost if you enjoy my model!! I am just starting out, and it means the world to me!
Watch my video here!! https://youtu.be/aXLY2iwtpqo
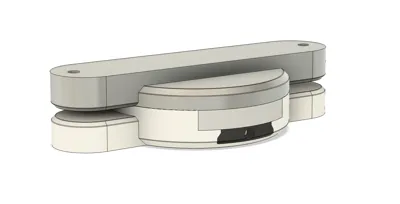
Ergonomic Office Chair Armrest Adaptor – Sliding & Swiveling 3D Print
The tolerances of this design are very precise, ensuring a buttery smooth operation of all aspects. Nothing in this print is rough or scratchy in its movement!!
Upgrade comfort and improve posture with this exclusive, maker-friendly 3D-printed adaptor that transforms ordinary office chairs — allowing your armrests to slide inward and swivel 55° for simple, customizable ergonomic support.
Upgrade your workspace comfort with this exclusive 3D-printed ergonomic armrest adaptor. Designed for makers and professionals alike, this adaptor transforms your standard office chair into a more user-friendly, customizable setup.
Compatible Office Chair
A generic adaptor file is also included, which can be modified to fit other office chairs using simple mesh editing or by drilling your own mounting hole.
This adaptor has a dedicated version specifically designed for the Performance Office Furnishings CoolMesh Pro Executive Mid Back Chair (Part Number: 8054SBLKPA01/BLK9106).
- Purchase link: Performance Office Furnishings CoolMesh Pro Executive Mid Back Chair (https://www.sourceofficefurniture.ca/coolmesh-pro-executive-mid-back-chair-black-fabric)
Disclaimer: I am not sponsored or affiliated with Performance Office Furnishings. After a lot of research, I personally found this chair to be the best bang-for-your-buck ergonomic chair available, offering an impressive range of customization and comfort right out of the box.
Key Features
- Sliding Adjustment – Move the armrests closer to your body for improved posture and support while typing, designing, or gaming.
- Swiveling Action – Each armrest can swivel up to 55° inwards, bringing support exactly where you need it.
- 3D Print Exclusive – Optimized for home 3D printing with strong geometry, minimal supports, and an ergonomic finish.
Custom Fit – Choose between the ready-to-go CoolMesh Pro version or the generic STL template for your own chair model.
Assembly & Hardware
This model is primarily 3D printed, but requires a few readily available hardware parts:
- 2 × R8RS bearings
- 2 × M3 bolts (≈10 mm, Allen key head)
- 2 × M6 screws (≥9 mm long)
(Generic template only): 2 × M6 nuts or a drill/drill bit for creating your own mounting hole
Recommended Tools
- Rubber mallet (for gentle press-fits)
- Thin, strong tool (e.g., jeweler’s screwdriver) for support removal
Philips screwdriver (only tool required for the CoolMesh Pro version)
Step-by-Step Assembly Instructions
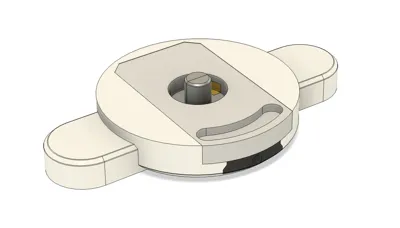
- Insert the bearings – Press each bearing into the sliding body component, ensuring a flush fit.
- Install the slide rails – Insert the rails into the slider, ensuring each rail is aligned with the correct slot.
- Assemble the slider – Slide the complete rail mechanism into the main body of the print.
- Secure the plug – Fit the plug component into the slot openings within the main body and screw it in place with the M3 bolt.
- Prepare the swivel peg – Take the two halves of the peg and gently hammer them into the upper swivel component (ensure the chamfered and filleted end of the peg goes into the swivel component).
- Join swivel to body – Align the partially assembled swivel component with the partially assembled main body. Make sure the slot and key are on the same side for proper angle adjustment, then press them together.
Final assembly – Once the peg is fully seated into the main body, attach the ergonomic swivel/slider to your office chair using the appropriate mounting screws.
Assembly Video
👉 This adaptor offers a balance of ergonomic adjustability, practical DIY assembly, and maker-friendly customization—making it an ideal project for anyone looking to level up their office chair without investing in an entirely new seat.
License
You shall not share, sub-license, sell, rent, host, transfer, or distribute in any way the digital or 3D printed versions of this object, nor any other derivative work of this object in its digital or physical format (including - but not limited to - remixes of this object, and hosting on other digital platforms). The objects may not be used without permission in any way whatsoever in which you charge money, or collect fees.
Comment & Rating (0)