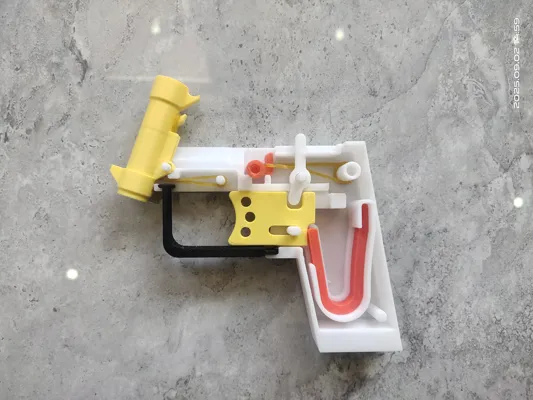
shell ejecting BB gun quick release no hardware no glue


Print Profile(3)


Bill of Materials

Description
Boost Me (for free)
Membership
Feature demonstration video:
【3D Printed Shell-Ejecting BB Toy Gun Demonstration - Bilibili】 https://b23.tv/hmemKJR
Warning⚠️: Please make sure to print shells and return springs with PETG!!! Otherwise, it will not function properly! It is also recommended to use PETG for other small parts if possible! Always keep the build plate clean before printing!!!
Can fire 6mm BBs, ejects shells, a very stress-relieving toy gun
Assembly is very simple, only requires 2 rubber bands, no other hardware needed, no glue needed, the entire gun can be disassembled at will, and wear parts can be replaced freely
Note: Two threaded parts are designed to rotate counter-clockwise! Do not install them the wrong way during assembly! When releasing the barrel, push the lever upwards!
This toy gun is designed as a desktop shooting fidget toy, so its range is limited. Friends who seek long range should not print it.
The print does not include print files for 6mm BBs. If you don't have BBs, you can search in the community. It is recommended to use purchased 6mm BBs.
Video assembly tutorial:
For mainland China, please see: 【3D Printed Shell-Ejecting BB Toy Gun Assembly Tutorial - Bilibili】 https://b23.tv/78D8Ruf
Illustrated assembly tutorial:
1. Install the trigger guard

2. Install the locking mechanism, making sure the rubber band is taut

3. Install the rubber band on the barrel as shown below, a small tool can assist in installation, then install the barrel


4. Install the spring

5. Insert the trigger

6. Insert the lever

7. Align the pin and close the top cover

8. Insert the firing pin, note the round end faces forward

9. Slide in the slide

10. Screw in the lever counter-clockwise. Remember not to use too much force!!!

11. Insert the grip shell

12. Screw in the bottom counter-clockwise

Installation complete!!
If you have any questions, please leave a comment or send a private message
Creating is not easy, please do not leave negative reviews casually due to issues with your printer or build plate
Documentation (12)


License
You shall not share, sub-license, sell, rent, host, transfer, or distribute in any way the digital or 3D printed versions of this object, nor any other derivative work of this object in its digital or physical format (including - but not limited to - remixes of this object, and hosting on other digital platforms). The objects may not be used without permission in any way whatsoever in which you charge money, or collect fees.
Comment & Rating (45)