Search models, users, collections, and posts

Silo Tower

Print Profile(5)

All
A1
P1S
P1P
X1
X1 Carbon
X1E
P2S
A1 mini
X2D
A2L
H2S

0.2mm layer, 2 walls, 15% infill
Designer
13.2 h
5 plates
5.0(4)

0.2mm layer, 2 walls, 15% infill
Designer
11.2 h
5 plates
5.0(1)

0.2mm layer, 2 walls, 15% infill
Designer
11.4 h
5 plates
5.0(1)

0.2mm layer, 2 walls, 15% infill
Designer
12.3 h
6 plates
5.0(1)
Click to see more

Open in Bambu Studio
Boost
59
183
28
11
148
88
Released 

Description

Content has been automatically translated.
Show original

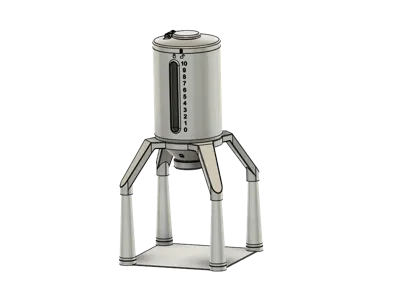
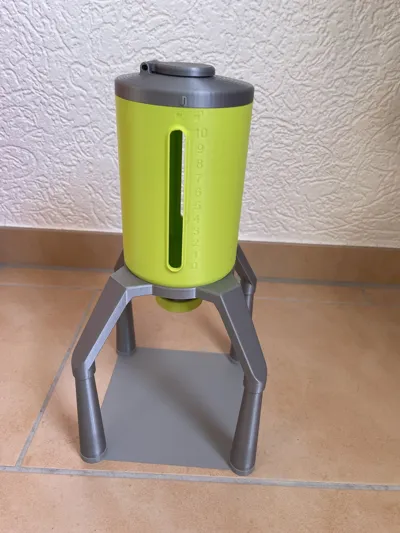
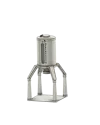
🔧 3D Print: Silo Tower (1:32) for Siku & Bruder Models
This 3MF file for Bambu Studio contains a silo tower – ideal as an accessory for Siku, Siku Control, and Bruder (1:32) toy models.
The tower features realistic functions such as an opening hatch in the roof, fill level indicators, and a rotatable outlet for emptying

📏 Model Dimensions

  • Silo Diameter: approx. 96 mm
  • Overall Height: approx. 345 mm
  • Base Area: approx. 165 × 165 mm
  • Distance from Outlet to Ground: approx. 135 mm

🪵 Special Details

  • Lid on top for opening and filling (e.g., with corn kernels)
  • Additional small roof hatch for loading
  • Side viewing windows with scale 1–10 for fill level indication
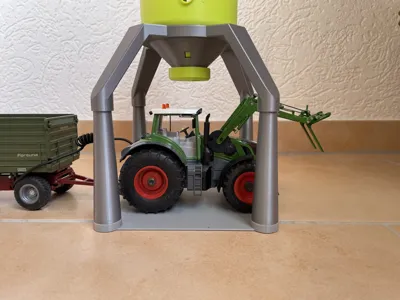
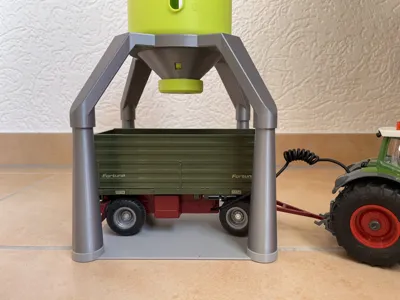
  • Continuously rotatable outlet at the bottom – allows controlled emptying into trailers
  • Suitable for 1:32 scale toys (Siku and Bruder)
  • Completely pluggable without glue – all parts are inserted, rotated, or pressed in

🛠Assembly Instructions

  1. Insert Silo: Press the silo tank into the funnel with the foot holder.
    → Tip: Place the funnel on its large opening and press the tank with firm pressure into the four retaining lugs.
    ⚠️ Important: The guides for the closure must point towards the center of the outlet.
  2. Assemble Rotary Lock: Rotate the closure so that the lugs fit precisely into the guides (one lug for the upper and one for the lower guide). Then press until both lugs snap securely into place.
  3. Place Lid: Insert the lid and turn with light pressure. It may be necessary to remove or rework some of the support lugs with an object.
  4. Insert Feet: Insert four feet into the funnel and then place them into the base plate.
    → Optional: Screw the feet with M3 screws (tap drill required).
  5. Side Openings: Equip with thin PET film (e.g., cut from a water bottle or optionally order from leading online retailers 😊). 

    Alternatively, laminating film, laminated empty and then cut to size, is also suitable. Simply slide it into the guides from above. The strips should be approx. 18 mm wide, 0.2 – 0.5 mm thick, and 12.8 cm long.

  6. Small Roof Hatch: Can be secured with a 4 mm pin, M3/M4 screw, or a printed 4 mm pin.

🧩 Usage

  • Ideal for dioramas, model building, and realistic play scenes with agricultural vehicles
  • Perfect accessory for Siku & Bruder models
  • Allows playful “filling and emptying” of silos


Comment & Rating (28)

(0/1000)

Boosted
Print Profile
0.2mm layer, 2 walls, 15% infill
This was one of the best prints in terms of model making that I have printed so far. The model fits perfectly, is stable and works wonderfully. Thank you very much for the great model! An insert or similar to cover the fill level indicator would be perfect now
(Edited)
The profile uploader has replied
Show original
0
Reply
Thank you very much for the great feedback, I'm really happy about it! 😊 Regarding the cover for the fill level indicator: In the description under the assembly instructions (side openings), it is planned to equip the sight windows with thin PET film or alternatively with laminating film, which is simply pushed into the guides from above. A printed, transparent window is unfortunately not that easy, as not everyone has transparent filament available and even with it, a really clear transparency is usually not achieved. However, I find your suggestion with an insert very interesting – I will definitely test it. Thank you very much for that! 👍
Show original
0
Reply
Thank you so much That is a great print well thought out functional Kids' eyes will light up 😊🎄
The designer has replied
Show original
0
Reply
Thank you very much for the nice feedback 😊 I am very pleased that you like the print and that it is also functionally convincing
Show original
0
Reply
The print on the A1 mini was successful, thanks again
Show original
0
Reply
Print Profile
0.2mm layer, 2 walls, 15% infill
good print quality after 3 parts. looking forward to final result ;)
0
Reply
can you add the H2S as a printer type by chance?
The designer has replied
0
Reply
Sure, I'd be happy to create a print profile for the H2S. However, since I don't own one myself, I can't test the print independently Regards Elle
Show original
0
Reply
I could try to test it. thank you
0
Reply
Replying to @elle_10 :
came out great thank you!
0
Reply
Would you please create another variant for the P2S Thank you very much
The designer has replied
Show original
0
Reply
Sure, I'd be happy to create a print profile for the P2S. However, since I don't own one myself, I can't test the print independently. Regards Elle
Show original
0
Reply
Perfect! Thanks, it's already on the printer I'll let you know how it turned out
Show original
0
Reply
It turned out great! Thank you very much
Show original
0
Reply
I want to print this with the A1, but the app doesn't allow it. Can you please add a suitable print profile
The designer has replied
Show original
1
Reply
Oh okay, I don't have an A1, but I can try to make a print profile It might take one to two days until I get to it
Show original
2
Reply
Replying to @elle_10 :
Many thanks for your quick response :-)
Show original
0
Reply
can you make 1:16 scale print profile
The designer has replied
2
Reply
The model is made in 1:32 scale. Unfortunately, a 1:16 version would be too large to print in one piece. The silo would have to be cut in half or divided into several parts for that, which is not easily feasible and can quickly lead to printing problems. Therefore, I unfortunately cannot offer this version at the moment
Show original
0
Reply
I would like to be able to print it on the A1 mini if it would work mfg Stefan
The designer has replied
Show original
0
Reply
Hello Stefan, Unfortunately, the A1 mini is too small due to its design to print the silo tower or the tank at the current size. The maximum build height is unfortunately not sufficient for this. In principle, one could try to reduce the size of the model or the height of the tank so that it can possibly be printed on the A1 mini. However, this would need to be tested and could affect the appearance somewhat. I will take a look at this when I get a chance and will let you know if there is any news. Best regards
Show original
0
Reply
Hello Stefan, I looked at the model again and have since uploaded a new model and a print profile for the A1 Mini. For this, only the height of the tank was reduced by 10 mm (from 186 mm to 176 mm) so that the print is possible within the build volume of the A1 Mini. Since I don't own an A1 Mini myself, I couldn't test the profile unfortunately. I would be very happy to receive feedback or reports of experience so that I can further improve the profile if necessary. Best regards Elle
Show original
1
Reply
how cool, I actually wanted to build something out of wood, I can save myself that now. thank you very much for the great plan, it will be implemented soon ☺️
Show original
0
Reply

License

This user content is licensed under a Standard Digital File License.

You shall not share, sub-license, sell, rent, host, transfer, or distribute in any way the digital or 3D printed versions of this object, nor any other derivative work of this object in its digital or physical format (including - but not limited to - remixes of this object, and hosting on other digital platforms). The objects may not be used without permission in any way whatsoever in which you charge money, or collect fees.