under-sink water filter stand-up base


Print Profile(1)

Description
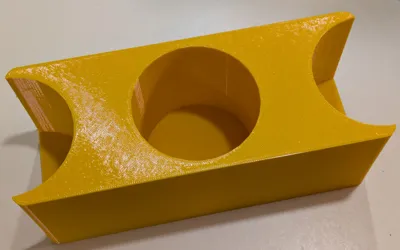
If you don't care for the wall-mounting option for an under-sink water filter, perhaps you will like this "box with holes" gadget for standing the unit on the floor. It's parametric, so you could also use it for something else. Defaults are for the Aquasana Claryum 3-Stage Max Flow (because that's what I have :-)) printed in PETG on a Bambu Lab A1. It doesn't need much structural strength, so the I reduced some settings in the print profile and printed it as the largest available layer height for my nozzle to save print time.
I found the wall-mounting arrangement for my under-sink wate filter a bit flimsy and unstable, and I was pretty sure I was going to have a tough time changing the filter cartridges down the road. So, I designed this simple floor-standing base. You can either use full sockets (holes) for each cartridge, or you can use half-sockets for the end cartridges (that's what I did). Customization will let you do it either way.
Assuming your needs require different dimensions from mine, I suggest the following iterative approach to minimize wasted time and material:
- Measure as much as you can the (top) diameter of one of the cartridges at about the height you want to make this base. If you are using tapered sockets, measure the (bottom) diameter of the bottom of one of the cartridges.
- Make a model with a single socket, a zero base plate thickness, and minimal side and edge extras. It only needs to be a few millimeters thick. For the diameter, use the top diameter measurement. Print and iterate on this until you have the socket diameter dialed in. If you are using tapered sockets, make a note of how high up the good fit happens (so you can use that as your socket depth).
- Measure the center-to-center distance between 2 cartridges.
- Make a model with 2 sockets similar to #2 above. Print and iterate that until you have the spacing dialed in. You can optionally use negative side or end extras to cut print time down even more.
- If you are using tapered sockets, make a model like #2, but with a socket depth that you want, and use both top and botton diameters. Print and iterate that until you have the taper dialed in. (Or, alternatively, do exactly like #2, but using the bottom diameter. Print and iterate until that fits well at the bottom of the cartridge.)
- (Optional) If you want to be doubly sure before you commit to a long 3D print, make a model with the final number of sockets, zero base plate thickness, and a short socket depth. That should print reasonably quickly and let you verify that the whole thing will actually fit. "Measure twice, print once" (or something).
- Put in the final numbers for number of sockets, base plate thickness, end and side extras, top and bottom diameters, and socket depth. That should give you a model that fits pretty well.
If you are using your own local OpenSCAD instead of MakerWorld customizer, you can use this JSON file to get the exact 1, 2, 3-piece prep pieces that I used for the above steps and go from there. (MakeWorld doesn't allow uploads of the JSON file, so just copy it into a file with a name the same thing as the OpenSCAD file, but with extension "json" instead of "scad".)
{
"fileFormatVersion": "1",
"parameterSets": {
"one_hole_72.5": {
"base_corner_radius": "8",
"base_end_extra_thickness": "3.6100000000000136",
"base_plate_thickness": "0",
"base_side_extra_thickness": "3.9100000000000108",
"socket_count": "1",
"socket_depth": "3.1000000000000001",
"socket_diameter_bottom_delta": "0",
"socket_diameter_top": "72.5",
"socket_spacing": "104.5"
},
"two_holes_104.5": {
"base_corner_radius": "8",
"base_end_extra_thickness": "-36.609999999999999",
"base_plate_thickness": "0",
"base_side_extra_thickness": "3.9100000000000001",
"socket_count": "2",
"socket_depth": "3.1000000000000001",
"socket_diameter_bottom_delta": "0",
"socket_diameter_top": "72.5",
"socket_spacing": "104.5"
},
"three_holes_104.5": {
"base_corner_radius": "8",
"base_end_extra_thickness": "-36.609999999999999",
"base_plate_thickness": "0",
"base_side_extra_thickness": "3.9100000000000108",
"socket_count": "3",
"socket_depth": "3.1000000000000001",
"socket_diameter_bottom_delta": "0",
"socket_diameter_top": "72.5",
"socket_spacing": "104.5"
}
}
}
Comment & Rating (0)