Locking Blade Saber (Collapsible, Modular #9)


Print Profile(8)


Description
In this iteration of the design, I have developed a new locking mechanism that continues to improve from what I learned from each of the previous locking mechanisms. This mechanism is much sturdier and easier to install!
This version continues to have an option for a light module, but no connector cap was created due to the inspired design. (If requested, I can probably create an update for one in the future.)
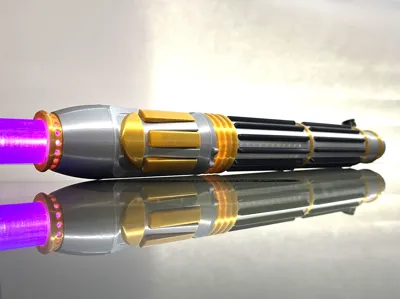
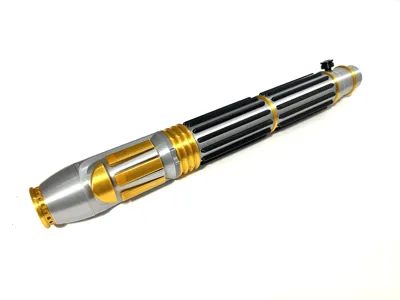
The saber completely assembled with the light module and extended light cap is about 118cm extended! And about 36cm collapsed. In its shortest configuration it is only around 28cm collapsed and around 110cm extended.
While designing this saber, I was playing with the new TPU for AMS (and other hard TPUs from other manufacturers) and fell in love with the stuff! I highly recommend using it to create parts of your handle to greatly increase durability!
About This Saber
This customizable collapsible saber is the nineth (9th) collection of many different designs.
The sections screw together and are meant to be interchangeable with all the parts in these collections.
Here is a link to the whole collection: https://makerworld.com/en/@bill.m.davis/collections/713533
With this design I am including a light module (designed for a pen flashlight) and a decorative end cap. I may add a connector cap in the future, so there is more variety in the options for these.
To make the options easier to understand I have created separate print profile for each one, so you don't accidently print a part you didn't need for the configuration you wanted.
Inspirations for this model

Inspired by “Mace Windu” from “Star Wars: Attack of the Clones” and the actual prop used in the movie.

I loved how clean and elegant the saber looks. But I did have to shorten the Mid section (50%), so you will have to use two of these to get them to work properly with other models in the collection.
Assembly instructions

Most of the parts simply screw together and are printed all in one color (making them easier to print and with less waste).
Note: See below for individual part assembly instructions!
This model also offers a simplified version where the decorative parts that require glue are attached to their models for easier assembly, not requiring any glue. All the parts print on one plate for ease of printing, but this method will not result in the same strength of a part printed by object.


Locking Head Assembly
But the locking is more complicated. It consists of several parts (main head, shroud, nozzle, face decor pieces, and locking mechanism).
Note: After printing the head, sometimes the tooth gets “stuck”, so you might need to push/pull it out to open it the first time. Make sure moves freely. It will need rely on gravity for it to close and be able to be locked.
The face decor pieces slide into the notches in the face of the head (glue might be required to hold them if they are not held by press-fit).

The locking mechanism slides into the bottom slot in the head and rests in the notch at the bottom. The shroud and nozzle simply screw onto the top of the head.
End Cap Assembly

The end cap is more complicated than usual, due to the detail and decor. It consists of several parts (ring, end cap, knob, decor disc, bottom sheath, and securing screw).
The bottom sheath slides over the fins on the decor disc. Make sure the flat end of the sheath is against the disc, so the securing screw can fit inside and secures to the bottom of the cap.
The ring just sits on top of the cap and is secured when attached to the next part. The know simply screws into the side of the cap.
Light Module Assembly

These are the flashlights I use with this design (Non-affiliated links):
- US: (5.2 inch - long pen lights) https://www.amazon.com/dp/B09H2MNB65
(Note: This model was only designed to work with the longer 5.2 inch pen lights. A shorter light might be designed later if requested.)
The light module is made up of several smaller parts (two decorative rings, the main body, twelve fins, light cap, side knob, decorative disk, securing sheath, and the light holder with pen light)
Optional Parts: All the decor is optional. The two rings, the twelve fins, the side knob, the decor disk, and securing sheath are not necessary for operation of the module. But they do look nice!
- The rings go on the top and bottom of the main body (glue is optional; will be held on by connection parts).
- The fins slide into the slots in the main body (glue might be necessary; I had both scenarios in testing).
- The securing sheath slides onto the fins of the decorative disk, and then screws into the bottom of the light cap.
- The side knob screws into the side of the light cap.

The inner light holder (pictured in grey above) comes together to close around the pen-light. It is then inserted into the light module (pictured above on the left), and held in by screwing in the light cap (pictured in above on the right). The button on the bottom of the light pokes out end, allowing you turn it on and off while assembled.
About the photos
I take my photos on top of my Glowforge (laser cutter) in my office. It has a glass top the gives that reflective shine! I keep some white posterboard to use as the backgrounds. And when I don't want the reflection, I lay it flat on top and take photos from above.
I use my iPhone 13 for the photos (which I normally hate for photos). It works well for quickly getting the photos to the computer for editing. I edit the photos in Windows Photo Editor (default) and sometimes Paint (only to remove something from the frame). When editing I usually bump up the brightness to make sure it looks well lit, and crop the frame to ensure it only contains what I want focused on. That's it.
Request for feedback
Please give me feedback in the comments. I am always looking to improve my designs and have several ideas in the works already, but I am always looking to improve things!
Boost Me (for free)
I am constantly iterating on my designs. Let me know which designs you like, so I know which direction to keep going!
It lets me know that all the effort that goes into each one is worth it, and encourages me to keep working on the next one!
© 2025 bill.m.davis. All rights reserved. No part of this content may be reproduced without permission.
License
You shall not share, sub-license, sell, rent, host, transfer, or distribute in any way the digital or 3D printed versions of this object, nor any other derivative work of this object in its digital or physical format (including - but not limited to - remixes of this object, and hosting on other digital platforms). The objects may not be used without permission in any way whatsoever in which you charge money, or collect fees.
Comment & Rating (134)