Bambu Labs X1 & P1 Spare Parts Case (Version 4.0)


Print Profile(2)


Bill of Materials


- M3 x 6mm BHCS x 14: 8-14 needed depending on options
- M3 x 8mm SHCS x 2: can also use FHCS
- M3 x 10mm SHCS x 6:
- M3 x 14mm SHCS x 2:
- M3 x 20mm x 10:
- M3 x 25mm x 4: or 2 M3x50mm SHCS for the hinges
- M3 x 30mm SHCS x 2:
- TPU 95A or 98A x 1: optional
- Generic PETG - GREEN x 1:
- Generic PETG - WHITE x 1:
Description
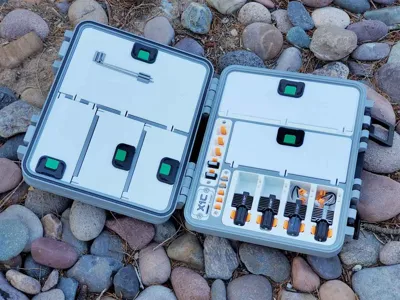
This is a spares case for the X1 and P1 series of Bambu printers, and is designed to hold all the stuff needed to maintain the printers in a convenient package .
The design has evolved with feedback from the community here, and the models here are version 4.0 of the design, with a number of updates and improvements. Getting this update done has been a ton of work, and with all the prototype cases I've printed, I now have way more cases than I have printers :D But I feel the changes are going to be worth the effort, and I hope you find the case useful. I check the comments often, and feedback is welcome, so please feel free to post any questions or feedback in the comments.
This update includes the following changes, compared to the prior version 3.1 design:
- Updated module design, which allows a better fit for the modules in the base of the case.
- Redesigned hotend modules. These changes appear small, but the holders were fully redone and now have a tiny bit more room for wires.
- New compartment modules with latching lids. Big thanks to Lexam for the idea for the bin module options, and for collaborating on and testing the prototype design!
- New 4 color design option for the case shells (but the more basic design is also still available in the 3mf profile too).
- Redesigned TPU gasket option. It is still not waterproof, but seems to be more water resistant in my testing.
- A hidden pocket designed to hold an Apple Airtag.
Because this case has a number of options, the image below of the 3mf profile looks a bit complex. There are colored boxes around plates which have associated parts, and the image is meant to work with the description below it, to help identify which plates are needed for the various options. There are also several plates with parts that are common to all builds, and those are also described below.

The options shown in the pic above are:
- TOP LID WITHOUT A TPU GASKET - Use plates 01 or 21 (PLA), and plate 06 (and optionally 10) (PETG)
- TOP LID WITH A TPU GASKET - Use plates 02 or 22 (PLA), plate 06 (and optionally 10) (PETG), and plate 7 (TPU)
- BOTTOM BASE WITH GLUE BOTTLE HOLDERS - Use plates 03 or 24 (PLA)
- BOTTOM BASE WITH A CENTER COMPARTMENT (no glue bottle holders) - Use plates 04 or 23 (PLA), and plate 9 (PETG) - note that a glue bottle will not quite fit in the center compartment. If you need to store glue bottles, the version with the two dedicated glue bottle slots is the best one to use.
- PARTIAL HOTEND HOLDER MODULES (left and right) - these are the large modules which install in the bottom shell of the case, and hold partial hotends only (without fans or socks attached) - Use plates 12 (PLA), and plate 17 (PETG)
- FULL HOTEND HOLDER MODULES (left and right) - these are the large modules which install in the bottom shell of the case, and hold full hotends only (with fans and socks attached) - Use plates 13 (PLA), and plate 18 (PETG)
- FULL or PARTIAL (HYBRID) HOTEND HOLDER MODULES (left and right) - these are the large modules which install in the bottom shell of the case, and hold either full or partial hotends only (with or without fans attached, but they must have a sock) - Use plates 14 (PLA), and plate 19 (PETG)
- LARGE COMPARTMENT MODULES with LATCHING LIDS (left or right) - these are the large modules which install in the bottom shell of the case, and have a single compartment (instead of hotend holders) - Use plates 15 (PLA), and plate 20 (PETG)
Common Modules:
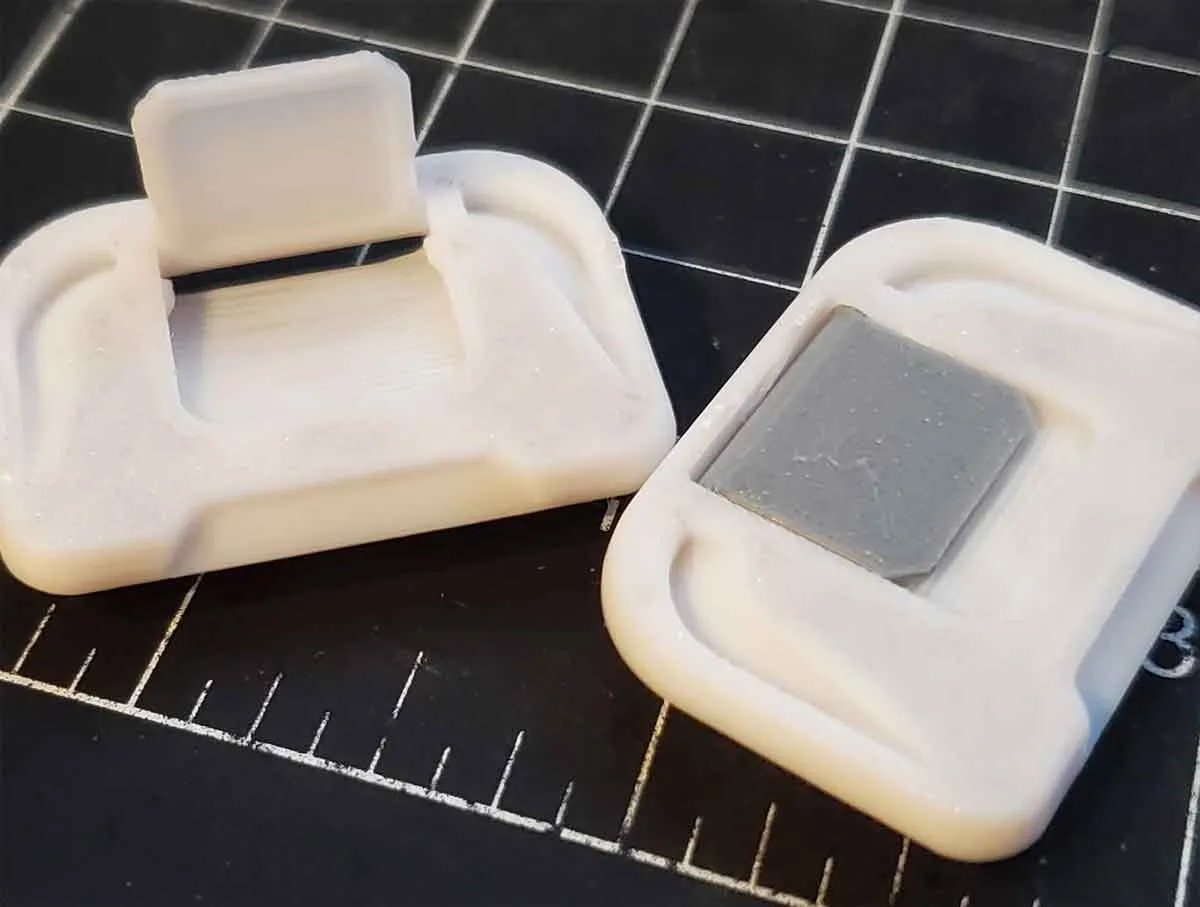
- PLATE 5 (PLA) - this plate contains the latch insert parts for the top and bottom shells of the case. I recommend printing them in the same color and material as the case lid and base, unless you prefer that they contrast with those parts.
- PLATE 8 (PETG) - contains the latch parts, handle and an optional front label designed for use with Brother P-Touch 12mm labels. If you want to use a printed label with text, just delete the label from this plate and print one from plate 25 (explained below). This plate also has two options for the latches ("REG" and “SHORT”). The “SHORT” latch will make the case close tighter, and therefore may add some stress to the hinges and latches, but I prefer it, so added it as an option. If you find the case is very hard to latch, stop to avoid cracking something, and try the “REG” latch or post a comment so I can assist.
- PLATE 25 (PLA or PETG) - This plate contains all the latches and labels (front and inside) for the case. One of the upper latch parts on this plate will be needed for each lidded bin used. The upper latches can be printed in PLA, PETG or a mix of both materials, since they have an integrated print in place hinge. The label options are multicolor and include options for X1C, X1E, P1P and P1S printers, as well as blank option which can be customized with your own text.
Note that the TPU gasket version will not make the case water tight, there are too many variables to that. I think the gasket helps though. But don't expect to dunk this case, and have everything stay dry.
If printing the gasket version of the base, I recommend that you test that your printer and buildplate can run TPU without issues first. I suggest using 95A or 98A TPU, since it is a bit stiffer and should feed better than the really “noodly” stuff.
To install the TPU gasket, the cap of a sharpie is the tool I use to press the TPU gasket into place. Start by pressing in the middle of the gasket along all 4 sides, then once it's set in position, press in the corners.
I printed my prototype cases in PLA and PETG. PETG is recommended to be used on the latches, clips and to a lesser degree, the compartment doors, since PLA may be a bit brittle for some of the tabs and printed springs which retain the various parts.
If you use the included 3mf profile (which I recommend), note that there are 7 materials, including TPU. The reason for so many materials is due to some of the multicolor options, so you may not need all of them.
Hardware List:
This will require some M3 hardware to assemble. Specifically, it requires the following screws:
- (8-14) M3 x 6mm BHCS (2 per lidded compartment) (now optional - see update below regarding snap together latch slides)
- (2) M3 x 8mm SHCS (or FHCS)
- (6) M3 x 10mm SHCS
- (2) M3 x 14mm SHCS
- (10) M3 x 20mm SHCS
- (4) M3 x 25mm SHCS (or 2 M3x50mm SHCS for the hinges)
- (2) M3 x 30mm SHCS
- (2) 8x3mm cylinder magnets (for the optional large compartment door with the Allen key holder (PLATE 10))
BHCS = Button Head Cap Screws
SHCS = Socket Head Cap Screws
FHCS = Flat Head Cap Screws
Tips on building it:
I recommend using safety glasses since there are a few parts that must snap in place.
You will need some long Allen keys for the M3 SHCS screws. I use a cordless screwdriver with a long (100mm) ball end H2.5 bit, which really speeds up building these cases. I have built them with standard Allen keys though, and they also work.
Step 1: Assemble the hinges
The hinges require the following parts:
(4) M3 x 25mm SHCS (or 2 M3x50mm SHCS for the hinges)
A long ball end Allen key or long H2.5 driver bit will be very helpful for assembling the hinges (I use a 100mm H2.5 bit with a cordless screwdriver). If using a power screwdriver, go slow, otherwise the friction of the screw going into the plastic could cause the screw to melt the plastic and veer off course. If you have M3x50mm screws, you can use a shorter bit and just drive the screws in from the outside in one pass per side, which is bit easier.

Step 2: Install the handle
The handle requires the following parts:
(2) M3 x 20mm SHCS
The case handle installs on the bottom shell (base) of the case with two M3x20mm SHCS screws.

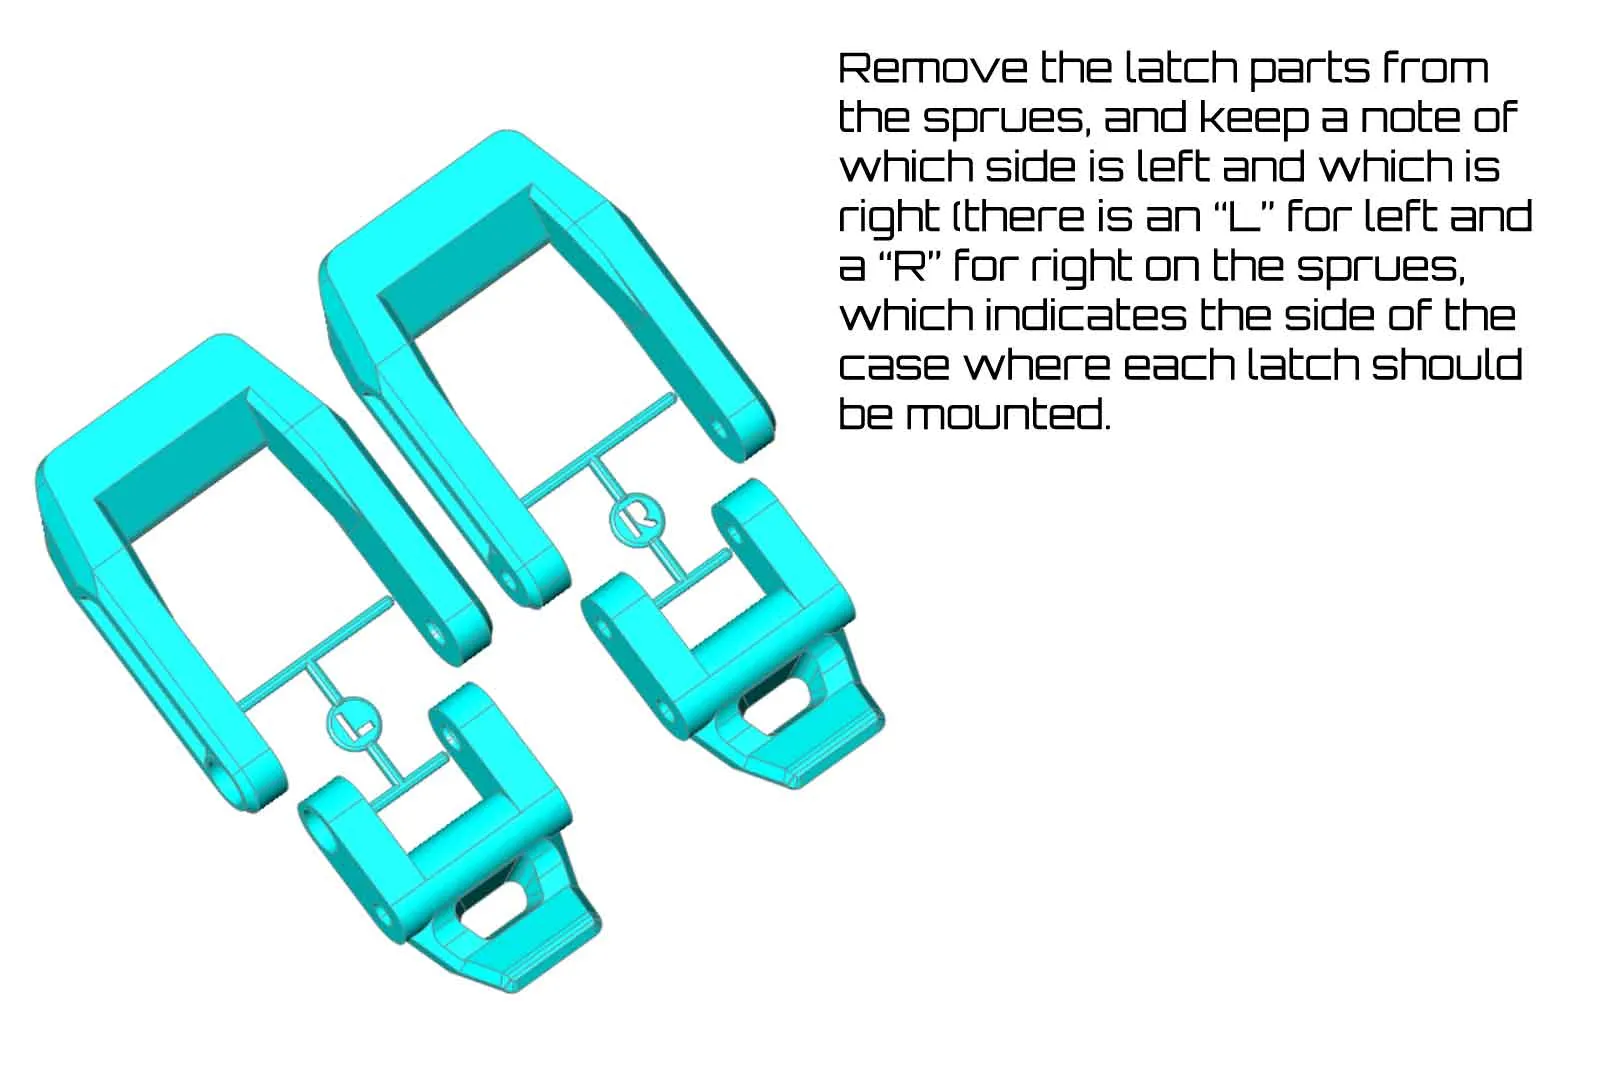
Step 3: Assemble the latches
The latches require the following parts:
(2) M3 x 20mm SHCS
(2) M3 x 30mm SHCS
(2) M3 x 8mm SHCS (or FHCS)
(2) M3 x 14mm SHCS
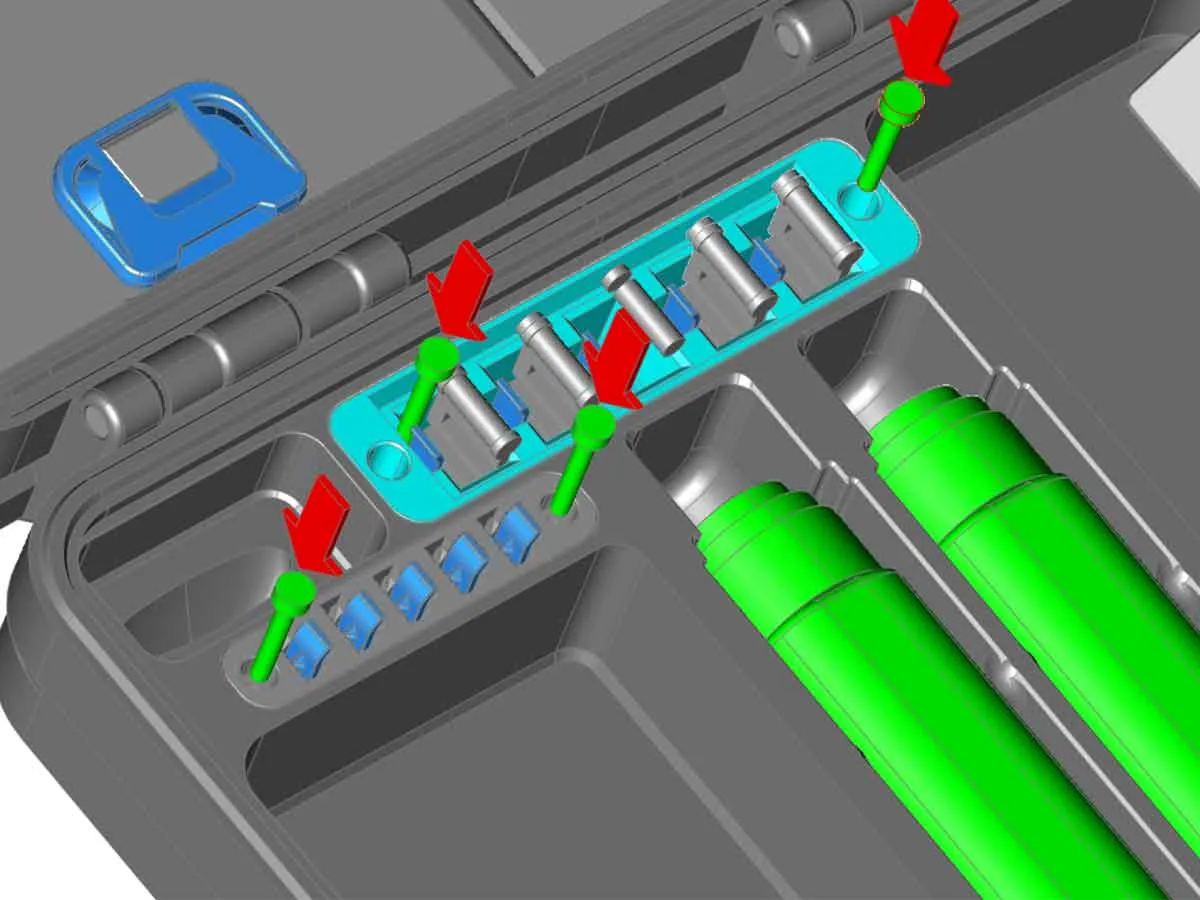
The images below show the steps to install the latch inserts, and assemble the latches. If the inserts are too tight, give them a light sanding, so they slide into the dovetail grooves in the case shells.
I don't expect this to be a problem, but if you find the latches are too tight, and the case will not close without forcing them, please stop, and either try the “REG” latches from plate 08, or post a comment and I will try to assist.
12-22-2025 I've also uploaded some longer latches you can try if you find the latches are too tight. They are included in the files > folder "ALTERNATE LONGER LATCHES - UNTESTED". There is a 0.6mm longer ("LONG") and 1mm longer ("X-LONG") U shaped latch part in that folder, along with a 3mf which includes both models. These parts are not tested, but are simply longer versions of the latch parts which I am using in my case, and may help if the latches are too tight. If you use them, please let me know if addition lengths are needed.
If you force a latch closed, which is extremely tight, you risk cracking something due to the stress that will place on the hinges and latch components.

|  |
 |
 |

|  |
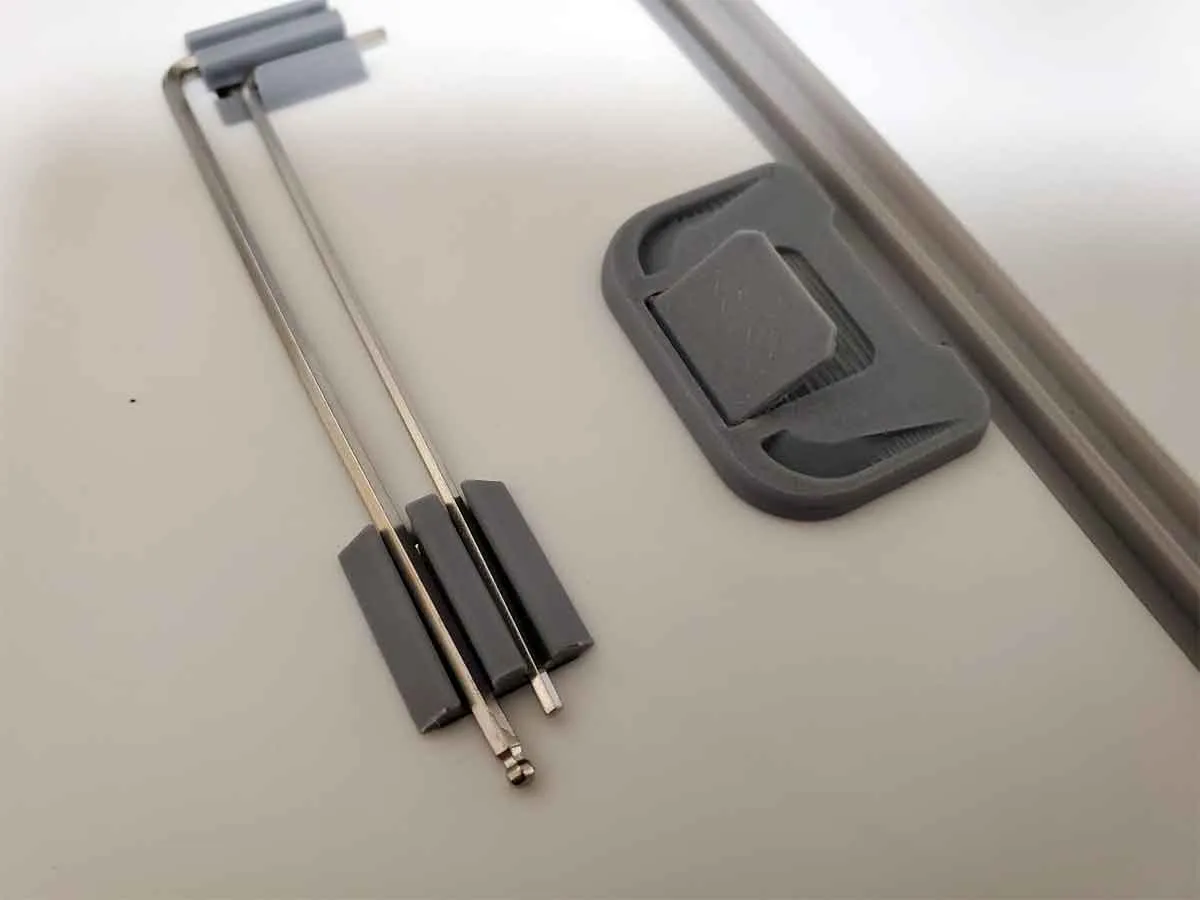
Step 4: Assemble and Install the wiper and cutter modules
These modules require the following parts:
(4) M3 x 20mm SHCS
The wiper and cutter modules have separate clips which are insatlled first (see pics below). Then each module is installed in the base of the case using two M3x20mm SHCS.
 |  |
Step 5: Assemble and Install the hotend or compartment modules
These modules require the following parts:
(4) M3 x 10mm SHCS
The hotend modules have tab inserts, which hold the hotends, and these parts must be installed before the modules are installed in the base of the case. The inserts should sit flush with the base of the module, but if they don't, just lightly sand the module to remove any imperfections that block the inserts from sitting flush.
To install either the hotend, or compartment modules, first clean up any defects from the modules and the base of the case, whcih may stop the modules from fully seating. Then, with the hotend clip inserts installed in the modules, drop the modules in their respective locations and secure them with M3x10mm SHCS.
 |  |
If you use the “hybrid” hotend modules (from plates 14 (PLA), and plate 19 (PETG)), which can hold partial (no fan) or full hotends (with a fan), the following images should help with assembling the modules with the inserts. The completed modules have flip out “tables” to help support partial hotends. Regardless of the type used (full or partial), the hotends will need to have socks installed, so the clips on the modules can grip the hotends. If you have questions, please post in the comments and I will try to assist.
 |  |  |
Step 6: Install the compartment doors and latches
This step requires the following parts:
(8-14) M3 x 6mm BHCS (2 per lidded compartment)
Note that the upper part of the latches for these compartment doors can be found on plate 25 (which is multicolor):

To assemble the latches for the small compartment doors, two M3x6mm BHCS (or SHCS) for each door will be needed. They assemble by sandwiching the door with the top and bottom latch parts, which then connect using the screws (which are installed from below). Before installing the latches, it may be necessary to release the latch tabs using a spudger or thin screwdriver. The tabs rotate on a hinge and may need to be cycled a couple times before they work freely. The tabs are designed to stay closed when shut, so they do not flow down when closing the case (and interfere with closing). The image below shows the orientation of the parts for assembly:

|  |
Update - There is a new alternative latch which requires no hardware (it snaps together).

If you want to try them out, just use the 2nd profile which is named “Updated Snap together slide latches”:
SNAP_TOGETHER_SLIDE_LATCHES_V7D.3mf
Note that when assembling the doors and latches, the flat (smooth) side of the door should face outward when finished. The side which has some extra structure will face inward on any doors which have that.
To assemble the optional door with the Allen wrench holders, a pair of 8x3mm cylinder magnets are required. Install the magnets into the open end of the inserts, and then snap the inserts into the compartment door. The inserts are not the same, so take care to note the orientation of the parts when assembling. It may help to use an Allen wrench to help align the inserts and confirm they are in the correct orientation.
If you have larger Allen wrenchs than are shown in the images (wiith a thicker and more round cross section), please let me know in the comments, and I can upload a different version of the large door, which will work with those as well.
 | 
|
 |
To install the doors into the case, it will help to start by lining the doors up at an approximately 30-45° angle and then pressing in one hinge at a time. For the large door, install one side hinge, then the middle and finally the last side hinge.
 |  |
 |
Step 7: Inside and outside case labels (and MicroSD card holder)
This step requires the following parts:
(2) M3 x 20mm SHCS
The case has two labels, one is inside the case, and the other is on the outside near the handle. The inner label has a microSD card holder, and is also designed with a hidden pocket to place an Apple Airtag. The tests I have done with printed “dummy” Airtags have shown the fit is good, however if it is too loose, a small piece of double sided foam tape may help. Since the design was posted, it has been reported that an Airtag will fit (thanks TechGirl!).

The inner case label insert installs with two M3x20mm SHCS screws, similar to how the cutter and wiper modules are installed.

The outside case label is just pressed into place. Take note of the orientation though, so it does not appear upside down when closed. The orientation shown in the image below is correct:

Step 8: Fill it up with spare hotends and the other spare parts, and enjoy using your new spare parts case!
If you have a question or a comment, please also drop a post or a pic. If you have a problem, I check the comments regularly and will try to assist.
Other stuff:
Most of the parts in this version 4.0 are not backwards compatible with the earlier version 3.1 and below design, so I plan to remove the old version 3.1 and below files to avoid folks making the old version. But if you need the older files, let me know. You may need to post a comment if PM does not work, since I have not received any PM's recently, and suspect there may be some issue with PM's.
This case design does not have a remixable license. However, if you want to create your own remixed modules, the blank modules with a remixable license can be found here:
https://makerworld.com/en/models/1589577-bambu-labs-x1c-p1-case-blank-modules-for-remixing (with STEP files)
Thanks and Acknowledgements:
This design has evolved over 4 versions (and several smaller point versions in between), with the help and feedback from the community. Below are some of the people who have made suggestions, gave me inspiration, helped to test prototypes, or provided feedback to improve the case over the years:
Thanks to Mr Sullivan's and his awesome Accessory Storage Case over on Printables for sharing his case. Originally, the earliest version of the case used some remixed elements from Mr Sullivan's awesome Accessory Storage Case, however the latest versions have been redesigned with many updates and changes, and are no longer a remix of that design.
Thanks to Hits-Man for the suggestion for the screw holders to the all the hot end modules, and the addition of a 5x full module tray.
Special thanks to Lexam for the idea to add the bin options for the base (to be used in place of the hotend holders), and for collaborating on and testing the prototype design!
Thanks to the suggestion from AgentP1P for the suggestion to add 1.5mm and 2mm Allen Key holders in the large compartment door (in the lid).
And THANK YOU! everyone who has posted a comment and provided feedback on all the earlier versions of the spares case over the years!
If you find these models useful, or have any problem, please post a comment with some pics of your prints and I will try to assist.
Boost Me (for free)
Thanks for supporting my work!
You can find the other things I'm working on at my blog here. You can also follow me here or on Printables, to see what new stuff I post. If you would like to support my work, you can Boost this design (link above), or Buy Me A Coffee using this link:
https://www.buymeacoffee.com/mystoopidstuff
Thanks for looking!
The model posted here is for personal, non-commercial use only, and is being shared (for free) with the 3D printing community to help us organize our Bambu printer stuff (so we can get it all together, and put in this box…all the stuff…so it's together). The trademarks used in this model belong to Bambu Lab.
If you have a different Bambu Printer, or want to check out my other Bambu Printer Spares Cases, you can find links to them below:


There is also a “generic” printer case which can be found at the link below:
https://makerworld.com/en/models/1879290-printer-took-kit-v1-0
 |  |  |
I also have a few gridfinity cases, which you can find in this collection:
https://makerworld.com/en/collections/844576-gridfinity-stuff
 |  |  |
Changelog:
8/27/2025: Uploaded version 4.0
12/3/2025: There was a problem with the 5x large full hotend module, which has been corrected. The model in the attached files has been updated to the corrected version (Bambu_ToolKit-V4-0_170_R63_LG_MOD_5x_FULL_HOTENDS), and the profile is also now updated as well. The current (updated) profile is “X1C_Bambu_ToolKit-v170-r63_v4-0_MW.3mf”. Thanks to Simon for letting me know of the problem!
12/22/2025: I've uploaded some longer latches you can try if you find the latches are too tight. They are included in the files > folder "ALTERNATE LONGER LATCHES - UNTESTED". There is a 0.6mm longer ("LONG") and 1mm longer ("X-LONG") U shaped latch part in that folder, along with a 3mf which includes both models. These parts are not tested, but are simply longer versions of the latch parts which I am using in my case, and may help if the latches are too tight. If you use them, please let me know if addition lengths are needed.
3/23/2026: Added a profile named “Updated Snap together slide latches” with new snap together latch slides.
License
You shall not share, sub-license, sell, rent, host, transfer, or distribute in any way the digital or 3D printed versions of this object, nor any other derivative work of this object in its digital or physical format (including - but not limited to - remixes of this object, and hosting on other digital platforms). The objects may not be used without permission in any way whatsoever in which you charge money, or collect fees.
Comment & Rating (184)