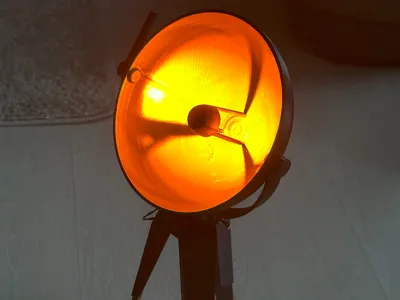
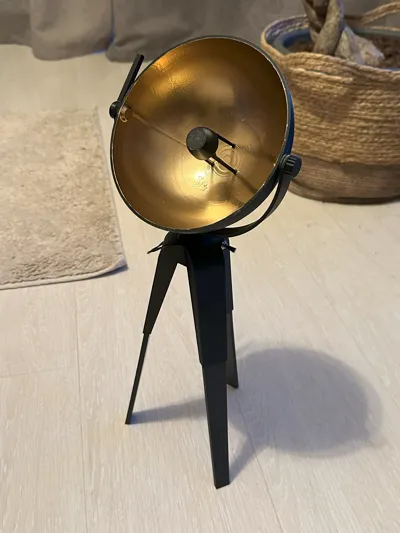
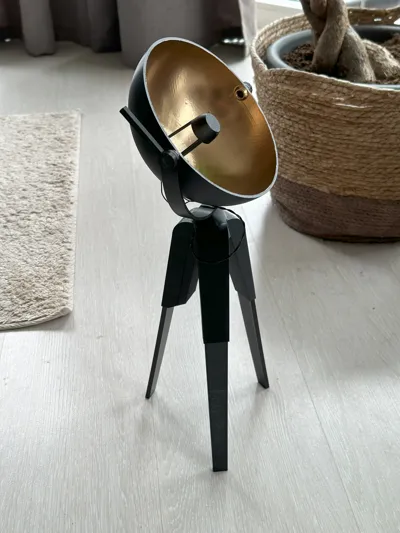
Mini Studio Theater Reflector Light


Print Profile(1)

Bill of Materials


- 18650 rechargeable battery + battery socket x 1:
- 3 position switch - SP3T (on-off-on) x 1:
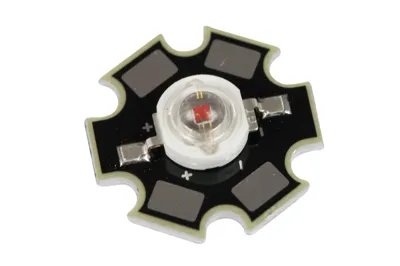
- 1W LED x 1: on 20mm aluminum PCB
- resistor 3R3/1W x 1:
- 120R/0,6W x 1:
- golden mirror finish decoration spray paint x 1:
Description
Mini version of theater studio battery operated light. It focuses light and can bring specific mood to your scene or home. Simply direct it to the specific object to make it stand out, or simply turn into ceiling to make overall light diffused effect…
What extras you will need for this build:
- 18650 rechargeable battery + battery socket
- 3 position switch - SP3T (on-off-on)
- LED module on 20mm aluminum pcb as seen in one of the attached pictures (I have used 1W yellow LED)
- thin cables (about 0,25mm^2) - ideally black only
- resistors - 3R3/1W and 120R/0,6W
- golden mirror finish decoration spray paint
- 2pcs of 6x2mm magnets
Its tricky to assemble as all parts are quite small !
Definitely do not use PLA for this build!!!
Build instructions:
- Shorten one end of the 3R3 resistor and solder the wire to it. Than solder this resistor to “+” pole of the LED and fold it behind the led module. You need powerful soldering iron as aluminum pcb sink heat very well. Solder "-" pole of LED to another wire. Let it cool.
- Glue the LED module into the socket with CA glue or epoxy. Inside the socket there are two notches to hold the PCB. Feed the wires around edges of led module to guide them out. On two of the holding sticks there is recess created to feed wires along. If you have exact wire size it will nicely snug fit in it. If not a small drop of CA glue does the trick.
- Use masking tape to cover edges of Parabolic part. Spray paint inside of parabolic part with primer (not needed but it increase overall durability). After it dries spray paint mirror gold decor paint. Let it dry for at least few hours.
- Feed wires thru holes in the middle of Parabolic mirror and secure LED socket in place. It should be nice snug fit without need of glue. But just for extra durability I used drop of glue on each leg from back side after fitting.
Attach parabolic U shaped holder with one screw on one side and on opposite side with square shaped handle part. You will need to apply a drop of CA glue or hot glue on square part to fasten it permanently in parabole. Beware of not glueing holder U shaped part, only inside of parabole so it holds in place but parabole is free to rotate.
- Prepare mockup of switch with 120R resistor and solder positive battery holder wire to it.
- Glue the magnets into main stand and battery cover.
- Glue the parabolic assembly holder into main stand - there is small square shaped piece that helps to hold it in place. Should be nice and snug fit.
- Twist led wires that comes from parabolic mirror and feed them into tiny small hole on side of main holder.
- As you probably used both wires same black, test the polarity which is + and -
- Solder minus wire to minus battery holder wire
Solder positive led wire to center pin of the switch, the schematic is attached below:

- test the operation: there should be two modes: full power and dimmed and off in middle position.
- wiggle in the switch so it goes thru side hole and secure it in place with its nut
- fold the extra wiring in upper part around the switch and insert the battery holder in. My battery holder with one wire going along it fits so well and tight, that no glueing was necessary, if you have smaller holder just use some hot glue to secure it in place.
- insert battery, test operation and if all is well - congratulations! you made it thru the hardest part :) now just cover it with magnetic cover.
- Insert and glue-in pro-long feet for stand with hot glue or similar.
As LED produces heat its essential to use some heat-resistant material, PETG as minimum.
Possible upgrades: instead of yellow 1W LED you could try to use warm white 3W LED module in same package. However this heats significantly more and more heat resistant material than PETG is necessary for LED holder (abs or asa). If you use 3W white led, the 3R3 resistor is not necessary as these LEDs can be wired directly to 3,6V batteries. (they are usually specced to survive 4V)
License
You shall not share, sub-license, sell, rent, host, transfer, or distribute in any way the digital or 3D printed versions of this object, nor any other derivative work of this object in its digital or physical format (including - but not limited to - remixes of this object, and hosting on other digital platforms). The objects may not be used without permission in any way whatsoever in which you charge money, or collect fees.
Comment & Rating (0)