Search models, users, collections, and posts

Retro TV - Nintendo Switch 2 Case

Print Profile(1)

All
X1 Carbon
P2S
H2D Pro
A1
H2D
P1P
X1E
P1S
H2C
H2S
X1
X2D
A2L

0.2mm layer, 3 walls, 10% infill
Designer
20.5 h
5 plates
5.0(8)

Open in Bambu Studio
Boost
803
1784
31
12
448
119
Released 

Bill of Materials

Maker's Supply Kits and Parts
Select all
BT3x8 SHCS Self Tapping Screw (20PCS) - AA108
D6x2 mm Round Magnet (20PCS) - CA004
Bambu Filaments
Select all
Brown (10800) / Refill / 1kg
Iridium Gold Metallic (13400) / Filament with spool / 1 kg
Matte Charcoal (11101) / Refill / 1kg

Description

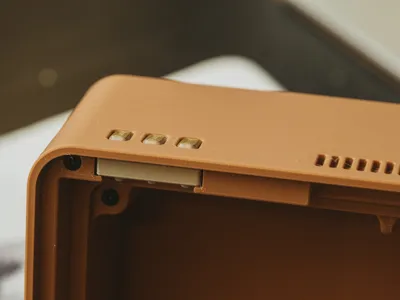
[update 09-09-2025] I adjusted the buttons for the volume/power to fit a little better, after getting some feedback. I also added a notch on the power button to make it easier to identify 


Introduction

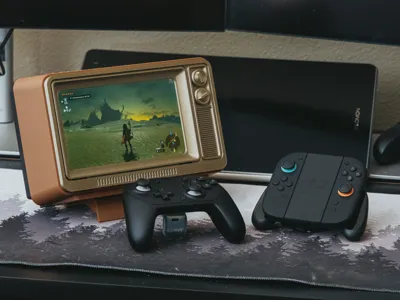
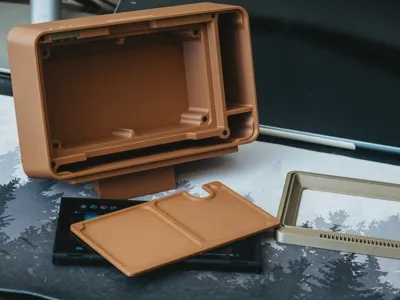
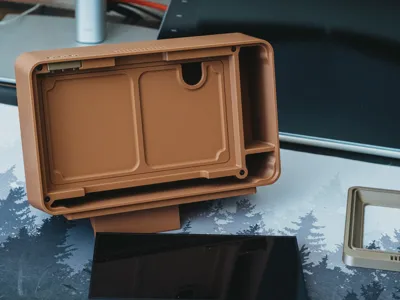
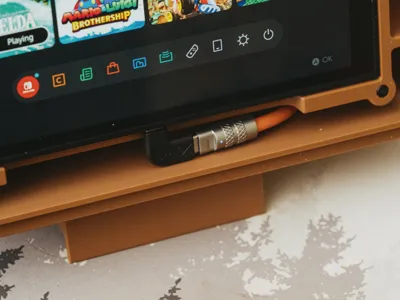
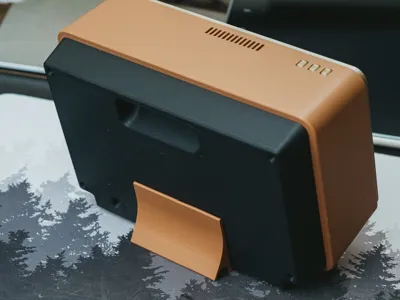
A Switch 2 version of my Retro TV inspired case! This version brings along with it a couple of improvements, and a slight adjustment to the hardware. The main big improvement, besides being able to accommodate the Switch 2, is a built in compartment with lid for storing accessories. Previously this compartment was just left wide open! 


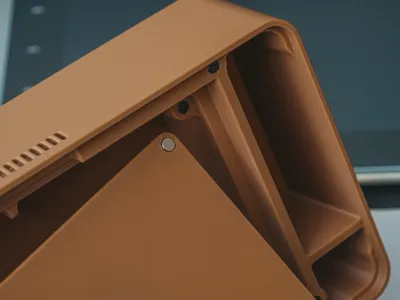
For the hardware, I adjusted how I handle magnets. Using a magnet on one side and a screw on the other, so you don't have to worry about the polarity of the magnets and matching this up. This does mean that you need to stick with the Bambu Screws. I've tried self taping screws from sources on Amazon, but they weren't the right sort of metals to work with magnets. 


Filaments & Hardware

  • Bambu PLA Basic Brown
  • Bambu PLA Metal Iridium Gold
  • Bambu PLA Matte Charcoal


Hardware:

  • 14 x M3x8mm Self Tapping Screws (Designed to specifically fit the Bambu screws)
  • 8 x D6x2mm magnets

[Assembly]

We’ll start by inserting 8 M3x8mm self tapping screws. These will be the base for the magnet covers to fit to. 
Next we’ll insert the 3 control buttons for the power and volume. The power button is slightly ever so longer than the volume ones (I've added a notch on the power button to help identify it from the others), so take note as you insert them. Once the buttons are in place, insert the retaining bracket to help keep them there. 
We'll use 4 M3x8mm Self Tapping Screws to attach the back
For the front panel of the TV, we’ll use 2 M3x8mm Self Tapping Screws to attach the knobs, and we’ll insert 4 D6x2mm round magnets. They should be press fit, but you might want to add a little glue to help keep them secure. 
For the storage panel we’ll do the same as the front panel, using 4 D6x2mm magnets. They should be press fit, but you might want to consider a little added glue for added security.  
Last but not least, we’ll put the panels into place. And that's it!

-------

If you like my work, consider showing your love by Buying me a coffee. Additionally, if you're looking to sell prints of my design, please check out my Patreon page for more information.

Comment & Rating (31)

(0/1000)

Model printed great, just waiting on the self tapping screws to arrive. Thanks for updating this to work with the Nintendo Switch 2. I agree with @personaspace that the buttons may be too short, I am scaling the Z axis to 110% as they suggested and will try again. I know that the power button is longer and I made sure to assemble it properly, will see if longer buttons fix my issue. I posted a few accessories for this print and linked back toward your project, hope you don't mind! https://makerworld.com/en/models/1768536-accessories-for-retro-tv-nintendo-switch-2-case#profileId-1882371
The designer has replied
designer
4
Reply
Nice on the added accessories! I've updated the power/volume buttons after the provided feedback. :)
3
Reply
Hello would resizing the parts be sufficient to adapt the model to a Nintendo Switch 1 please
The designer has replied
Show original
0
Reply
i think i saw one for switch one a while back but i don't remember where i saw it
0
Reply
Replying to @Drcre8 :
Thank you very much for your reply, I will look for it This model is beautiful
(Edited)
Show original
0
Reply
Replying to @Diadm :
same guy that did this did the first one also just look at his collection
designer
2
Reply
can you make a fallout terminal version pls
The designer has replied
designer
2
Reply
Ohhh. I'll look into that. That'd be a fun idea!
1
Reply
Replying to @Josheh_3D :
how is that going.....
0
Reply
My faceplate doesn't stick to the M3 bolt as well as it did with magnets on the old model... I think it may be better to press fit magnets on both sides of the print and abandon the self tapping screws.
The designer has replied
0
Reply
Are you using the Bambu screws? Have you tried backing them out a little too, to make sure the magnets are making contact? I did a version that'd fit the common self tapping screws I've found on Amazon, but those screws weren't so magnetic, I found out. With the Bambu screws, they've been working for me in a number of applications, including this use. I could do a version though that'd just be press fit magnets all around.
0
Reply
Replying to @Josheh_3D :
I'm using Amazon screws, I will make sure to order some from Bambu when I need a supply refill!
designer
1
Reply
can't we magnetize the metal at home same way we do screwdriver bits? major difference is metal composition sure. but that would be as simple as seeing which brand at ur local hardware store stick to a magnet (found a couple aisles over lol)? like rub a strong magnet on the screws head in the base before slapping the faceplate on there and see if it helps revitalize the magnetism or maybe im all the way wrong and our amazon screws suck lol
0
Reply
Neat print but I'm finding that the buttons are too short to actually press the buttons on top of the Switch 2 unless I shim it up, but then I risk covering the speakers or putting extra pressure on the system itself.
The designer has replied
0
Reply
Ohh. Interesting. Do you have a value in mm you might suggest? I'll take a look and see.
1
Reply
Replying to @Josheh_3D :
I scaled the Z axis on the buttons to 110% and that’s done the trick without any added pressure on the switch or print itself
0
Reply
Replying to @personaspace :
Thanks for the info. I got the buttons updated and they're fitting a bit better now.
1
Reply
Print Profile
0.2mm layer, 3 walls, 10% infill
Excellent model. Had to scale up the top buttons to 110% and the magnet hole tolerance is super tight, but otherwise a real fun project. Use a retro NSO controller to really sell the effect.
profile
1
Reply
what usb charger are you using?
0
Reply
Thats so cool
0
Reply
Print Profile
0.2mm layer, 3 walls, 10% infill
0
Reply
Print Profile
0.2mm layer, 3 walls, 10% infill
0
Reply

License

This user content is licensed under a Standard Digital File License.

You shall not share, sub-license, sell, rent, host, transfer, or distribute in any way the digital or 3D printed versions of this object, nor any other derivative work of this object in its digital or physical format (including - but not limited to - remixes of this object, and hosting on other digital platforms). The objects may not be used without permission in any way whatsoever in which you charge money, or collect fees.