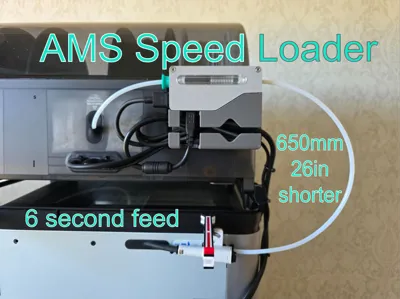
AMS Speed Loader - Reduce time & wear


Print Profile(3)


Description
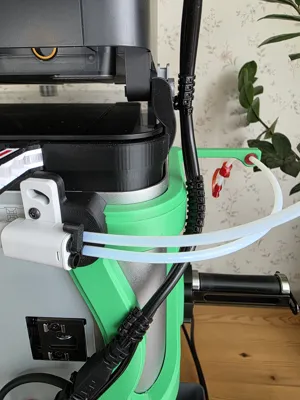
AMS Speed Loader - Shortens the filament path by 650mm / 26in and decreases the filament feed time to only 6 seconds. Also less wear on motors and filament. I mounted the buffer plate as far up and to the right as possible using velcro to make the radius of the PTFE-tube large for low resistance reliable feeding. Clean cable management.
Requires:
- Longer AMS 4-pin cable if you're using a riser and / or want the top right placement I use. Highly recommended! I used this quality $4 AMS Lite Cable Extension - 4-pin 0.5m from Biqu - those who makes the blue buildplate BQ Panda CryoGrip. Shipping to EU including my clear favorite buildplate BQ Glacier was only $5. The original cable can also be extended by soldering. Else: If you place it lower and not using a riser, original cable can be used, but not recommended due to small radiuses.
- Velcro or double-sided tape.
PTFE-tube lengths for my mounting position, using Sanja 3D AMS Glass Slider Riser V5 (I got the V4 - same dimm.).
- Tilted version - 179mm / 7.05in and 361mm / 14.21in.
Flat version - 163mm / 6.42in and 370mm / 14.57in.
Make radiuses smooth, especially 2nd loop since it moves in and out of the buffer when printing.
If you want the faster loading time to be reflected in the estimated print time calculation, Filament load and unload time can be adjusted manually in Bambu Studio, Preview tab, Printer settings, first tab.
- - - - - - - - - - - - - - -
Must recommend the Biqu Panda Glacier build plate if you're paying shipping anyway for extension cable, even tho it's not that much. Imo, it's better in every way than Textured PEI which I never use anymore, because it has better grip than the Textured PEI while looking like it came of my way worse grip Bambu SuperTack (smooth) while accepting all materials unlike SuperTack and for PLA I never have to clean it. I like it a lot, well worth it for me, but note that the print lines are more visible. With many/most colors this still looks more similar to rest of the surfaces compared to Textured PEI. You can see the result here. Had to mod the G-Code tho using this info to lower nozzle for first layer by auto which is already done by auto for Textured PEI to compensate for the unevenness of the textured surface + some more. This is also needed for Bambu SuperTack to have first layer solidly filled. I use the Engineering Plate profile for the Glacier plate with same temps as Textured PEI.
My input in Machine Start G-Code is (scroll down about 45% - look for “Textured PEI Plate”):
;===== for Textured PEI Plate , lower nozzle bcs touching topmost texture when homing ==
;curr_bed_type={curr_bed_type}
{if curr_bed_type=="Textured PEI Plate"}
G29.1 Z{-0.04} ; for Textured PEI Plate
{elsif curr_bed_type=="Cool Plate SuperTack"}
G29.1 Z{-0.01} ; for Cool Plate ST
{elsif curr_bed_type=="Engineering Plate"}
G29.1 Z{-0.01} ; for BQ Cryogrip Glacier
{endif}
My value of (minus inlc.) -0.01 that I calibrated using in slicer made square, like 20x20x1mm, might differ from yours. Double-check your input before testing but try without this input first.
Because the default PLA profile has Engineering plate temp set to 0 it always warns me if I forgot to change to my own modified PLA profile because it thinks the temp is not proper, because Bambu Studio remembers selected build plate but defaults new filament.
Hope you like it!
Boost Me (for free)
Also check out my AMS 1 + 2 compatible filament clip that doesn't bump into the AMS spool guide fins, my See-through AMS Buffer Dust cover, my AMS PSU Holder, my AMS Buffer Cover, my Anti-Vibration Concrete Feet, my AMS 2 Air Intake Filter, my Vibration Isolated Poop Chute, Self Draining H2 Wiper for X1 / P1 and Poop Chute Door.


License
You shall not share, sub-license, sell, rent, host, transfer, or distribute in any way the digital or 3D printed versions of this object, nor any other derivative work of this object in its digital or physical format (including - but not limited to - remixes of this object, and hosting on other digital platforms). The objects may not be used without permission in any way whatsoever in which you charge money, or collect fees.
Comment & Rating (156)