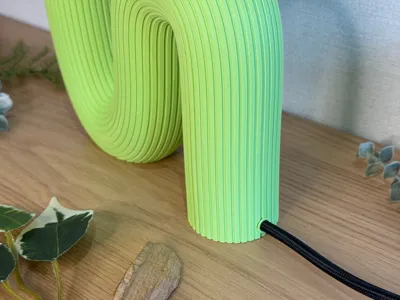
Wave lamp


Print Profile(1)

Bill of Materials

Description
I wanted to create a lamp with a soft and original shape.
Here is the equipment I used:
- BambuLab Apple Green PLA Mat
- Black fabric cable: https://www.leroymerlin.fr/produits/cable-tissu-tibelec-noir-300-mm-89100639.html
- E27 lamp socket: https://www.leroymerlin.fr/produits/douille-a-vis-e27-plastique-noir-82009494.html
- Black switch: https://www.leroymerlin.fr/produits/interrupteur-manuel-noir-2-a-500-w-maxi-74441164.html
- Electrical plug: https://www.leroymerlin.fr/produits/fiche-electrique-male-2-poles-connexion-en-haut-6-a-noir-88253210.html
- Glue
/!\ The materials I used came from a store in France. I chose the simplest option for me, but I think you can find electrical equipment in any good store. The only problem is the size of the lamp socket. The one I used is 39 mm in diameter. I designed the lamp so that a socket up to 42 mm in diameter would fit. Cable diameter: approx. 5.7 mm
Assembly
There are supports around the holes to hold the socket and in a few other places. There are also supports around the socket cover.
 |  |
I am counting on your basic electrical skills to connect the socket, switch, and electrical plug. The advantage of doing the electrical work yourself is that you can choose the desired cable length.
Here is the order in which I recommend assembling the electrical components:
| Attach the cable to the socket and place the socket and cable in the designated path. |  |
| Add the cable finishing ring. To do this, cut the ring with a scalpel (or a very sharp cutter). Then put the ring over the cable. Since it has been cut, it is more flexible and easier to place. |    |
| Put the switch at the desired distance. |
 |
| Connect the electrical plug to the end. But first, don't forget to put on the plug cover. The plug cover is optional because it is fragile and must fit the electrical plug exactly. | 
|
| Now test to see if everything works. |
 |
/!\ Don't forget to test whether the lamp works before gluing the two parts together.
After printing the connection pins, you can sand them to remove any residue. Then place the pins in the 4 holes provided. These pins are only used as guides to make gluing easier; they do not hold the two pieces together, which is why they are not with tension.

Before proceeding to the final gluing, add the centering disc to the socket. Each socket must have its own centering disc. You may need to modify it. I have left a customizable disc in Bambu Studio; you can choose the size of the central diameter by modifying the negative volume part.
 |  |
Glue the two parts together and hold in place for a few minutes to allow the glue to set.
 |  |
That's it. I hope you liked this model and that it wasn't too complicated to assemble. This is my first big model, and I'm still a beginner.
Thanks
Boost Me (for free)
Support my work

Comment & Rating (5)