TRX4M 1/17th Scale Kawasaki Teryx4 H2 Chassis LWB


Print Profile(1)

Description
Boost Me (for free)
If you like the design, don't forget to boost it! Thanks for supporting my fun hobby.
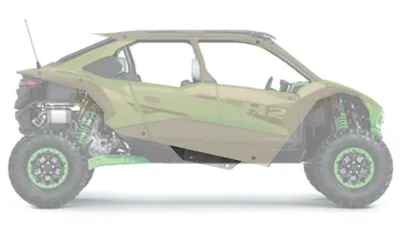
Inspiration taken from the new Kawasaki H2 this 187mm wheelbase rig is Designed to integrate with all stock components with no modification.
In order to make this work:
In the rear, you must run TRX4M High Trail rear links
In the front, you must run a TRX4M High Trail rear lower link and a Bronco/Defender rear upper link with a rear driveshaft
You will have to purchase a set of aftermarket driveshafts for the additional rear driveshaft needed if you do not have a spare sitting around.
The battery tray can be maintained, and the chassis rails will hold the battery in place; you will have to remove the strap.
Recommendations:
You will need quite a bit of hardware, this kit will have everything needed if used in conjunction with stock hardware. 705 Pieces M2.5 Screws Nuts Washers Set Black, Sutemribor M2.5 x 4/6/8/10/12/16/20mm Button Head Socket Cap Screws Nuts Washers Assortment Kit, 10.9 Grade Alloy Steel, Fully Threaded: Amazon.com: Industrial & Scientific
Velcro the stock ESC to the motor as close to the front as possible, be sure to place in an area where the battery wiring can still accessed.
Run the shocks upside down to eliminate the need for shock spacers and to keep the weight as low as possible.
I have attached a link to the file that I used to print the High Trail Links.
TRX4M Suspension Links - Print in place by Chatts MakerWorld: Download Free 3D Models
Assembly Order:
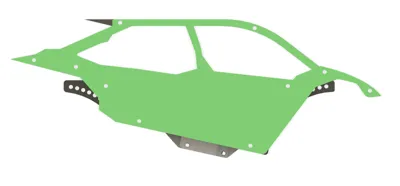
Assemble passenger side chassis rails using 4 2.5*8mm screws - repeat on drivers side

Assemble the rails to skid plate using stock link hardware

3. Assemble side plates using 2.5*8mm screws in the locations shown. In the other locations use whatever 2.5mm hardware you still have.

License
You shall not share, sub-license, sell, rent, host, transfer, or distribute in any way the digital or 3D printed versions of this object, nor any other derivative work of this object in its digital or physical format (including - but not limited to - remixes of this object, and hosting on other digital platforms). The objects may not be used without permission in any way whatsoever in which you charge money, or collect fees.
Comment & Rating (6)