Enclosure for Meanwell 25W and 15W Switching PSUs


Print Profile(1)

Description
ABOUT COMMERCIAL USE
I'm happy to share my designs but please note that them are for personal use only. This means you can print them for your own pleasure but I have NOT provided any commercial license to anyone to sell either digital or physical copies of my designs (e.g.: you cannot sell 3D-prints of this design). I will not hesitate to report to Etsy or other sites admin if I find them being sold there for profit.

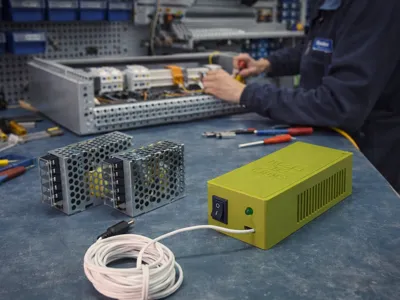
This is an enclosure box I designed for Meanwell 15W and 25W Switching Power supplies. Meanwell 15W power supplies have the marking starting with RS-15- followed by output voltage, so: RS-15-3.3 for 3.3Volts, RS-15-5 for 5Volts and so on. Similarly, Meanwell 25W power supplies have the marking starting with RS-25- followed by the voltage output.
I tested this design with Meanwell 5V Switching Power Supplies RS-15-5 and RS-25-5. Other Meanwell models with same power and different voltages looks to have same identical dimensions, at least from technical papers, so check dimensions first than print.
My advice is to print the enclosure using PETG or a more heat and shock-resistant filament since PSU can overheat.
⚠️ WARNING ⚠️
This project is for experts since involves working with dangerous voltages. The box is not suitable for the external use
After the print you need to insert an M3 brass insert in the hole on top of the enclosure:

The Lid must slide in the box grooves:

and then you can block the lid using an M3 countersunk screw having a length of threaded part from 3 to 10mm.
Optionally you can firmly attach the PSU to the box using 2x M3 countersunk having the length of threaded part of 3 or 4mm.
⚠️ WARNING ⚠️
Threaded part of screws used for attaching PSU must not have the threaded part more than 4mm or you'll damage the PSU!
Using screws on PSU chassis requires the PSU grounding! So you must compulsorily attach the yellow/green wire from the power cord to the grounding screw of the PSU!
Holes have a different placement depending on the PSU model: top hole is slotted since the 25W and 15W have a slightly different hole position:


Required parts (other than filament and PSU):
- Power Switch. I used this one (sponsored link): https://amzn.to/4oI4jj8
- 5mm round led
- Resistor for the led: the value depend on the PSU voltage output and the LED used (for 5V and a green led I used 330Ω)
- Power cord. External diameter of power cord cannot exceed 5.6mm diameter (hole is 5.7mm)
- 3x M3 countersunk screws having length of threaded part of 4mm
- 1x M3 brass insert
If you're printing this box you perfectly know how to connect wires!
Boost Me (for free)
If you like this design, you printed this design for enjoying it or to solve a your problem, please consider to leave me a boost so I can feel motivated and continue to share my creations for free. Thank you very much
PROBLEMS WITH THIS DESIGN?
If you had a problem with this design or you need some edits for fit your own needs, first than leave a bad review please let me know what is your problem/need. You can leave a comment (I prefer this since anyone can benefit from it) or send me a direct message. I can make edits to my designs or change printing profiles for fit your own needs. Please note I can actually understand Italian and English language, so please don't write in another language since I can have problems with automatic translation.
License
You shall not share, sub-license, sell, rent, host, transfer, or distribute in any way the digital or 3D printed versions of this object, nor any other derivative work of this object in its digital or physical format (including - but not limited to - remixes of this object, and hosting on other digital platforms). The objects may not be used without permission in any way whatsoever in which you charge money, or collect fees.
Comment & Rating (7)