Search models, users, collections, and posts


Print Profile(1)
3 Walls, Variable Layer Height on Shells, Lightning Infill
Designer
9.6 h
5 plates
Open in Bambu Studio
Boost
98
222
22
10
82
41
Released
Bill of Materials
Bambu Filaments
Select all


List other parts
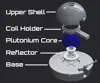
- 73mm Diameter Induction Coil x 1:
- 5x5.4mm Blue Wireless LED Lights x 12:
Description

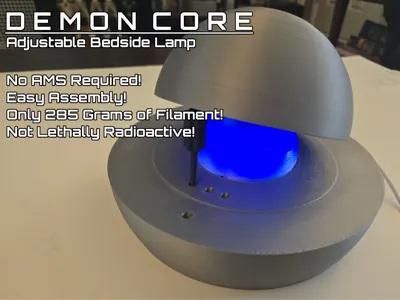
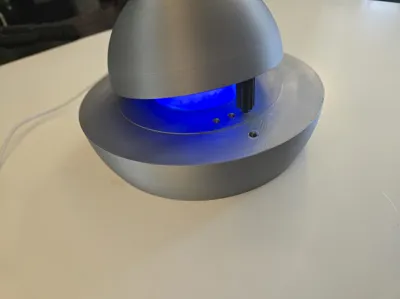
This model is a ~60% Reproduction of the famous “Demon Core”, a Plutonium Core responsible for the deaths of Harry Daghlian and Louis Slotin in ill-advised, unsafe nuclear experiments. This model faithfully reproduces the spirit of the experiments by increasing the intensity of the intensity of the LED lights inside the Plutonium Core as the upper shell is lowered into place. Enjoy the soft and soothing lighting created by the textured interior of the Plutonium Core as you are reminded of the lethal price of arrogance!
Features
- Easy assembly - no glue, no precise printer tuning
- No AMS Required - all parts can be printed without a multi-material system and no filament switching is needed
- Variable Lighting - the brightness of the LEDs changes based on the position of the upper shell
- Not lethally radioactive - Contains 0% Refined Plutonium
Parts List
This model requires two external components to function properly, both of which can be found on Amazon or equivalent stores:
- 1 x 73mm Wireless Induction Coil - Non-Affiliate Amazon Link
- 12 x 5mm x 5.4mm Wireless Blue LED Lights - Non-Affiliate Amazon Link
Assembly Instructions

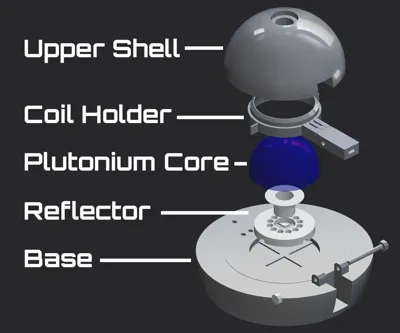
- Part 1 - Upper Shell
- Place the Induction Coil onto the Induction Coil Holder, making sure the loop goes over the small tap on the front
- Scoot the Induction Coil circuit into the empty space in the base
- Press the Induction Coil Top into its space on the back of the base, above the circuit
- Press the Induction Coil Holder into the underside of the Upper Shell, which should remain firmly in place
- Part 2 - Lower Shell
- Snap the Reflector Base into the center of Lower Shell, aligning it with the intersecting horizontal guides
- Insert the Wireless LEDs into the Reflector Base
- Insert the curved Reflector into the Reflector Base
- Remove the internal support structure from the Plutonium Core
- Insert the Plutonium Core into the Lower Shell, aligning it with the intersecting horizontal guides
- Part 3 - Putting it Together
- Place the Upper Shell on top of the Lower Shell, with the hole through the Induction Coil Holder aligned with the two hinges on the lower shell
- Take the Induction Coil Holder Axle and slide it through the two hinges in the Lower Shell and the hole in the Induction Coil Holder
- Press the two Induction Coil Holder Caps into either end of the Induction Coil Holder Axle to secure it in place
Documentation (4)
Assembly Guide (4)


License
This user content is licensed under a
Creative Commons Attribution-Noncommercial-Share Alike
Comment & Rating (22)