Search models, users, collections, and posts

Stubby Gen2 Impact Casoman Packout Insert

IP Report

Print Profile(3)

All
X1 Carbon
X1E
P1S
H2D
H2D Pro
P1P
A1
X1
H2S
P2S
H2C
X2D
A2L

0.4mm Nozzle, 0.28mm layer, 2 walls, 15% infill
Designer
17.1 h
3 plates
4.9(18)

0.6mm nozzle, 0.42mm layer, 2 walls, 15% infill
Designer
14.1 h
3 plates
5.0(5)

Text on top rather than under the sockets
19.2 h
3 plates
5.0(8)

Open in Bambu Studio
Boost
577
1625
68
26
1.1 k
439
Released 

Description

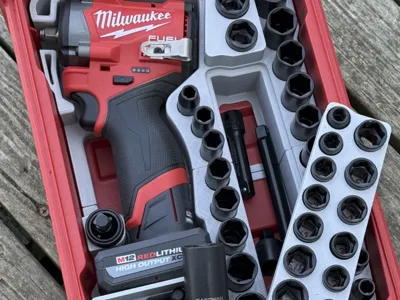
I've seen a number of these Milwaukee Packout inserts for sale online, but they're all made to fit a 43-piece socket set from Milwaukee, which is expensive. I found a 49-piece Casoman brand set on Amazon (https://a.co/d/c9pqQIE) which is very affordable, and thus far, durable and functional. So, I set about to make an insert to fit my needs.


I had saved a number of photos of the inserts I found and used them to guide this design. There are elements from a few of the ones available to purchase. I found a model of the shape of the Packout interior on GrabCAD and used it to get my model close. 


The 21mm and 22mm deep sockets are commonly used on my vehicles, so I broke them out into a separate area, for quick access. I rarely use the shorter length sockets in those sizes, and there wasn't room to squeeze them into their own places, so those and the extensions and adapters fit into the large cell under the removable section with the smaller sockets. With the lid closed, the case can be oriented in any direction without the sockets falling out of their places. 


There's a pocket on the underside for an Apple Airtag.


I printed mine with a 0.6mm nozzle out of PETG, with a 0.42mm layer height, and painted the text labels red in the slicer. 

Comment & Rating (68)

(0/1000)

Print Profile
0.4mm Nozzle, 0.28mm layer, 2 walls, 15% infill
Awesome design, added numbers to the top for added visibility when sockets are in it.
profile
6
Reply
How did you add the numbers? Can you share the file?
(Edited)
2
Reply
Was a fast print. I have the Rubber Cover on my impact so a little sanding was needed to fit how I wanted. I carry a couple extra flex sockets that slid right in and storage for extensions and hand ratchet was perfect. Thanks
1
Reply
How much of a pain was it to sand to get it to fit with the boot on?
0
Reply
It was about 3min with a Milwaukee Rotary sander. It fit before sanding but was VERY tight. I carry this box on my Side by Side. This is a much better fit than another I had printed. Great work.
1
Reply
Replying to @user_3126751119 :
Appreciate the response. This looked too good to pass up even if I have to use an adapter to connect to Modbox bases easy enough.
0
Reply
This was super easy to print, and it made a friend very happy. Thank you!
designer
2
Reply
Print Profile
0.4mm Nozzle, 0.28mm layer, 2 walls, 15% infill
Great print, fit nicely!
profile
1
Reply
Print Profile
0.4mm Nozzle, 0.28mm layer, 2 walls, 15% infill
came out awesome. used PTEG
(Edited)
profile
1
Reply
perfect print. love it
1
Reply
Print Profile
Text on top rather than under the sockets
this works great!!
1
Reply
Print Profile
0.6mm nozzle, 0.42mm layer, 2 walls, 15% infill
This insert printed great and had no issues at all. it fits in our box perfect. My hubby was very grateful to make this work. The tool set was cheap too but nice. thanks!
profile
1
Reply
Printed with matte pla. boosted
designer
1
Reply
Print Profile
Text on top rather than under the sockets
Printed in PETG (Elegoo Rapid) and came out great. Fits packout box perfectly and overall great design.
1
Reply