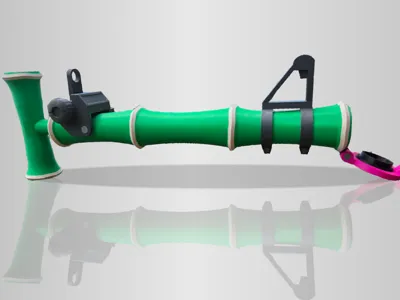
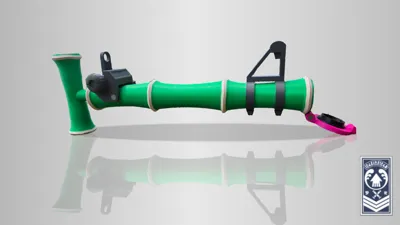
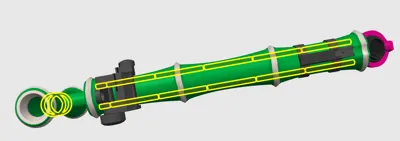
Bamboozler 14 Mk I


Print Profile(3)


Description
If you like my stuff and got a Boost, why not toss it my way? Every bit I get
helps me to do this full time.
Boost Me (for free)
Press this button to use a Boost Token to give me a free dollar!
And if you're interested in purchasing a Commercial License Membership, check it out here!
Membership
Click here to get the rights to sell prints of my models yourself!
Sorry for the interruption; on to the Meat and Potatoes!
Bamboozler 14 Mk I
Breaking News:
If this is a bit too big for you, I've made one that's a bit more… human-friendly. It's a bit smaller. You can print it here!
https://makerworld.com/en/models/1790504-bamboozler-14-mk-i-smaller
Intro
"A reissue of a weapon used during the Great Turf War. It charges up extremely quickly and boasts great range even when not fully charged. Unfortunately, it is rather weak."
–In-game description
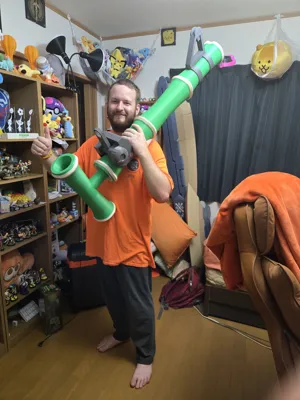
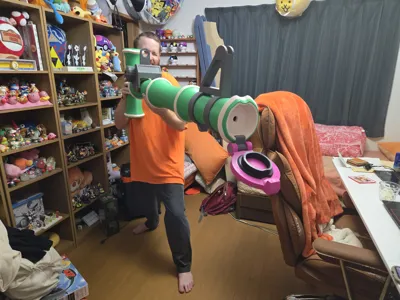
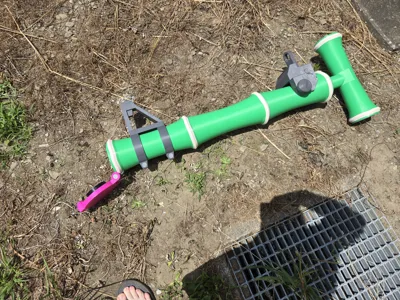
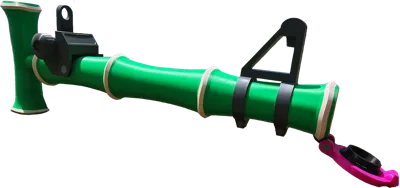
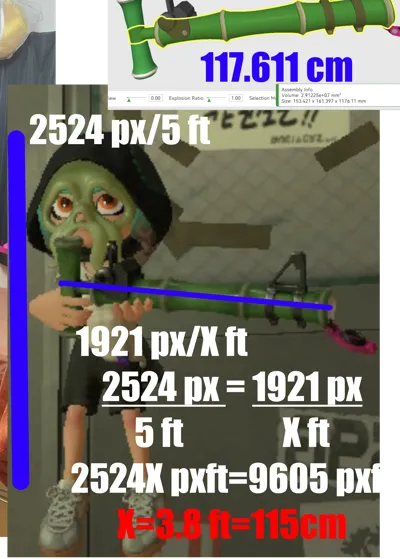
The Bamboozler 14 Mk I has been a staple of the Splatoon series, and first appeared way back in the original. It’s a remake of the weapon Cap’n Cuttlefish used in the Great Turf War, and is the fastest (albeit weakest) charger-type weapon in each game it appears in. I’ve brought into real life with this 1:1 scale model, assuming an Inkling is 5 feet tall. It is just a model; no shooting of ink or water involved. Let me know if you’d be interested in something like that! It is hollow, so if anyone is interested in running a tube through it…
And yes, it looks huge, but… yeah. The Inklings have a freakishly high hand-to-body ratio, but you can double-check my math via the diagram in the photos, if you’re interested.
Along those lines, this takes a LOT of filament–over two rolls’ worth. I needed about 1.5 rolls of green, but every other color stayed well under one roll. If you try to scale it down, you may run into issues with the tolerances no longer working, and you may not be able to assemble it anymore–do so at your own risk!
Also, there are some details on the model (essentially, the cream-colored parts on the main body and some of the rivet-like parts on some of the other parts) that were just too small/complicated/difficult-to-work-with to justify trying to separate them out for people who can’t print in multicolor, unfortunately. Obviously, you can get around this by just not printing them in multicolor; the loss of detail will be minimal if you do.
Overall, though, I’ve provided an assembly video and 3mf files that contain everything you need to print out and assemble the model, so if you’re interested, you can pick one of them to use and then skip to the end of this description for the video.
I’ve designed three 3mf files–one for the BambuLab H2D (the one I used), one for the X1/P1/A1 printers, and one for the A1 Mini (so yes, even the small bois can get in on the fun!)
But if you’re not interested in those, the STEP files are free to be disassembled however you want to, So read on for the written instructions!
Parts List
Filaments:
All filaments used were BambuLab Basic PLA:
- Bambu Green x2 (Main color of the Main Body)
- Dark Grey (Main color of the Sights, Lid Clip)
- Black (Stopper, Pegs)
- Beige (accented color of the Main Body)
- Silver (SmallKnobPin,SightBigPin, secondary color of any of the Dark Grey parts or the Lid)
- Magenta (Lid)
Printed Parts:
Special Print Instructions:
Generally automatic supports should do you well, but I don’t think any of the Main Body pieces need them.
Pegs all have 20% infill for strength and rigidity, with all other parts at 5% for weight.
I’ve categorized the parts into 5 different Groups:
- Main Body
- 11 parts numbered 1-11, excluding 7 and 9 (Bambu Green, sometimes with Beige)
- HandleTop (Bambu Green)
- HandleMiddle (Bambu Green with Beige)
- HandleBottom (Bambu Green with Beige)
- Close Sight
- SightMainBody (Dark Grey with Silver)
- Sight (Dark Grey)
- SmallKnob (Dark Grey with Silver)
- SightBigKnob (Dark Grey)
- SightBigPin (Silver)
- SightSmallPin (Silver)
- Far Sight
- 7 & 9 (Dark Grey with Silver)
- FarSightPoint (Dark Grey)
- Lid
- LidClip (Dark Grey with Silver)
- Lid (Magenta)
- Stopper (Black)
- Pegs
- Peg(Long) X10 (Any color is fine)
- Peg(Short) X2 (Any color is fine)
- Peg(Round with a wide triangle cut out of it) (Any color is fine)
- Peg(Round with a skinny triangle cut out of it) (Any color is fine)
Non-Printed Parts:
- Glue (I used JB Weld, but regular Super Glue should work fine)
Assembly
Intro:
I designed this to be as foolproof as possible–in the vast majority of cases, the parts have been designed in such a way that figuring out the correct way to assemble them is very obvious, and putting them together is often physically impossible (I hope). You could probably have a relatively easy time just by using the images here as a reference, and gluing the parts together accordingly.
That said, there are a couple things to keep in mind:
- Main Body #1 doesn’t have a bumped out number like the rest of them due to printability, so make sure you line the 1 up with the reversed 1 on Main Body 2!
- The SmallKnobPin can be put in backwards–the curved edge is supposed to face inwards, which makes it easier to insert.
- Technically the LidClip and Lid can be put together backwards, but it’ll look really weird and be really awkward to assemble if you try to do that.
- The HandleMiddle can be put on either way, but it’s symmetrical, so it literally won’t matter. You don’t need to worry.
Instructions:
Overall, I don’t think you necessarily need instructions; despite its size it’s simple enough that you can just reference the picture and build it from there.
- The first thing we’ll deal with are the numbered bodies. Set aside #1 for now, and glue the long pins into each hole, working your way up and matching each numbered body from #2-11. Each number fits into the corresponding hole of the next body in order to prevent mistakes.
- Stand that up to let gravity hold it together while it dries. While that is happening, glue the FarSightPoint to Bodies #7 and #9–it doesn’t fit if you do it the wrong way.
- Next, we’ll work on the other sight apparatus. Using the SightBigPin, pass it through the same-shaped hole on the left side of the SightMainBody, threading it through the Sight on its way through, like the image. It’ll be poking out of the right side, so glue the SightBigKnob on it to cover it up. Leave that for now.
- On to the Handle! Take our friend #1, along with the two Circular Pegs. One has a short but wide triangle groove in it, and the other has a tall but skinny one. Glue one into the appropriate groove on the handle side of #1, and glue the HandleMiddle onto that Circular Peg as well. Glue the other Circular Peg onto the other side, and then Glue the Handle Top and Handle Bottom to their corresponding Circular Pegs.
- For the Lid, glue the Stopper in the big groove on the Lid. Then, fit the LidClip into its place on the Lid, making sure it faces outwards.
- Finally, we can glue everything together:
- Put the sight apparatus on #2, lining up the holes in the sides with the indentations in #2. Glue the SmallKnob in on the left side (it has a little tab to line it up), and glue the SmallKnobPin in on the right, making sure the curved-lipped side goes in first. Make sure they line up with and go into the indentations in the sides!
- Fit the Lid Clip into the indentation on #11. Make sure it’s properly dry and solidly attached before you proceed.
- Lastly, glue #1 into #2. In order to make it easily printable, I couldn’t make the “1” into a little tab on this one, so make sure you line them up and glue them on properly!
Conclusion:
That’s it for the build! As always, I hope you enjoyed putting it together, and if you have any questions, let me know in the comments below!
And thank you to everyone who keeps downloading my models! If you like what I do and want to support me to keep things free for anyone to make, please share my stuff, like, comment, follow, post makes, and check out my profile for other socials to follow on! I’ll see you next time!
Assembly Video:
Comment & Rating (33)