Search models, users, collections, and posts

AMS 2 Pro Desiccant Holders

Print Profile(7)

All
X1 Carbon
H2D Pro
A1
X1
P2S
H2D
X1E
P1S
H2S
P1P
H2C
X2D
A2L
A1 mini

0.20mm layer, 2 walls, 15% infill
Designer
15.2 h
2 plates
4.9(1.5 k)

0.2mm layer, 2 walls, 15% infill - without hygrometer hole
Designer
15.3 h
2 plates
4.9(306)

H2D Printer - 0.20mm layer, 2 walls, 15% infill
Designer
16.9 h
1 plate
4.8(95)

One build plate, P2S
16 h
1 plate
4.9(127)
Click to see more

Open in Bambu Studio
Boost
2973
11114
4981
1 k
18.6 k
12.9 k
Released 

Bill of Materials

Maker's Supply Kits and Parts
Select all
Bambu Filaments
Select all
Black (33102) / Refill / 1 kg

Description

Important - if you are using the .stl file, please read the instructions at the bottom. However, I recommend using either Bambu Handy, the “Open in Bambu Studio” option, or the .3mf file as everything will already be configured for you.


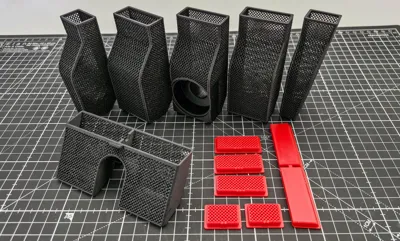
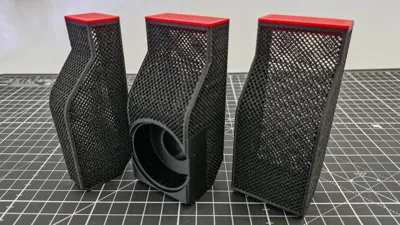
This is my new design for the AMS2 Pro desiccant holders. I regularly get 7% humidity (according to Bambu Studio) within a couple of hours as long as the desiccant is regularly refreshed, and that's in a room with 70% ambient humidity. There are five containers for the front sections and a single container for the rear section. 


I designed them to maximise the airflow to the desiccant yet keep the containers rigid and robust, with the added bonus of great visibility if you are using colour changing desiccant (so that you know when it's exhausted). Due to the complex nature of the mesh it is a long print, but I honestly believe that these are the most efficient containers that you can use - and you'll only be printing them once - so it's worth it!


My design includes 3 funnels to fit the large containers, small (end) containers, and the rear container.


The main download file has space for a hygrometer (the one that is available from Maker's Supply), but if you don't want or need a hygrometer then you should use the print profile labelled “without hygrometer hole”.


The profile uses PETG, however, be very careful to fully dry the filament before printing. There are a lot of z-hops and PETG is very susceptible to stringing if it contains any dampness. I usually won't print unless the AMS reports 25% or less humidity. I would also recommend not using PLA as it will soften if you're using your AMS2 Pro with the drying cycle.


Printing instructions - only needed for .stl files

Be sure to set the “Wall generator” = Arachne. The mesh holes are very small and I found that when Bambu Studio sliced the lids it omitted the holes if I used Classic - not very useful! 


The only area that may need supports are the top of the arch in the rear container and the hole for the hygrometer. I would also set the “Initial layer expansion” to 8mm as the default base for the supports is in my opnion too small.


Set “Brim type” to No-brim - they're really not necessary.

Note: this design is for the AMS2 Pro, see my other design if you're using the standard AMS: 

https://makerworld.com/en/models/1182366-bambu-lab-ams-front-desiccant-holders#profileId-1192863


I also have a design for the AMS HT with the same design concepts:

https://makerworld.com/en/models/1993736-ams-ht-desiccant-holder#profileId-2145835


as well as Bambu filament spool desiccant holders:

https://makerworld.com/en/models/2067734-bambu-filament-spool-desiccant-holder#profileId-2233018

Boost Me (for free)

This project took me 35+ hours of designing in Fusion, and Boosting this model will provide me with some feedback that I'm heading in the right direction. Many thanks.

Comment & Rating (4981)

(0/1000)

Printed all the parts in one batch but can't get the back piece to print correctly. Have tried around 3 plus tries but somewhere a hole will always form. All prints performed on sub 10% filament and bambu brand so I'm out of ideas that could be causing it.
The designer has replied
1
Reply
I'm having the exact same problem at the same part of the same piece on my H2C. Tried twice so far. I'm using Bambu's PETG-HF dried out and living at 4% rh. The other containers and lids are great. But this back piece will not print cleanly.
0
Reply
Replying to @DeltaSteele :
I also have a H2C strange
0
Reply
Hi @Benjkuj @DeltaSteele - and sorry to have taken so long to get back to you all. I have been investigating as best as I can and tried printing the back box again with Bambu black PETG-HF and ASA and I just can't get either materials prints to fail - which really doesn't help you at all. I need to understand why you're both experiencing similar failures so that I can fix it. Normally I would say that your filament needs drying as that is what the results look like, but I know you both have been printing with good dry filament. I had advised other users that this was the problem, and they confirmed that it was fine after reprinting, It's interesting that you both have a H2C, but in single colour models like this there is no real mechanical difference to my H2D.
(Edited)
0
Reply
Boosted
Print Profile
0.20mm layer, 2 walls, 15% infill
For me the "net" is not printed on the caps therefore after 3 attempts I have a lot of frames but no actual lids I'm really open to ideas
(Edited)
The profile uploader has replied
Show original
5
Reply
Hi Günter, would you mind telling me why you've given a low print rating? I'm not being rude, I'd just like to know if there are any improvements that I can make to the design.
(Edited)
1
Reply
Boosted
Replying to @RobertWest :
Sorry, it was my mistake. I will try to change to 5* asap.
0
Reply
Replying to @Renner73 :
You absolutely must set the the wall generator to Arachne - it is already configured like that in my .3mf file. Did you use the 3mf file (or "Open in Bambu Studio") or did you download the .stl file (which wouldn't have included any settings)? I did mention this would happen in the instructions - and your results are exactly what I would expect to see if the wall generator is set to "Normal"
(Edited)
5
Reply
I like these (replaced the center with one of the non-sensor boxes as the low-cost hydrometers are not very accurate anyway) except the lids could have a much thinner mesh layer and just a simply support structure (if you think the strength is needed) to decrease the print time.
The designer has replied
1
Reply
To be honest, I don't find the hygrometer that Bambu sells too bad. It's just handy to be able to glance at it to make sure that I haven't had a catastrophic humidity increase (it's pretty humid here) without having to fire up the PC or look in the printer menu - I'm very lazy. I took a look at reducing the height of the mesh on the lids, but at most it'd save ~25 minutes, and I rather like the chunkiness of it as I do handle it quite often. However, thanks for your suggestion, and if you have any more ideas please do let me know.
2
Reply
Fitment issue. The side pods don’t sit at the bottom. There is some sort of interference that makes them rotate. Very close to the spools, but I don’t think they will touch. I tried swapping them left to right and the issue is worse. Same in all four of my AMS 2 PRO.
2
Reply
Replying to @user_1863025223 :
Here is a pic.
1
Reply
Print Profile
0.20mm layer, 2 walls, 15% infill
Wonderful print and everything came out perfect. I printed these in transparent filament so that I could see the desiccant better and cause it matches the AMS 2 Pro better in my opinion to keep the transparency going ☺️ Thank you!
The profile uploader has replied
6
Reply
Thanks for the comments, photos and print profile rating, very much appreciated. They do look very nice in transparent.
(Edited)
2
Reply
what settings did you use as I am wanting to try my transparent filament as well
0
Reply
Replying to @user_2706294206 :
Hi, the only thing that I changed was the filament type to print in PETG, which is what you should print these in anyway since the AMS 2 Pro has the drying feature and could warp other materials when using that feature on a high setting. Everything else I left as per profile.
0
Reply
Boosted
Print Profile
0.20mm layer, 2 walls, 15% infill
PETG HF with 0.4mm standard nozzle
(Edited)
The profile uploader has replied
Show original
4
Reply
Thanks for the profile rating, it's very much appreciated. The photo looks very stringy, was the PETG really dry before printing? I haven't got a HighFlow nozzle, so I can't replicate the problem, but I have had issues with humidity and PETG before which had very similar symptoms. I normally won't print unless I've got the humidity down to around 15% or less.
0
Reply
Boosted
The filament was probably not dry I will print it again with the same filament after drying it in the AMS 2 pro
Show original
0
Reply
Replying to @peterh62 :
Could you let me know how you get on, all feedback is useful. Many thanks 👍
0
Reply
Great print, came out great but there is something off with the H2D all on one plate profile. It only prints the containers and the stuff (funnels, lids) on the front of the plate dont print until after the back ones are complete. Obviously this would either error out or cause a collision, so I just stopped it once it got to the slice and didn't give it a chance. Tossed you a boost though, because the detail on this is stellar. Edited: I realized the print order was set that way on purpose, and it works as intended. Great print, thank you!
(Edited)
The designer has replied
12
Reply
Hi @user_2463535618 - I was just about to reply and then noticed that you'd figured it out yourself :-) For anyone else that is reading this and is interested, the containers are combined into a single group and the lids & funnels are in a second group, and then the entire build plate is set to "Print by Object". This means that all of the containers will print first, and then the lids/funnels. If you're printing in 2 colours you will only have one filament swap - and even on a H2D this still saves about 90 minutes. Obviously, this is all superfluous if you're printing in a single colour! As you correctly pointed out, it looks like there would be a collision when printing the lids/funnels, but due to the way they are laid out this won't happen - and MakerWorld rigorously checks that this can't happen before allowing you to publish a model. Thanks very much for you comments and boost, and it's really cool that you did figure out why I did what I did!
(Edited)
8
Reply
I printed it today on my PS2 and the exact same thing happens The covers only print the edges and not the "net"
Show original
0
Reply
Boosted
I printed the parts through the Handy app, selected the No Hygrometer profile, used generic black PETG and Dynamic gold PETG, the black filament was a bit stringy and the gold filament failed printing the funnels but the box tops managed to come out fine. I’ve salvaged all the main boxes and need to get more desiccant to fill them all. The rear box finished the print but had some glaring errors, unfortunately. I’m going to print it again, just the rear box and will reorient it on the plate more vertically. It would appear the black filament is still damp for some reason even though the AMS humidity readout was 22-24% humidity. Plate 2 I guess failed because I failed to wash the build plate between prints. I thought I could get away with it. One of the funnels detached mid print and it all turned to spaghetti. Sigh.
The designer has replied
1
Reply
Hi @McLeod I'm afraid that does have all the hallmarks of damp filament, you should really aim for around 15% humidity for PETG as it will get very stringy with all of the z-hops and retractions necessary for such a fine mesh. They also need good bed adhesion, so give it a good wash with isopropyl alcohol or a quality dish washing liquid. Just out of interest, what printer are you using? I have a couple of other users with H2C's that had very similar results, but specifically the back box, and they are using dry filament. BTW - the back box was designed to be printed at that exact angle - the internal surfaces of the mesh are angled so that they are parallel to the printbed - which should make a cleaner print.
(Edited)
0
Reply
Could you let me know if drying the filament fixes you problem please, I'm trying to keep track of everyones issues!
0
Reply
Boosted
Replying to @RobertWest :
I'm printing on an H2C; I haven't yet seen humidity in the AMS below 22% yet, but hopefully soon! I made another couple of attempts and finally have all the components printed. Still using the black PETG, I reoriented and changed the supports in order to successfully print the back box and it came out fairly alright - intact and serviceable. I also printed the funnels in black PETG and the came out perfectly fine.
0
Reply
Boosted
Hello, this is one of my first "major" prints, started out printing the one with hygrometer in, went well. Then decided to put all in on plate and send it!, Almost worked out, except for the lids. Anyone that can explain why they failed, the frame on them fits perfect, but the mesh part is just missing, making them well frames not lids.. Thanks in advance
The designer has replied
0
Reply
You need to set the Wall Generator to "Arachne", it will not print the mesh on the lids otherwise (it's in the instructions). Better still, use the "Open in Bambu Studio" option or download the .3mf file as all of the settings are baked in, including some others that you will be missing.
1
Reply
Boosted
Replying to @RobertWest :
Thanks yeah you're right, i missed that step, Will give it a try, printing something else right now. Can't have the printer standing still :P The rest is really good looking THANKS, a really solid setup here, appreciate it, and you taking time to reply
(Edited)
0
Reply
Replying to @TDVV :
Glad to be of help. If you get a chance, would you give a profile rating please? Every one of them helps!
1
Reply
Print Profile
0.2mm layer, 2 walls, 15% infill - without hygrometer hole
Had trouble printing the containers. I opted to use PLA as the support interface layer to make it easier to detach the support from the box that goes in the back of the AMS 2 Pro. Didn’t print well at that layer, also probably needed to increase the purge volume. Switched back to PETG for the support interface layer and it all printed really well. Bed was cleaned/washed and still had one of the end containers tip over at about 40 layers left out of 490 something. Bed temp was 70 for first layer and then 65 for the rest, because chamber temp rose to point of getting too hot error message from temp creeping up. Added a 8mm brim with a 0.2mm spacing and it reprinted well and brim came off easy. Funnles fit well but not 100% snug. Just enough to where it won’t fall off by itself when held at an angle. Funnles are a must. Makes it crazy easy to fill with desiccant beads. Mesh is the most breathable design I’ve found and is super easy to see when beads need to be recharged.
The profile uploader has replied
1
Reply
Great review, thanks!
0
Reply
Hi @user_3215803204 - when you printed the rear container, did it also print the 4 little supports that are part of the model as well? I've not heard of many issues with adhesion before and was wondering if you used the .stl file. Many thanks for the boost, photos and comments, they're really appreciated.
0
Reply
Replying to @RobertWest :
Hello @RobertWest, yes the rear container printed the tree supports, I believe I used the .3mf file. I wanted a more better finish than tree supports normally leave so I opted to use PLA as the support material for the top interface layer of the supports so they will pull away cleanly since PLA and PETG don’t really adhere to one another. Either it was a fluke, or maybe I needed to increase the purge volumes between materials to ensure the old material was completely out before printing. The misprint happened on all the containers at the layer corresponding with the top surface of the support of the rear box. Indicating that was the problem. I switched the support material back to PETG and it all printed great. I carefully removed the supports as to not leave any surface marring. I noticed you had 2 different profile in the time I looked for them. The first one I saw and saved and printed was with the rear container oriented at 45 degrees to the plate.
(Edited)
0
Reply
Print Profile
0.2mm layer, 2 walls, 15% infill - without hygrometer hole
Does the job! Forgot the lids but the creator @RobertWest took time below to let me know. posting added pics later with lids thanks & boosted.
(Edited)
The profile uploader has replied
0
Reply
Thanks for the comment and print profile rating, very much appreciated. You seem to be missing the lids, did they print OK?
0
Reply
Replying to @RobertWest :
Thanks for the reply. I gave a boost because you took the time to reply. TBH I forgot the caps and full disclosure I got a tiny bit of stringing because even though my AMS2 Pro was at 20% I didnt pre-dry my PETG. I was going to hit it with the hair dryer to see if it helped but they look great. I'm going to make the lids and reply. This community it amazing and its nice to see creators like yourself who take time to reach out @RobertWest thank you 🙏🏼.
0
Reply
Replying to @user_4198492927 :
Hi @user_4198492927 - yeah, you need to really dry PETG to stop the stringing, which is a bit ironic for a filament dryer! When you print the lids I'd suggest using the .3mf file (or the "Open in Bambu Studio" option) as it has all of the settings. If you're using the .stl file it is absolutely crucial to set the Wall Generator = "Arachne" otherwise you won't get the mesh! I do try and reply to every comment on here. If they've made the effort to leave a message or given me a boost, then I should make the effort to thank them. This is a really great community. I've worked with several people who've downloaded the model and had suggestions, and it's improved the design and made it better for everybody. Long may it continue.
0
Reply

License

This user content is licensed under a Standard Digital File License.

You shall not share, sub-license, sell, rent, host, transfer, or distribute in any way the digital or 3D printed versions of this object, nor any other derivative work of this object in its digital or physical format (including - but not limited to - remixes of this object, and hosting on other digital platforms). The objects may not be used without permission in any way whatsoever in which you charge money, or collect fees.