GTS 10 XC Setup Aid + Gridfinity Organizer


Print Profile(1)

Description
Boost Me (for free)
If you like this model, consider giving it a boost – it really helps my work reach more makers and keeps me motivated to share more! Thank you! 🙏
🇬🇧 English Description
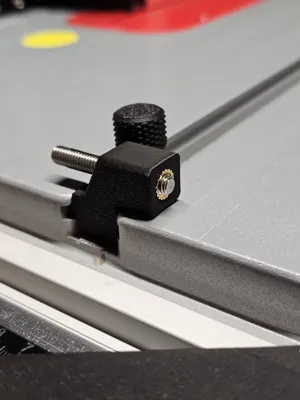
This is a collection of setup aids designed for the Bosch GTS 10 XC table saw. The goal was to create practical tools to simplify setup and adjustment tasks. The idea was inspired by @Nachdenksport’s setup aids, but all components were fully designed from scratch without copying or reproducing existing parts.
The set includes multiple tools to support precise alignment and adjustment of the rip fence, sliding carriage, and related components, helping to improve accuracy and workflow.
Required Hardware:
- For the “setup block for rip fence”:
One M6 heat-set insert and one M6 nut (I used Ruthex brand). - For the “hand nut 2x”:
One M6 nut each (printing profile includes a pause to insert the nut during printing). - For the “baseplate”:
One M4 nut (also inserted during printing via a pause). - For the “Setup Block for Sliding Carriage”:
One M6 x 35 cylinder-head screw (used to adjust the precise distance between the aluminum profiles that guide the sliding carriage). - For attaching “baseplate”, “topplate” and “Height adjustment plate”:
Two M4 x 12 flat-head screws with matching nuts. - For the “T-bar adapter for sliding carriage”:
One M4 nut and one M4 x 16–18 flat-head screw (nut inserted during printing via a pause). - For fastening “baseplate” to “topplate”:
One M4 x 8 flat-head screw. - For attaching “T-bar slider – adjustable” to “baseplate”:
Two M6 x 16 countersunk screws. - For adjusting the height of the “Height adjustment plate”:
One M4 x 6 set screw. - For “T-bar slider – adjustable”:
One M4 x 6 countersunk screw with nut. - For “T-bar adapter for sliding carriage”:
One M4 x 12 countersunk screw with nut. - For the “setup block for rip fence”:
Two M6 x 14 hex-head screws.
All parts were designed with functionality and ease of use in mind.
Have fun with the model – hopefully it will be useful for your setup.
🇩🇪 German Description
This is a collection of setup aids for the Bosch GTS 10 XC table saw. The goal was to develop practical tools that simplify the setup and adjustment of the machine. The idea was inspired by the setup aids from @Nachdenksport, however, all components were completely designed independently without copying or reproducing existing parts.
The set includes several tools for precise alignment and adjustment of the rip fence, sliding carriage, and other components, thus contributing to improved accuracy and workflow.
Required Hardware:
- Setup block for rip fence:
- 1x M6 heat-set insert
- 1x M6 nut
- Hand nut (2x):
- 1x M6 nut each (inserted during printing via a pause)
- Baseplate:
- 1x M4 nut (inserted during printing via a pause)
- Setup block for sliding carriage:
- 1x M6 x 35 mm cylinder-head screw
- Connection baseplate / topplate / height adjustment:
- 2x M4 x 12 mm countersunk screws with matching nuts
- T-bar adapter for sliding carriage:
- 1x M4 nut (inserted during printing via a pause)
- 1x M4 x 16–18 mm countersunk screw
- Fastening baseplate to topplate:
- 1x M4 x 8 mm countersunk screw
- T-bar slider – adjustable to baseplate:
- 2x M6 x 16 mm countersunk screws
- Height adjustment plate:
- 1x M4 x 6 mm set screw
- T-bar slider – adjustable:
- 1x M4 x 6 mm countersunk screw with nut
- T-bar adapter for sliding carriage:
- 1x M4 x 12 mm countersunk screw with nut
- Setup block for rip fence:
- 2x M6 x 14 mm hex head screws
All parts were developed with a focus on functionality and ease of use.
Have fun with the model – I hope it helps you with your setup.
License
You shall not share, sub-license, sell, rent, host, transfer, or distribute in any way the digital or 3D printed versions of this object, nor any other derivative work of this object in its digital or physical format (including - but not limited to - remixes of this object, and hosting on other digital platforms). The objects may not be used without permission in any way whatsoever in which you charge money, or collect fees.
Comment & Rating (10)