Manual Three-color Overprint Stamp Case (For Mint&Casio)


Print Profile(2)


Description
Thanks to the MakerWorld competition, I finally created my multi-color stamp, hahaha!
Introduction:
This is a three-color stamp set, suitable for Mint and Casio 3030 stamps (actual stamp surface size is 32*32, this model is suitable for stamp surfaces with thickness > 1.6mm, recommended thickness > 2mm). One design is separated into three color sections and placed into the stamp, generating the complete desired design through three presses.
Updated on 2025/8/8
Special Thanks:
Thanks to the expert @啊又断啦 for suggesting using the "Image Keychain Generator" and "Sign Customizer" in MalerLab to achieve color separation for images!

This method allows for quick generation of corresponding color block patterns. At the same time, this method can even achieve 3D printed stamp surfaces. If 3D printed patterns are used instead of photosensitive stamp surfaces, the overall size is recommended to be set to 31.8*31.8, with a recommended thickness > 2mm

Updated on 2025/8/10
Successfully achieved the production of matching stamp surfaces through 3D printing. The era of multi-color stamp freedom is approaching (lol)

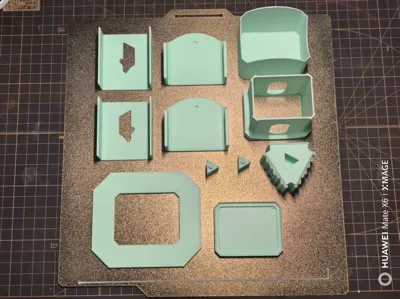
Component Introduction:
1. Motion Limiter

2. Motion Limiter Outer Sleeve

3. Stamp Carousel

4. Carousel Shaft

5. Shaft Limiter

6. Shaft Limiter Outer Sleeve

7. Stamp Cap

8. Stamping Assist Plate

Model Notes:
*Please install step by step, paying attention to the installation direction, and try to ensure success on the first attempt.
Although the overall model is assembled, it can be disassembled in reverse after assembly. However, due to the tight fit of some parts of the model, secondary disassembly and reassembly may cause damage to the printed parts.
*Before printing, please ensure the build plate is clean. If some components of the model warp, it may affect the overall appearance and functionality.
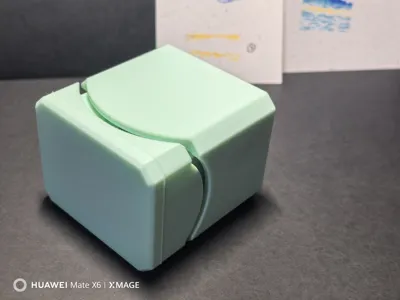
Main Body Installation Instructions for the Stamp Set:
1. Insert the Motion Limiter into the Motion Limiter Outer Sleeve (pay attention to direction), and align the two side panels of the Motion Limiter (may require force).
2. Insert the Stamp Carousel (pay attention to direction). Normally, the stamp surface should be horizontal when the carousel shaft hole aligns with the lower section of the Motion Limiter. If not, please flip the Stamp Carousel 180°.
3. Insert the Carousel Shaft from both sides of the Stamp Carousel.
4. Cover the Shaft Limiter from both sides, ensuring the Carousel Shaft falls into the Shaft Limiter hole.
5. Place the Shaft Limiter Outer Sleeve over the Shaft Limiter (may require force).
Operation and Installation Video:
[3D Printed DIY Multi-color Stamp] https://www.bilibili.com/video/BV11StBz6EiG/?share_source=copy_web
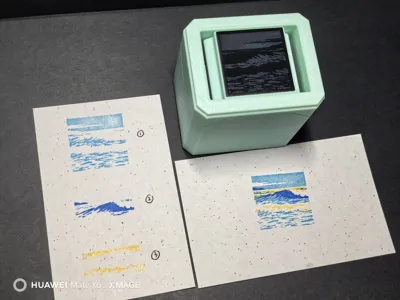
As an example, the color-separated images from the video are provided below. You can save these images for stamp testing.


Thanks for the reminder. After importing color images into Mint software, you need to adjust the threshold; otherwise, the pattern may be incomplete or not display at all. It is recommended to set the color to black before importing.
The black versions of the example images are available for download below.


Multi-color Stamp Tips:
1. Apply appropriate grease to the Motion Limiter and Shaft Limiter areas to make the movement smoother.
2. After multiple optimizations and tests, the stamp itself has a simple and reliable structure. However, whether the final printed effect matches the original image largely depends on the positioning of the stamp surface. Here, it is recommended to print an additional set of calibration points on the diagonal of the stamp surface when printing, such as a small triangular area. After all three stamp surfaces are fully printed, cut off the calibration points. Using one of the stamp surfaces as a reference, mark the same positions on the three faces of the Stamp Carousel using the cut calibration points. Then, paste the stamp surfaces using these calibration points as a reference. This will maximize the correspondence between the stamps on the three faces.
License
You shall not share, sub-license, sell, rent, host, transfer, or distribute in any way the digital or 3D printed versions of this object, nor any other derivative work of this object in its digital or physical format (including - but not limited to - remixes of this object, and hosting on other digital platforms). The objects may not be used without permission in any way whatsoever in which you charge money, or collect fees.
Comment & Rating (2)