Holder for Drill Bit Assortment, parametric


Print Profile(2)

Description
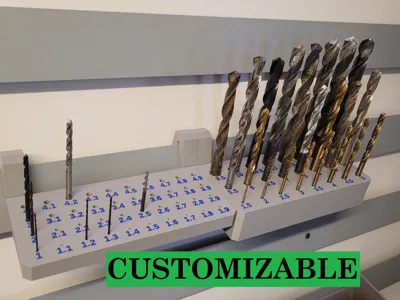
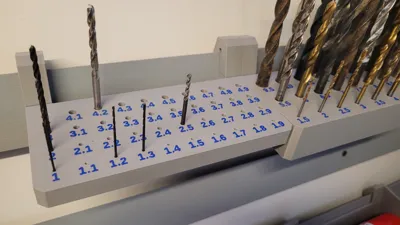
Holder for Providing Drill Bits on a French Cleat Wall
The holder is fully parametric
This means it can be customized as desired, for example, to accommodate drill bits from 1 - 10 mm with a 1mm spacing
So, a holder with holes for 1 - 2 - 3 - 4 - 5 - 6 - 7 - 8 - 9 - 10 mm. To do this, simply set the start diameter to 1 and the hole spacing to 1 in the customization dialog
The total number of holes is determined by the number of columns and rows. Here, for example, 2 rows a' 5 holes
The labeling is automatically generated to match
Similarly, holders for drill bit sets with 0.5mm spacing or 0.1mm for metalworking can now be created
If you set the spacing to 0, all holes will be the same size, e.g., for end mills. In this case, the labeling can, of course, be deactivated
Using automatically determined correction factors, hole diameter, chamfer height, and hole depth are corrected to generate optimal values. This means that both a 1mm drill bit and a 13mm drill bit fit snugly in the hole
To print the labeling in a different color, please proceed as follows:
1. Make all model adjustments
2. Disable labeling using the parameter “Text_enabled”
3. Generate the STL file of the main body without labeling, adjusting the STL file name as needed.
4. Enable labeling and disable generation of the main body using the parameter “Body_enabled”
5. Generate the STL file of the labeling without the main body, adjusting the file name again here
6. In Bambu Studio, select both STL's together when opening in the file dialog.
7. Answer yes to the query asking if the files should be merged
8. In Bambu Studio, a different filament can now be assigned to the main body and the labeling respectively
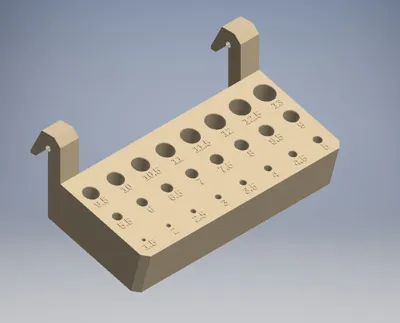
Customizable Parameters:
- Number of Columns and Rows
This controls the arrangement and total number of holes
- Distances to Edges
Edge distances are set here, for example, to also have space for labeling
- Diameter of the First Hole
This is the diameter of the first hole on the bottom left. All subsequent holes are arranged to the right up to the set number and then continued in the next row until the number of rows is reached. The diameter of each hole increases by the step size of the hole diameter
- Step Size of Hole Diameters
This sets the amount by which the hole diameter increases for each subsequent hole
- Hole Depth as a Multiple of the Diameter
A default value of 2 should fit in most cases. This means a 10mm hole will be 20mm deep. Very small holes are automatically made deeper, as, for example, a 2mm depth would be too little for a 1mm drill bit
- Degree of Countersink/Chamfer of Holes
Stronger or weaker beveling of the holes
- Labeling on/off
The generation of labeling texts can be disabled with this
- Main Body on/off
The generation of the main body can be disabled with this. This is needed for multi-color prints (see below)
- Text Height of Labeling
Can be adjusted within certain limits, 4-5mm has proven to be practical
- Height of the Main Body
Depending on the hole diameter, the depth of the holes also increases. Here, the thickness of the main body can be adjusted accordingly
- Height of Hooks
Here, in combination with the previous parameter, a specific position of the main body can be achieved, helpful for bringing several different holders to the same height on the wall. (As seen in one of the pictures)
- Angle of Main Body
It can be set how obliquely the holder is arranged so that, for example, the labeling can still be seen at an elevated position on the French Cleat wall
Comment & Rating (2)