Sliding door P1S right side - a remix of marcopolo


Print Profile(2)


Description
🔧 Remix of the Sliding door with rollerbearings / 135° door designed by marcopolo.
I made a remix of the brilliant project Sliding door with rollerbearings / 135° door, which I had been looking for for quite a while. The original design was created by marcopolo.
The publication of this remix is done with the marcopolo permission, for which I sincerely thank him.
The project is very well designed, but it only supports left-side installation. Unfortunately, adapting it to the right side is not straightforward, so I decided to create a remix that enables mounting the door on the right side of the printer. I also made some improvements to strengthen a few elements and prints easily.
Additionally, I included a magnetic strip so the door can still be securely closed using magnets like original one.
Unfortunately I cannot say if these modifications will work with the X1C as I do not have an X1C and have no way to check :(
🔁 Redesigned parts:
Wheels – optimized for easier printing
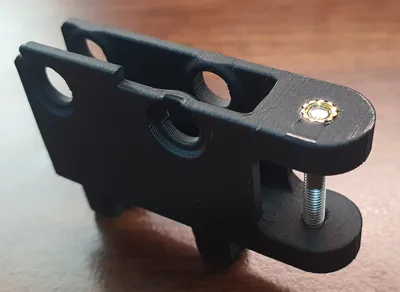
Carriages – added reinforcements to prevent breakage, improved fit, and ease of printing
Wheel pins – simplified for easier printing
Front guide rails – adapted for mounting on the right side
Rear upper guide rail mount – redesigned to support right-side installation
Hinges – adjustable in length for precise door alignment (if needed)
📦 Included in my profile:
Carriages with holes for M3 4.2×3 mm heat inserts
(you can use taller inserts up to 4 mm, though it’s not required)alternative Carriages with holes for M3x20 screws (no heat inserts)
Adjustable-length hinges
Magnetic door strip for 10×3 mm round magnets
Magnetic strip with customizable magnet size for round magnets
Magnetic strip with customizable magnet size for square magnets
Generally, I used PLA Matte filament, with only the door-closing strip printed from PETG HF, as it might get too warm for PLA inside the chamber.
🛠️ Assembly
The installation process is very similar to the original and I recommend familiarizing yourself with it. However, because there's no way to mechanically attach the upper and lower front guide rails, they need to be secured with double-sided tape (I recommend using 1 mm thick tape). The use of double-sided tape requires the use of different hinge lengths, depending on the thickness of the tape used. But more about that later.
Rear guide rails are attached using screws, but I recommend applying the same tape thickness (without removing the protective backing) to ensure the spacing matches that of the front guide rails.
💡 This method allows you to disassemble the system without removing any tape from the printer.
🔩 Assembly order
💡 For easier and more precise installation, I recommend placing the printer on its left side. Secure the printhead and heatbed first.

Remove the door and unscrew the original hinges – Bambu Lab P1P Enclose Kit Installation is really helpful in that matter
📌 Rear guide rails:
Apply double-sided tape (optional), but don’t remove the backing on the printer side!

Screw the guide rails into the printer using M3x10 screws.


📌 Carriages and wheels:
Mount the wheels into the carriages.
If you're using heat inserts – it is time to melt them into the holes too.
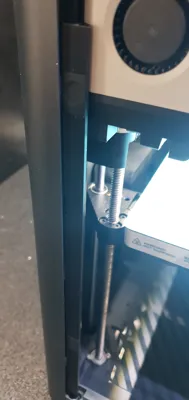
Slide the carriages (with the connector strip) into the rear guide rails.
📌 Front guide rails:
Apply double-sided tape, but do not peel the backing yet.
Slide them into the rear guide rails – ensure connections is aligned.

Move the carriages to the front of the printer.
📌 Doors:
Attach the hinges to the door – the fit is tight, so no need to screw them in yet. Ensure they're inserted securely.
Place the door into the printer opening as if you're closing it.
While secureing the door, attach the hinges to the carriages and secure it with M3x20 screws.
If you're using carriages with inserts, you can screw it slightly. If not, just inserting the screws in is suffice for now. You will need to remove the door few times, so it's we don't want to wear out the threads in the plastic to fast.
📐 Aligning the guide rails:
While pressing the guide rails against the carriages and aligning the gaps between the door and the printer frame You'll achieve proper alignment.
Lightly mark their final position with a pencil on the printer’s side for reference.

🧷 Attaching the front guide rails
If your tape’s protective layer peels off easily – try doing it without disassembling.
If not –
Remove the door (unscrew the M3x20 screws).
Slide the hinges out of the carriages (keep them attached to the door).
Slide the carriages back and remove both front guide rails.
Peel the tape backing, attach the guide rails, and insert a spacer to avoid premature adhesion.
Reinstall the door and secure with screws (again, no need to tighten fully yet).
🔄 The trickiest part:
Press the guide rails gently against the carriages, align the door gaps, then lightly lay the guide rails onto the printer body.
Do not press hard yet – this gives you a chance to reposition if needed.
✅ Once you're happy with the alignment:
Press the guide rails along their full length to stick them firmly.
Let them sit for 1–2 hours so the adhesive bonds properly.
🧵 Cord installation:
Unscrew the rear guide rails and remove the carriage.
Feed the cord through the bottom of the front lower rail and tie a knot to prevent slipping.
Route the corde along the groove → through the carriage connector (between the wheels)
Slide the carriage back in and reattach the rear guide rails to the printer.
Align the carriage perpendicularly to the rails, gently tension the string, and secure with an M3x5 screw.
If movement is uneven – adjust the tension accordingly.
🔩 Final hinge installation:
If no adjustments are needed – screw the hinges to the door with the original screws.
To protect the glass:
Apply a layer of electrical tape before screwing in.
Do not overtighten, to avoid damaging the plastic threads.

🧲 Installing the magnetic strip
💡 Print this element with PETG filament.
Slide or glue in the magnets (e.g., 7×3 mm round magnets).
The default fit is snug – glue is optional, unless the magnets fall out.Use 3 strips of double-sided tape in the marked locations (0.5–1 mm thick).
If using thinner tape, you can apply it elsewhere as needed.


Glue the strip to the printer frame, pressing it first to the back and then to the left to stick it to the printer frame.


You can add some electrical tape over the magnets to protect glass from hitting against the magnets. This will also muffle the sound of the closing door.

🛠️ Customization options in .3mf profile:
🔧 Adjust hinge length:
In Bambu Studio, move edge1 or edge2 to the desired offset.

🧲 Modify magnet hole sizes (round or square):
Select the _magnet1 object (square_ or round_)
Choose the Scale tool and uncheck Uniform scale
Adjust X and Y dimensions for width/height

To change the depth:
Use the Lay on Face tool and select opposite face from magnet

then rotate obcject by 45

Using Move tool adapt the deapth of the magnet hole ((e.g., move by 1 mm to reduce from 3 mm to 2 mm)).
Ensure you're useing World Coordinates

Next using the same method You need to revert rotation and lay the obcject on this face

If You have any doubts or problems don't hesitate to ask me via comment or chat.
License
You shall not share, sub-license, sell, rent, host, transfer, or distribute in any way the digital or 3D printed versions of this object, nor any other derivative work of this object in its digital or physical format (including - but not limited to - remixes of this object, and hosting on other digital platforms). The objects may not be used without permission in any way whatsoever in which you charge money, or collect fees.
Comment & Rating (53)