Customizable Wera Tool-Check Modules


Print Profile(2)


Bill of Materials

- Knipex Cobra Mini (125 mm) x 1: One of the available pliers options for the pliers module.
- Knipex Pliers Wrench (125 mm) x 1: One of the available pliers options for the pliers module.
- Wera Rapidaptor x 1: One of the available bit holder options for the pliers module.
- DeWalt Extreme DT7524 x 1: One of the available bit holder options for the pliers module.
- kwb One-Touch x 1: One of the available bit holder options for the pliers module.
- Olfa SVR-2 Slimline x 1: Small utility knife for the knife module, with 9 mm snap-off blades.
- Olfa ABB-50 x 1: Replacement blades for the Olfa SVR-2 Slimline.
- Fisher Space Pen (Bullet, Chrome) x 1: Versatile ballpoint pen for the screwdriver module, specially designed to write in any condition, even underwater.
- Wera 838 RA-S x 1: Ratcheting screwdriver for the screwdriver module, replacing the original smaller and non-ratcheting one.
- Olight Oclip x 1: Mini LED Light with a clip and magnets for the screwdriver module.
Description
Boost Me (for free)
Thank you so much for considering to support my efforts. Designing in OpenSCAD, maximizing customizability, validating everything extensively, printing loads of test prints, etc., is both very time- and cost-intensive. Therefore, if you can spare a Boost, I'm more than grateful for that! But every View, Download, Print, Comment and Rating helps immensely in terms of motivation and development costs in the form of MakerWorld points I gain.
Summary
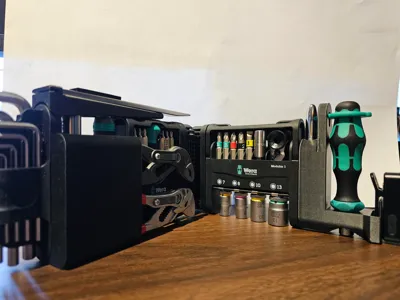
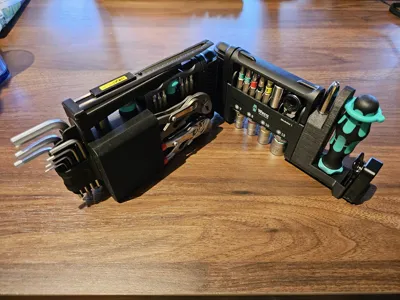
These are my custom-designed modules for various tools, made to fit onto the excellent Wera Tool-Check Modular.
I have previously filmed a video showcasing the functionality and assembly of these modules for your convenience. Note that these are the deprecated OnShape models! The assembly is the same; there simply might be some minor differences regarding geometric details, which, however, don't impact the functionality. I tried to stay as true to the original design as possible with the port.
Why though?
As I got the new Tool-Check modular, I ran into the issue of how to carry my Knipex 125 mm Cobra & Pliers Wrench. There are a couple of models out there already, supporting the XS variant of both tools or only a single 125 mm tool, but I wanted both. So I designed myself. Subsequently, more and more tools were added, supercharging the Tool-Check by a considerable margin.
Why the remodel?
There were two main reasons for the remodel:
- The OnShape model kept breaking when I needed to adjust some parameters.
This for sure had to do something with my design, but with many sub-models, it meant slow iteration of new features and a bad customization experience for you guys.
With OpenSCAD, I find it much harder to create designs that aren't suitable for customization. The process is simply well suited for that. - Customization of the model requires people to have an OnShape account with a valid license.
There is a free plan (for now?), but still it irked me the wrong way, as I want my designs to be accessible to everyone.
Though the Customize feature requires an account on MakerWorld, I figured since we're already on MakerWorld to begin with and an account is completely free, it would be the lesser evil in that case.
It's also the reason I decided against using the Fusion360 integration of the Customize feature:
> “Each generation uses a third-party service. Currently free, but may require MakerLab Credits in the future to cover costs.” (direct quote)
I wanted everyone to have equal access to this feature, though!
In any case, the customization experience using the Customizer is worlds apart from tinkering in some CAD model.
Customizer
For a general tutorial, scroll all the way down. Specifically for this model collection, though:
- Select the Module you want to generate at the top.
You shouldn't need to customize anything within the “General” section yet if you haven't made a print and didn't encounter any fitment issues yet. - Go through the relevant categories and settings to customize the module(s) to your liking.
The settings regarding each module are explained in the respective module's section below. - After generating your module(s) and downloading their respective STLs from the Customizer, make sure to use the “Replace with STL” feature within Bambu Studio.
This ensures that print settings of individual modules are preserved. Still double-check the correct orientation of the modules after replacing them! Printing orientations are also stated in the module descriptions below.
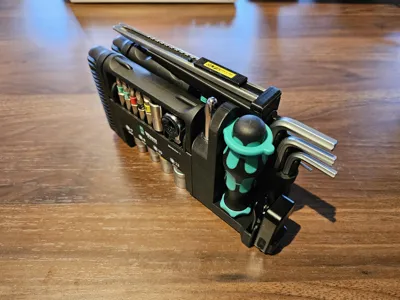
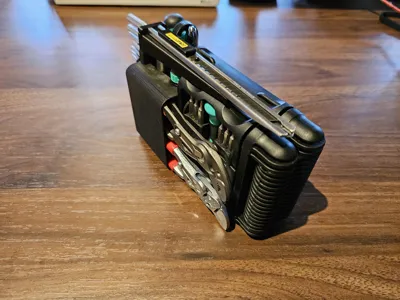
Modules
There are various modules available in this project.
Many are made to fit a specific tool, so I will exactly specify what it was made for and tested to fit.
If you wish to modify these modules for your personal use and specific tools, refer to the top of the page for instructions on how to access the Customizer and use the resulting models.
Additionally, every model has a dedicated section explaining the different parameters you can tweak in the Customizer.
Please do keep in mind, though, that the modules were designed with the showcased arrangement in mind, so you might need to mirror some modules or modify the model itself if you prefer a different placement.
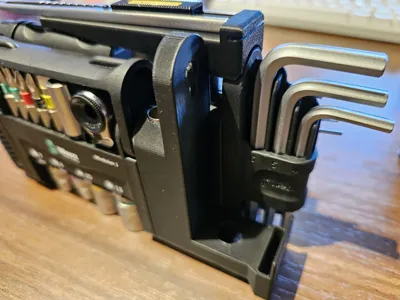
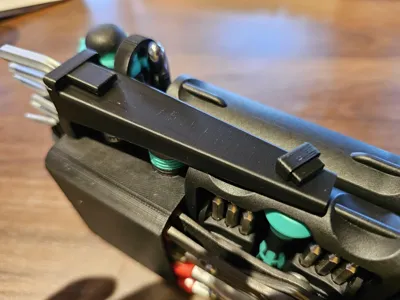
Pliers Module

This module is made to fit 2 pliers and 2 bit holders. Available tool options are
- Knipex Cobra 125 mm
- Knipex Pliers Wrench 125 mm
- Wera Rapidaptor
- DeWalt Extreme DT7524 Magnetic Locking Slim Bit Holder
- kwb One-Touch Magnetic Bit Holder
Customizer
You can select which pliers you want to have on top and on the bottom.
You can even carry two of the same kind around, if you so desire.
The same goes for the bit holders.
Even though you can even choose the kwb One-Touch bit holder separately, it does fit in the slot dedicated for the DeWalt.
Just keep in mind that it will sink deeper, making it harder to retrieve.
The slots feature magnets at the bottom of the hex shafts.
You can change the magnets' diameter, their thickness, and the amount you need.
You can also disable this feature.
Note that at the normal thickness, only a maximum of 4 magnets fit, due to space constraints. If you go way overboard, you'll have a hole at the bottom of the holder.
Furthermore, the maximum diameter you can install, due to physical limitation, is 6.2 mm. This might be changed at a later date but will require a stop mid-print.
If you notice that the holders are too tight for your liking (required for them to not fall out), you have an option to enable “loose” mode..
This makes them easily retrievable. Keep in mind that secure retention is only possible with the magnets then.
The holder for the pliers has multiple variants, too.
The default one, “Slim,” varies from the previous (OnShape) design in that it is closed at the front.
I found this to greatly improve keeping the dirt out and also improve long-term tightness while preventing printing issues with the thin overhang.
If you want a design similar to the old OnShape version, choose the “Super Slim” variant.
Keep in mind that it will have some sharper edges, though (it's not as easy to bang a fillet on absolutely everything in OpenSCAD).
If you care about every module being the same thickness (maybe you've made some modifications of your own), you can pick the “Normal” option, extending the thickness beyond the thickness of the pliers to match the dimensions of the main body.
Lastly, I found the bottom-left corner (viewed from the pliers' side), extending over the original Allen key module (when assembled in the standard arrangement), to be very sharp and uncomfortable to touch.
That's why I introduced an option to fit this corner to said Allen key module.
This only works with modules next to it, which slide on it from the top, as the rounded corner blocks access to the modular interface from the bottom.
If you aren't concerned about the sharp corner or want to attach a different module or something similar, you can disable this round-over.
Printing
- This module is designed to be printed upright.
- Avoid crossing walls.
- Use 15% cubic infill.
- Use tree supports of the hybrid variant. This ensures, especially with the open/Super Slim variant, the massive overhangs don't fall apart.
- Remove small overhangs.
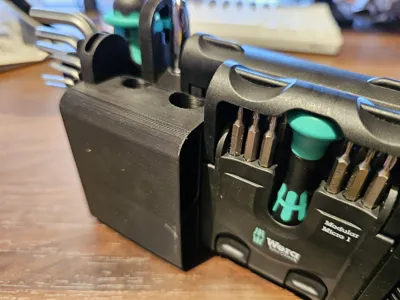
Knife Module

This module sports support for a utility knife with 9 mm (break-off) blades, as well as some spare blades.
- Olfa SVR-2 Slimline
- Olfa ABB-50 Replacement Blades
The blades should be interchangeable, with any 9 mm replacement blades fitting in the Slimline.
As it is required to remove the clip for attaching the knife, the holder also includes a slit for breaking off the blade sections securely.
It is intended to be inserted into the two openings on top of the official Wera Allen key module.
Customizer
By default the “butt” of the holder (the side with the breaker slit/snapper) is rounded over.
As the module sits on top of the Tool-Check, it makes for a nice feel.
If you prefer a harsher look, you can disable the round-over.
You can also specify the thickness of a single replacement blade.
The thickness may vary between brands, materials used for the blade, etc.
If you don't need space for as many refill blades or want to carry even more, you can do so.
Keep in mind that increasing/decreasing the blade count changes the overall height of the module!
Finally, by default, I don't want the cap of the refill department to come loose or get pushed out when the spare blades knock around the inside. That's precisely why I designed it to be an extra tight fit.
This means that you will have to break it in a little. Carefully insert the cap, slowly wiggling it around, until it slides in completely.
To open, use a flat-head screwdriver on the small included ridge and rotate from side to side to get the cap out.
Successive openings should get progressively easier while still securing the cap sufficiently.
If you don't want all that, you can disable the extra-tight property using the toggle.
Printing
- This module is printed butt-down (the side with the snapper, therefore orienting the opening of the spare blades compartment upwards).
- The cap is printed with the back side down (the side without the nub).
- Avoid crossing walls.
- Use the Arachne wall generator!
- Use 15% cubic infill.
- Use tree supports of the hybrid variant. This ensures, especially with the open/Super Slim variant, the massive overhangs don't fall apart.
- Remove small overhangs.
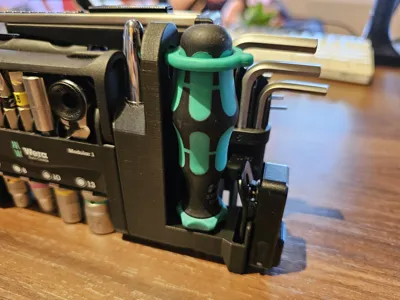
Screwdriver Module
This module adds support for a screwdriver, bullet pen, and LED light clip.
- Fisher Space Pen, Bullet Variant (best in chrome with no other coating, so that it doesn't sit too tightly in the holder, therefore still allowing for removal with a pair of pliers)
- Wera 838 RA-S Ratcheting Screwdriver
- Olight Oclip Mini LED Clip with Magnet

This module replaces the original holder for the included Wera 815/1 screwdriver. It extends higher than the rest of the modules but is the same height as the top of the knife holder (when you use the default settings), so it still makes an elegant silhouette.
The screwdriver holder reuses the green rubber of the original holder, which can simply be twisted in the right direction to remove. It sports the same mechanism for insertion as the original.
The Olight Oclip holder sports a groove, making sure the light is securely held in place.
The Space Pen holder is supposed to be pretty tight so that the cap of the bullet-style pen remains in the holder for easy insertion of the pen itself. This, of course, makes it so you can't post the cap on the back of the pen. I, however, found it to be way more convenient to be able to immediately write with the pen after pulling it out of the Tool-Check, instead of needing to still remove the cap.
Customize
You can now individually disable the pen and/or LED component.
Very practical if you just have/want the ratcheting screwdriver, for example.
If you're trying to align the end of the module with a specific part, or if you have problems grabbing the pen, you can extend the width of the pen holder.
I designed the hole for the Space Pen to be very tight, preventing accidental dislodges of the cap.
The cap is still retrievable using a pair of needle-nose pliers or even the Knipex Cobra, as a tiny part of the cap still pokes out the sides of the curved surface.
If you aren't concerned about the reliable retention of the cap inside the holder, there's an option to make it sit only loosely in the holder.
It might get too loose over time, though, at least with PLA.
Printing
- This module is designed to be printed upright.
- Avoid crossing walls.
- Use 15% cubic infill.
- Use tree supports of the hybrid variant. This ensures, especially with the open/Super Slim variant, the massive overhangs don't fall apart.
- Remove small overhangs.
Outlook
I still have some ideas for additional modules and variations, so stay tuned for any updates. I have included a changelog section below so you can see what changed. Occasionally I will also supply a small written roadmap on what's to come in future updates.
The old OnShape model's version (even if historic) is given in parentheses alongside it, wherever appropriate.
Changelog
- 04.08.2025 - Initial upload (V29)
- 14.08.2025 - Beta of Customizer screwdriver module released (edit: no source file upload due to license restrictions, only customizer)
- 17.08.2025 - Beta of Customizer pliers module released.
- 19.08.2025 - Customizer Knife module finished. All current modules were successfully ported and remodeled. Deprecation of the previous OnShape version. Upload of new print profile for official filament and print settings with the OpenSCAD modules as the default.
Update (14.08.2025)
I have already printed the new OpenSCAD screwdriver module and confirmed good fitment for all parts with official BambuLab PLA Black filament with the default filament print profile.
All the default parameter settings (when you initially click on “Customize”) were used for that test print.
To test this version, simply download the .3mf Bambu Studio project file of the ELEGOO print profile, disable every module except the screwdriver holder, and replace the STL file with the one from the Parametric Model Maker (Customize).
I will upload an updated print profile, as well as update all model images, as soon as I have ported all modules over to OpenSCAD, so I can create one feature-complete project file.
Update (17.08.2025)
Similarly to the last update, the same has been done for the pliers module. Follow the instructions above to print this module, too.
Update (19.08.2025)
Hooray! All modules are now available in Customizer!
I will therefore deprecate the OnShape version, augment the descriptions, and update the print profile accordingly.
All images have been updated too, to avoid confusion.
The next plan is to add some more modules, but most importantly, add several small testing models that you can print out to dial in your settings.
This should at least include the hex shaft of the bit holders, the opening for the pliers, as well as a circle for the pen.
As the print time for all the modules is (already) at around 3.5 to 4 hours, it makes sense to be able to dial everything in with smaller prints, instead of reprinting the bulk over and over.
Customizer Tutorial
I try to design every possible model in OpenSCAD.
This enables me to offer you extensive, fine-grained, and in-depth customizability.
You can effortlessly adapt the model(s) to your needs, without any knowledge or proficiency in CAD.
If the model is compatible, you can access the Customizer by pressing the Customize button.
You need to be on a Desktop-PC and logged into MakerWorld.
Then
- Customize the model(s) to your heart's content
- Export your custom STL
- Open the print profile in Bambu Studio
- Right click on the default model/STL
- “Replace with STL” selecting your exported STL, to preserve fine-tuned print settings
This is made possible due to MakerWorld's excellent OpenSCAD integration, called Parametric Model Maker (which I refer to as Customizer).
They also offer a Fusion360 integration, but it is mentioned that this might become a restricted/non-free option in the future.
However, I want my designs to be accessible for anyone, so I chose to use OpenSCAD exclusively.
License
You shall not share, sub-license, sell, rent, host, transfer, or distribute in any way the digital or 3D printed versions of this object, nor any other derivative work of this object in its digital or physical format (including - but not limited to - remixes of this object, and hosting on other digital platforms). The objects may not be used without permission in any way whatsoever in which you charge money, or collect fees.
Comment & Rating (26)