Melitta AromaFresh Pro – Fine Grind Upgrade

Print Profile(1)

Description
Step 1: Disengagement of the Grinding Mechanism
Remove the upper component of the grinding mechanism, in a manner consistent with routine machine maintenance.
Step 2: Separation of the Grinding Mechanism from the Adjustment Dial
Rotate the grinding mechanism robustly in a clockwise direction until it becomes detached from the adjustment dial.
Step 3: Removal of the Silicone Gasket
A silicone gasket is situated on the underside of the grinding mechanism.
Apply gentle tension until it disengages.
Step 4: Exposing the Retention Clips of the Grinding Mechanism
Beneath the silicone gasket, three diminutive retention clips (pins) are positioned, which secure the grinding mechanism within its housing.
Utilize a flat-head screwdriver or a comparable slender implement.
Delicately dislodge the initial clip by carefully prying between the grinding mechanism and the plastic casing.
Proceed cautiously around the perimeter until the remaining clips are likewise released.
The grinding mechanism may now be entirely extracted.
⚠️ Exercise diligence to prevent the misplacement of the six springs.
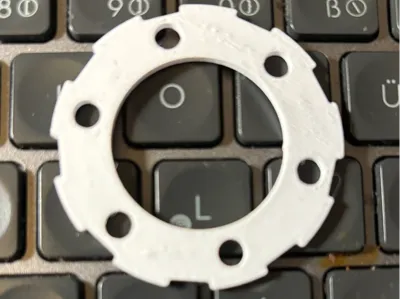
Step 5: Insertion of the Fabricated Spacer
Position the fabricated spacer beneath the six springs.
Step 6: Reinstallation of the Grinding Mechanism
Carefully return the grinding mechanism onto the (now reinforced) springs.
Ensure that the three retention clips are precisely aligned.
Subsequently, apply downward pressure to the center of the grinding mechanism to prevent any spring displacement and ensure all components securely engage.
Step 7: Reassembly Procedures
Reattach the silicone gasket.
Thread the grinding mechanism back onto the adjustment dial by rotating it counter-clockwise.
Reinsert the upper component of the grinding mechanism – the operation is now complete!
I utilize a variant of the spacer designed to elevate the springs by 4 millimeters.
Please note: With this particular iteration, the most delicate standard grind settings may no longer function with optimal dependability, as the coffee becomes excessively pulverized. This may consequently induce an error display on the machine or disrupt the brewing process.
However, employing medium to coarse grind settings with this modification yields exceptionally favorable outcomes.
Modification Instructions
⚠️ Note: Follow this guide at your own risk. This modification is not covered by the manufacturer's warranty.
Step 1: Remove the Grinder
Remove the upper part of the grinder, just like during regular cleaning of the machine.
Step 2: Detach the Grinder from the Adjustment Knob
Firmly twist the grinder clockwise to detach it from the adjustment knob.
Step 3: Remove the Silicone Ring
At the bottom of the grinder, there is a silicone ring.
Gently pull on it until it comes off.
Step 4: Expose the Grinder Mounts
Under the silicone ring, you will see three small clips that hold the grinder in place.
Use a flathead screwdriver or something similarly thin.
Gently pry between the grinder and the plastic housing to release the first clip.
Carefully continue around the grinder to release the second and third clips.
You can now remove the grinder entirely.
⚠️ Make sure to keep the 6 springs safe.
Step 5: Insert the Printed Part
Place the 3D-printed insert under the 6 springs.
Step 6: Reinsert the Grinder
Carefully place the grinder back on top of the now-reinforced springs.
Make sure the three clips are aligned correctly.
Press down evenly in the center to avoid any springs popping out.
Step 7: Reassemble
Reattach the silicone ring.
Screw the grinder back onto the adjustment knob by turning it counterclockwise.
Reinsert the upper grinder part – done!
I’m using a version of the insert that raises the springs by 4 mm.
Note: With this version, the finest standard grind settings may no longer work reliably, as the coffee becomes too fine. This can cause the machine to display an error or disrupt the brewing process.
Medium to coarse grind settings, however, work very well with this modification.
License
You shall not share, sub-license, sell, rent, host, transfer, or distribute in any way the digital or 3D printed versions of this object, nor any other derivative work of this object in its digital or physical format (including - but not limited to - remixes of this object, and hosting on other digital platforms). The objects may not be used without permission in any way whatsoever in which you charge money, or collect fees.
Comment & Rating (0)