Family Clock


Print Profile(3)


Description
Boost Me (for free)
🚀 If this model was helpful or fun for you, giving it a Boost really helps me out and motivates me to share more!
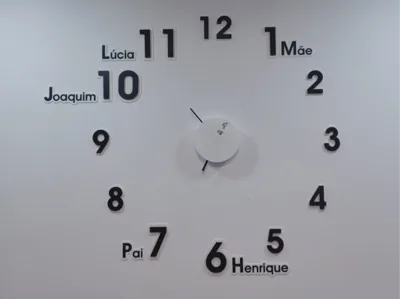
⏰ Minimalist Birthday Family Wall Clock
Create a one-of-a-kind custom clock that celebrates your family’s birthdays with a minimalist design.
- Months as Numbers- Each clock number represents a month.
- Personalized Names- Each family member’s name next to their month.
- Birthday Ring- The seconds pointer shows their birth day and year, aligned perfectly to their month.
Simply enter your family’s birthdays, and the model automatically generates a personalized, minimalist wall clock ready for 3D printing and assembly.
🛠 How to Customize Your Birthday Family Wall Clock
Follow these steps in the Customizable tab to make your own unique clock:
1️⃣ Names & Birthdays
- Enter each family member’s name and birthday.
2️⃣ Clock Mechanism
- Select your clock mechanism model based on the height of the center screw.
⚠️ Only choose one option in this section

3️⃣ Seconds Pointer
- Enter the diameter of your seconds pointer.
- This ensures the 3d printed seconds pointer will fit perfectly.

4️⃣ Clock Size
- Choose the diameter you want for your clock.
5️⃣ Optional Styling
- Adjust font style, colors, numbers, and text sizes to match your taste.
- Fonts: the fonts available are mostly Google Fonts, you can find them at Google Fonts (https://fonts.google.com).
6️⃣ Advanced Options (Optional)
- Other advanced options like thickness, spacing, and other fine adjustments are available for those who want to tweak the design further. But they are not necessary for basic customization.
7️⃣ Export & Print
- Once you’ve customized your clock, download in 3mf format.
- Next the only thing you need to do is to adjust the model of the mounting template, the other parts will be automatically arranged.
- To do so, select the model, split into objects, and arrange them on the plate.


🧩 Assembly Instructions
The model includes mounting templates to help position the clock perfectly on your wall, and parts to assemble the clock mechanism.
1️⃣ Prepare the Mounting Templates
- Gather all the template pieces and arrange them on a flat surface in order, following the sequential numbers printed on each piece.
- Use tape to join the pieces together as shown in the image.

2️⃣ Fix the Template on the Wall
- Position the assembled template on the wall using tape.
- The template includes 4 guide levels (one on each side) to help ensure it’s perfectly level.
- Adjust until the template is straight as shown in the reference image.

3️⃣ Mark the Mounting Holes
- With the template secured, use the template levels guide to mark the middle of the clock position.
- Use the mounting holes template to mark one or two mounting holes (you can choose to only use the center hole, or the side ones for better alignment).

4️⃣ Place the Numbers & Names
- Apply double-sided tape to the numbers and name plates.
- Attach the numbers to the wall using the template as a guide for perfect alignment.
- Remove the template from the wall.
- Attach the name plates, using a level for straight placement (template is mainly for numbers, not names, as names are easier to position with a level).


⚙️ Clock Mechanism Assembly
1️⃣ Install the Clock Mechanism
- Attach the clock mechanism to the center base plate.
- Screw the nut onto the clock mechanism to secure it in place.
- Install the hour and minute pointers in the positions as shown in the image.

2️⃣ Replace the Seconds Pointer
- Remove the original seconds pointer plate from the stock pointer.
- Press-fit the printed seconds pointer onto the mechanism.

3️⃣ Final Assembly and Calibration
- Place the seconds pointer onto the clock.
- Set the hour and minute pointers to align at the 12 position.
- Adjust using the clock mechanism to match the current time.
⚠️ Caution
This model has not been extensively tested, so I can't guarantee perfect results. If you encounter any issues, please reach out, and I will try to help.
If you achieve good results, I’d really appreciate your feedback! Please let me know if you used the default settings or if you had to tweak anything.
⭐ Also check out my other models:


License
You shall not share, sub-license, sell, rent, host, transfer, or distribute in any way the digital or 3D printed versions of this object, nor any other derivative work of this object in its digital or physical format (including - but not limited to - remixes of this object, and hosting on other digital platforms). The objects may not be used without permission in any way whatsoever in which you charge money, or collect fees.
Comment & Rating (1)