Search models, users, collections, and posts

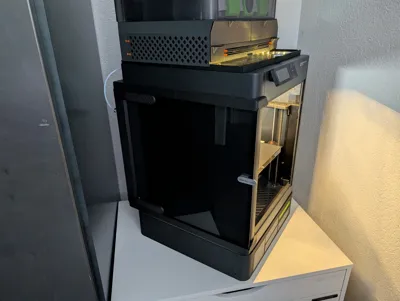
Sliding door with rollerbearings / 135° door

GIF

Print Profile(1)

All
P1S
X1 Carbon
X1
H2D Pro
H2C
P1P
A1
X1E
H2S
P2S
H2D
X2D
A2L

0.2mm layer, 2 walls, 15% infill
Designer
7.5 h
6 plates
4.9(110)

Open in Bambu Studio
Boost
1546
3997
343
270
2.2 k
811
Released 

Bill of Materials

Maker's Supply Kits and Parts
Select all
M3x5 SHCS Machine Screw (20PCS) - AA158
M3x10 SHCS Machine Screw (20PCS) - AA159
M3x20 SHCS Machine Screw (10PCS) - AA040
Bambu Filaments
Select all
Matte Charcoal (11101) / Refill / 1kg
Translucent Light Blue (32600) / Refill / 1 kg
List other parts
  • Cord (diameter approx 1mm) x 1: length ~1m, diameter ~1mm
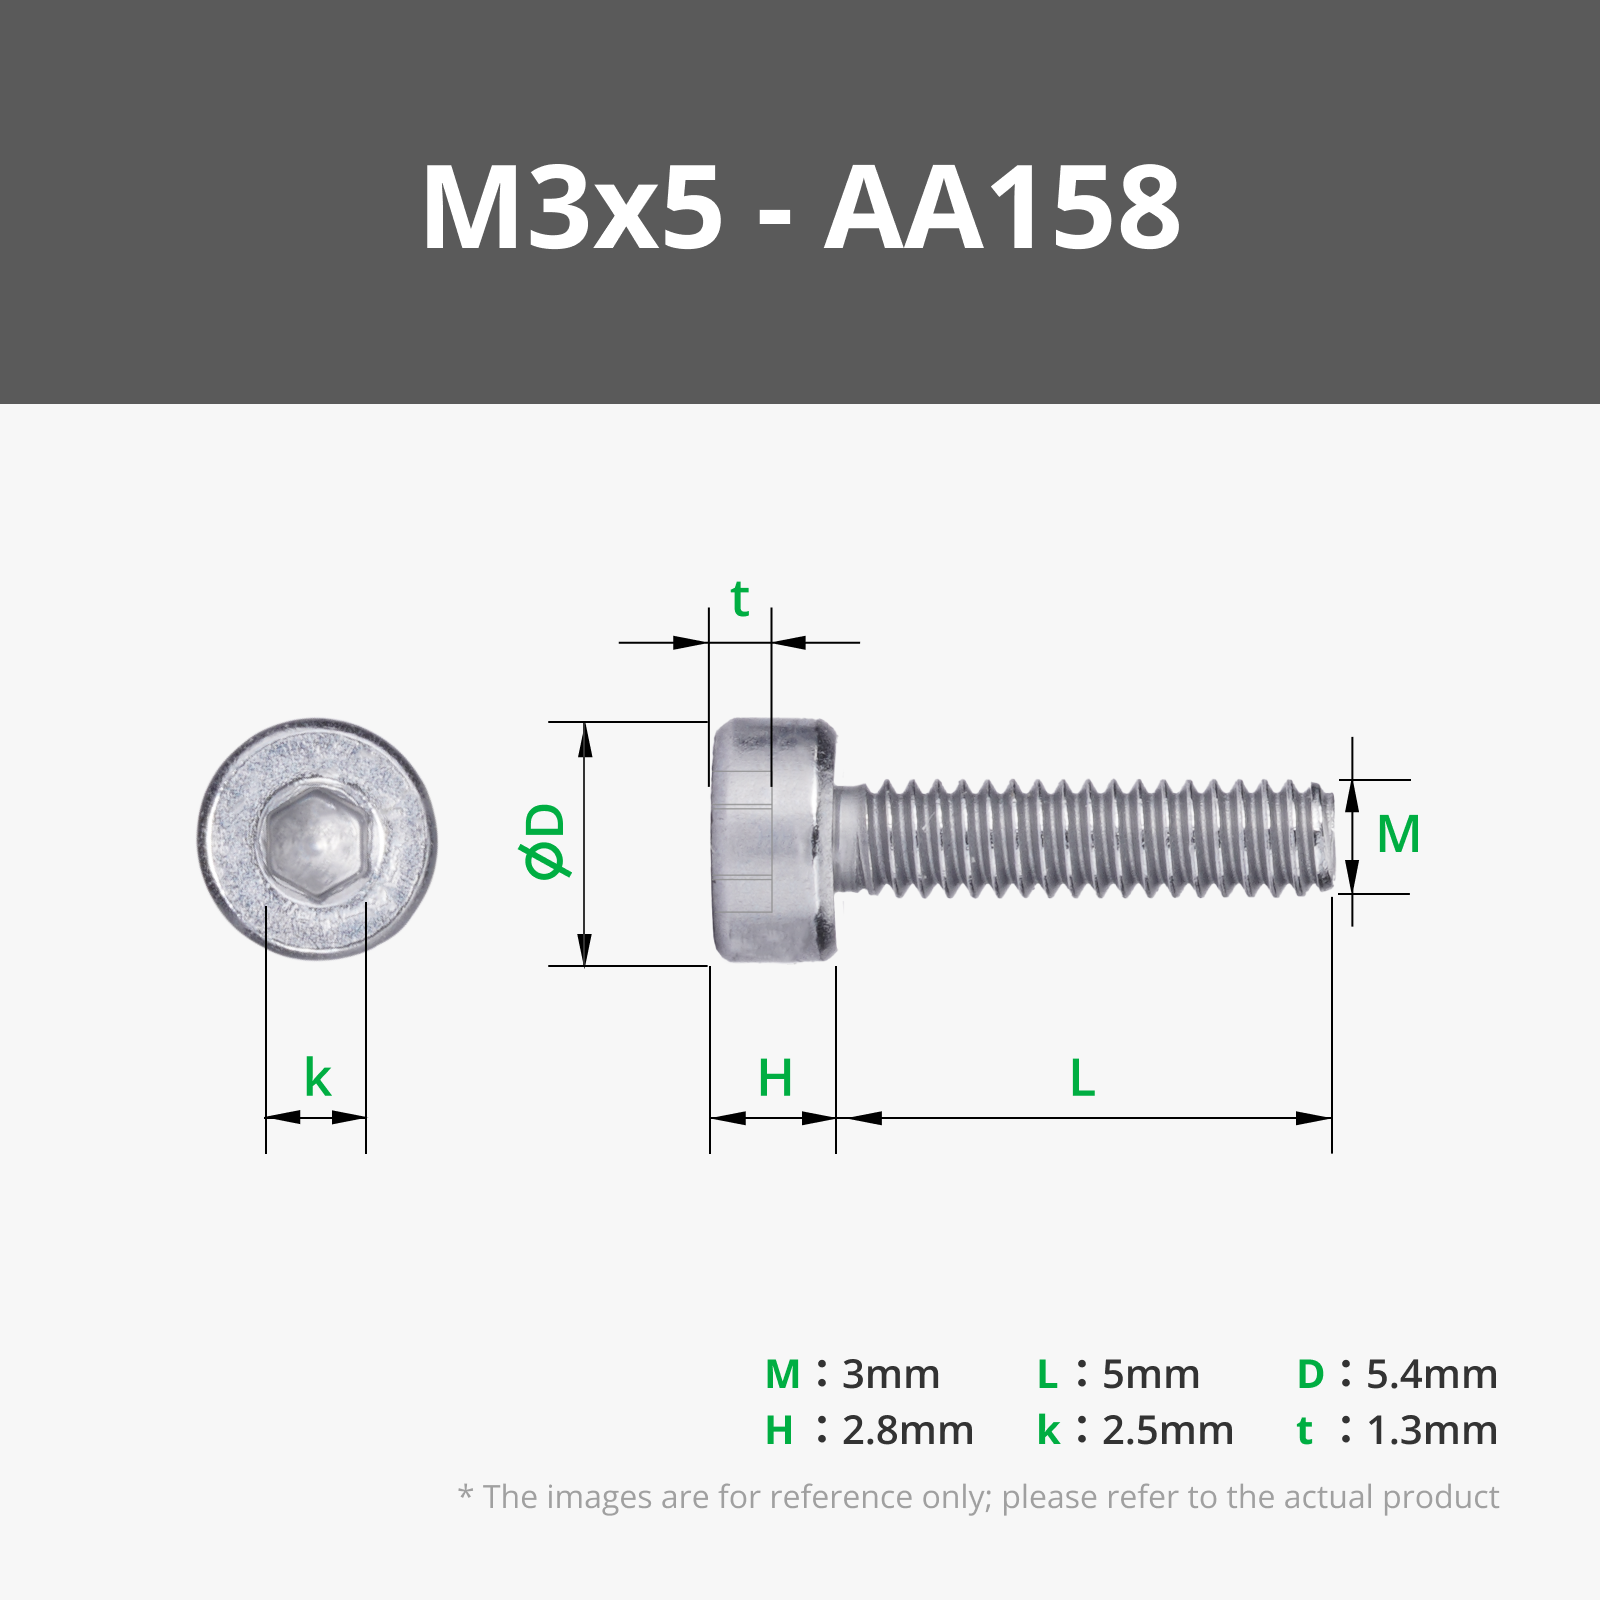
  • Thread insert x 4: M3x4x4.2

Description

Content has been automatically translated.
Show original

For everyone who's been waiting for a version for the P2S, here it is: https://makerworld.com/de/models/2801363-sliding-door-with-rollerbearings-135deg-door-p2s

Give your printer a cool upgrade with this door modification

After the modification, the door can be opened up to 135° and can be slid back on the side of the printer to save space

Many insights and improvements from the first design have been incorporated into this revised version

The door is now mounted on rollers, which leads to a much smoother movement

Furthermore, stability has been massively increased, and a cable pull prevents the door from tipping in the open/forward position

Another major improvement is that all parts can be mechanically attached to the existing interfaces of the printer No more double-sided tape is needed for mounting the guide rails

The modification can be reversed without leaving any residue in a short amount of time

Please give me feedback on what I can improve.

ENJOY!

Check also my other designs.


Boost Me (for free)

If you like my designs, please boost me for free! :) A quick click for you, a big reward for me


Documentation (1)

Assembly Guide (1)
Assembly instruction.pdf

Comment & Rating (343)

(0/1000)

Print Profile
0.2mm layer, 2 walls, 15% infill
Absolutely an incredible piece of design. I took a bearing from a bearing design and resize it, then I imported it into tinker cad resized the inner hole and add a grove to the outer ring. Also made the bearing 6 mm wide and printed 2 x 1mm shims. they work great. Hope the pictures help.
4
Reply
can you provide updated file you made?
(Edited)
1
Reply
Replying to @onebaldegg :
not sure how to do that but would be happy to share.
(Edited)
1
Reply
Replying to @user_1774424729 :
can you post a link to your file? Or can you DM me and I'll email you? This is exactly what I need.
(Edited)
1
Reply
Print Profile
0.2mm layer, 2 walls, 15% infill
Great design, prints without any problems. Everything works as it should.
profile
7
Reply
Thank you for posting your pictures! I have my external spool on the left hand side of my machine and thought I might not be able to use this mod. But your posting makes it possible! Again, thanks!!!
(Edited)
1
Reply
Replying to @user_1911478919 :
Hey, that's one of reason i chose to remix this model for right side :) Use my remix if You wish have it on right side. https://makerworld.com/pl/models/1672787-sliding-door-p1s-right-side-a-remix-of-marcopolo#profileId-1771354
0
Reply
By attaching the printed spring, the door can be prevented from vibrating. However, it is difficult to create a standard model. because, when assembling a door, the gap varies depending on the tension of the string. When making this, you need to find the size that can push the glass door without interfering with the screw. I also makes poop chutes for sliding doors. Often, the poop door interferes with the chute and does not open, so there is barely a poop. The position of the screw hole is being adjusted to find the optimal position. Also, when the sliding door is completely pushed back, chute and interference occur. There is no major problem with its use, so I am considering whether to modify it. The locking mechanism of basker is also being supplemented due to its weak strength.
designer
2
Reply
where to find your designs on the poop chute?
1
Reply
Replying to @onebaldegg :
Would also be interested in a link to the poop chute
Show original
0
Reply
Boosted
I would also like the file pls
1
Reply
Works great, no fitment issues. Only negitive I have found is the door slight rattles in the track when the printer is moving. Great Design!!
The designer has replied
designer
2
Reply
Printed springs can be attached to prevent the door from vibrating.
designer
2
Reply
Boosted
Replying to @user_3739643573 :
Hi could you share those spring stl by any chance?
0
Reply
check out my newest update:
3
Reply
Dovetail of the rail is loose. And the connection part of the carriage is broken by layering. It is necessary to make the connection part into a separate part and print it in a different direction.
The designer has replied
0
Reply
Boosted
I can't confirm any of the problems you mentioned…the dovetail joint on mine is rock-solid…I even had to use pliers to get it to lock into place
Show original
0
Reply
In my case, the dovetail was tightly fixed when expanded by 0.2 mm. For carriage connections, the pin was removed and holes were made in its place. Then, the pin printed by laying it down was connected through it. After the final assembly, when the door is slid, there is a gap between the door and the rail. I'll see if there will be noise when I print it out in this state. This model helped me to solve the situation I was in. Thank you. Now, we need to find a poop shoot that is emitted to the side that fits this model.
(Edited)
0
Reply
had a similar issue so thought I would just rotate and add a brim looks heaps better
0
Reply
Boosted
Works perfect, thank you!
The designer has replied
designer
2
Reply
is this the P2S??
0
Reply
Replying to @JustAPC :
The picture looks like P1S but wondering if it would also work on P2. My guess is that it would but wanted confirmation. Looking at this again it does look like P2S, but the main images of the creator was P1S. So it looks like this is compatible. **Update** I just tried it on my P2S and it doesn't fit for me. Like the back where the PTFE tube connects it is not the same as the P1S. Also it doesn't seem to clip into the front lower part of the P2S. It is possible the picture above was a remix. But I think we will have to wait for an official P2S version to come out.
(Edited)
0
Reply
P2S and P1S have not the same dimensions: Check out my new design for P2S: https://makerworld.com/de/models/2801363-sliding-door-with-rollerbearings-135deg-door-p2s
0
Reply
I like it so much that I want to print and install it, but I currently have an AMS Flipper installed, which prevents me from using the screw holes on the back I think it would be good if you could thin the part thickness of the screw mounts and create a hook to hold the Flipper post It's a shame I can't modify it myself, as I've only been using 3D Printers for a month The bottom is just an example, it would be great if the top could be modified in the same way
(Edited)
Show original
4
Reply
I had an ams flipper, but I replaced it with an ams riser. I do not want any glass breaking 😅. if you plan to keep it on I would recommend printing a handle.
(Edited)
0
Reply
Hi, do You think that the mirror trick will work in this version, as with previous ? so i could mount this on the right side of the printer ?
The designer has replied
2
Reply
I'd also be interested in this.
0
Reply
no, unfortunately not. the cut-outs for the hinges are missing on the right-hand side. these are needed to attach the rails. however, you can cut the model there and attach the rail with double-sided adhesive tape. It should work with the screw fastenings on the back. These are symmetrical.
(Edited)
1
Reply
Replying to @marcopolo :
thx, i'll give it a try ;)
0
Reply
Boosted
for those that need a bin for this, let me know if you are interested and I will upload magnetic to back, with bucket or chute edit - here it is https://makerworld.com/en/models/2521217-offset-purge-chute-bin-marcopolos-sliding-door#profileId-2773672
(Edited)
1
Reply
Boosted
Print Profile
0.2mm layer, 2 walls, 15% infill
this is beautifully engineered and thought out. if the designer isn't an engineer, sure should be, I have worked with many people who could not come up with something both creative and practical like this.
profile
3
Reply

License

This user content is licensed under a Standard Digital File License.

You shall not share, sub-license, sell, rent, host, transfer, or distribute in any way the digital or 3D printed versions of this object, nor any other derivative work of this object in its digital or physical format (including - but not limited to - remixes of this object, and hosting on other digital platforms). The objects may not be used without permission in any way whatsoever in which you charge money, or collect fees.